Audi Q3: Wheel Housing Liner
Overview - Front Wheel Housing Liner
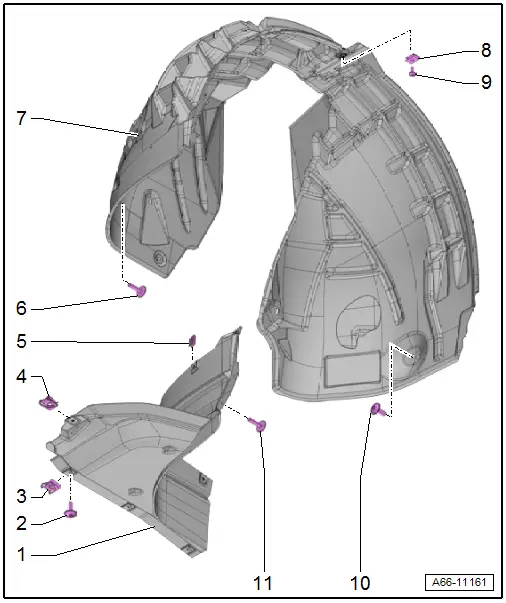
1 - Front Wheel Spoiler
- Removing and installing. Refer to → Chapter "Front Wheel Spoiler, Removing and Installing".
2 - Bolt
- 2.5 Nm
3 - Metal Nut
4 - Spring Nut
- For the quick release
- Quantity: 3
5 - Metal Nut
- Quantity: 4
6 - Bolt
- 2.5 Nm
- Quantity: 2
7 - Front Wheel Housing Liner
- Removing and installing. Refer to → Chapter "Front Wheel Housing Liner, Removing and Installing".
8 - Bracket
- For the wheel housing liner to the fender
9 - Bolt
- 2.5 Nm
10 - Bolt
- 2.5 Nm
- Quantity: 11
Overview - Rear Wheel Housing Liner
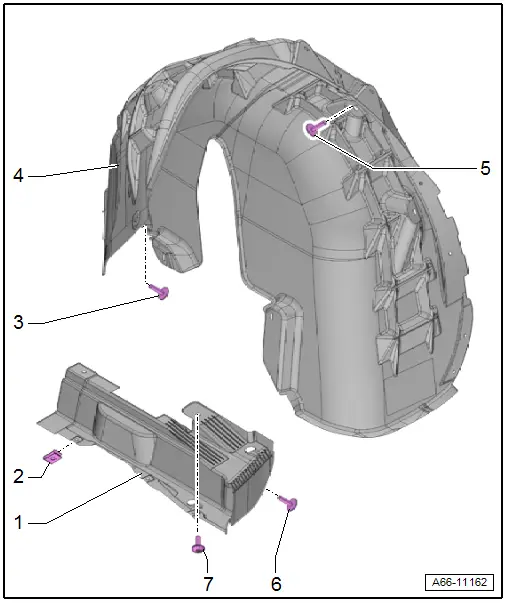
1 - Rear Wheel Spoiler
- Removing and installing. Refer to → Chapter "Rear Wheel Spoiler, Removing and Installing".
2 - Metal Nut
- Quantity: 5
3 - Bolt
- Quantity: 2
- 2.5 Nm
4 - Rear Wheel Housing Liner
- Removing and installing. Refer to → Chapter "Rear Wheel Housing Liner, Removing and Installing".
5 - Bolt
- 2.5 Nm
- Quantity: 10
6 - Bolt
- 2.5 Nm
7 - Bolt
- 2.5 Nm
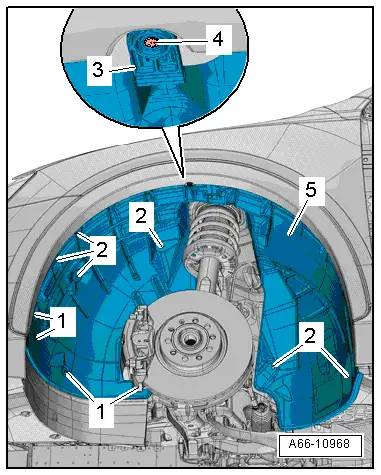
Front Wheel Housing Liner, Removing and Installing
Front Wheel Housing Liner, Removing and Installing
Removing
- Remove the bolts -1 and 2-.
- Remove the bolt -4- and then disengage the bracket -3- on the fender.
- Remove the wheel housing liner -5-.
Installing
Install in reverse order of removal.
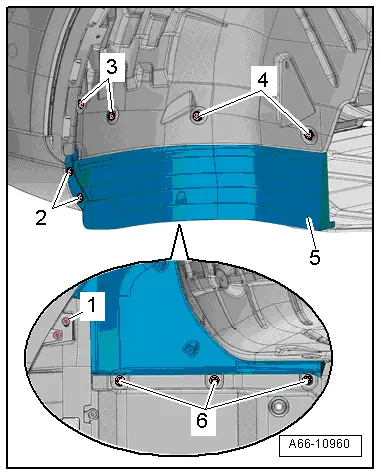
Front Wheel Spoiler, Removing and Installing
Removing
- Remove the bolts -1 to 4-.
- Loosen the quick release fastener -6- and remove the wheel spoiler -5-.
Installing
Install in reverse order of removal.
READ NEXT:
 Name Badges and Emblems
Overview - Name Badges and Emblems
Overview - Name Badges and Emblems, Vehicles through MY 2014
1 - Audi Rings
Removing and installing. Refer to
→ Chapter "Front Emblem, Rem
Trailer Hitch
Overview - Trailer Hitch
1 - Grommet
For the cable
2 - Bolt
Quantity: 4
Tightening specification. Refer to
→ Chapter "Overview - Impact Member".
3 SEE MORE:
Correct positioning for children
Always secure children in a child safety seat designed
for the body size, weight, and age of the
child.
You can secure child safety seats in your vehicle
using the lower LATCH anchors or the safety
belts. You can also secure child safety seats to
the top tether anchor. Depending on the child
safety
Battery, Removing and Installing
Battery in Engine Compartment, Removing and Installing, Version 1
Note
If the battery is to be replaced, connect the battery
charger for battery support mode. Refer to
→ Electrical Equipment General Information; Rep. Gr.27; Battery,
Charging.
Removing
- Turn 