Audi Q3: Fog Lamp
Overview - Fog Lamps
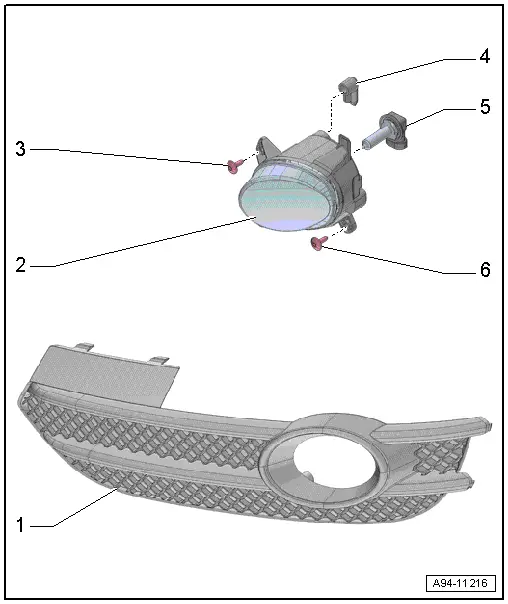
1 - Air Intake Grille
2 - Fog Lamp
- Removing and installing. Refer to → Chapter "Fog Lamp, Removing and Installing".
3 - Bolt
- 4.5 Nm
4 - Ventilation
- For fog lamp
5 - Fog Lamp Bulb
- Left Front Fog Lamp Bulb -L22-
- Right Front Fog Lamp Bulb -L23-
- 12 V, 55 W (H11)
- Removing and installing. Refer to → Chapter "Left/Right Front Fog Lamp Bulb -L22-/-L23-, Removing and Installing".
6 - Bolt
- 4.5 Nm
Fog Lamp, Removing and Installing
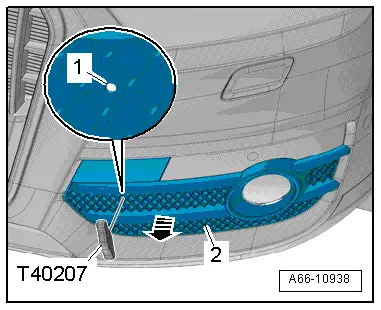
Special tools and workshop equipment required
- Hook Tool -T40207-
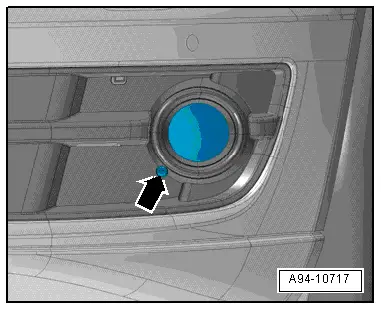
Removing
- Insert the Hook Tool -T40207- in the opening -1- and remove the lower air intake grille -2- from the bumper cover in direction of -arrow-.
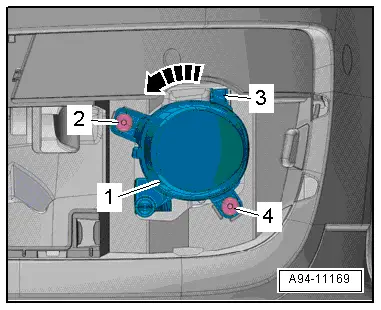
- Remove the bolts -2 and 4-.
- Remove the fog lamp -1-, to do this pivot out the mount -3- on the bumper cover: left counter-clockwise in direction of -arrow- right clockwise.
- Disconnect the connector.
Installing
Install in reverse order of removal. Note the following:
- Adjust the fog lamps. Refer to → Chapter "Fog Lamp, Adjusting".
Left/Right Front Fog Lamp Bulb -L22-/-L23-, Removing and Installing
Removing
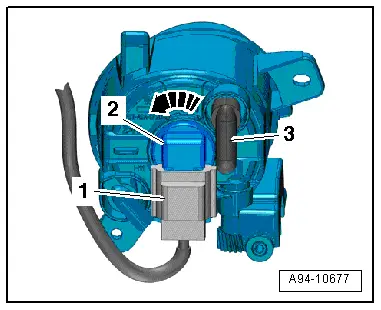
- Remove the fog lamps and disconnect the connector -1-. Refer to → Chapter "Fog Lamp, Removing and Installing".
- Remove the ventilation hose -3- on the left side of the fog lamp.
- Rotate the bulb -2- counterclockwise -arrow- and remove it from the fog lamp housing.
Installing
Install in reverse order of removal. Note the following:
- Insert the new bulb into the housing. Do not touch the glass bulbs with bare hands.
- Rotate the bulb clockwise to secure.
- Mount the ventilation hose on the left side of the fog lamp.
- Install the fog lamp. Refer to → Chapter "Fog Lamp, Removing and Installing".
Fog Lamp, Adjusting
Checking and Adjusting Conditions
- Tire pressure is OK.
- The headlamp lens must be clean and dry.
- The headlamp lens may not be damaged.
- Headlamp-reflector and lamp are OK.
- Roll the vehicle several yards or move it back and forth several times to seat the springs.
- The parking brake must not be engaged so that the vehicle is not under stress.
- The vehicle and headlamp adjusting unit must be on a level surface.
- The headlamp adjusting unit must be aligned to the vehicle. Refer to the Headlamp Adjusting Unit Instructions.
- The inclination dimension is set on the headlamp adjusting unit. Refer to the Headlamp Adjusting Unit Operating Instructions.
- Vehicle load must be created.
Vehicle load on driver's seat in otherwise unloaded vehicle (curb weight).
- One person or 75 kg.
Procedure
- The vehicle must be standing on a flat surface.
- Turn the headlamp switch to "low beam" - not "Auto".
- Pull the headlamp switch to "fog lamp".
- During the program, you will be asked to perform a headlamp adjustment.
Headlamp Adjustment
- To adjust headlamp range, turn the adjusting screw -arrow-.
- Angle dimension: 2%
 Note
Note
- The percentage indicator is based on a 10 meter (32.8 feet) projection distance. At an angle dimension of 2.0%, for example, converts to 20 cm (7.87 in).
- Side adjustment is not intended.
READ NEXT:
 Side Marker Lamp
Overview - Side Marker Lamp
1 - Front Bumper Cover
2 - Rear Side Marker Lamp Bulb
The entire body tail lamp must be replaced if an LED is faulty
Left Rear Side Marker Lam
Exterior Rearview Mirror Lamps
Overview - Exterior Rearview Mirror Lamps
1 - Mirror Glass
2 - Mirror Adjusting Unit Mount
3 - Exterior Rearview Mirror Housing
4 - Exterior Rearview Mirr
Tail Lamps
Overview - Rear Lid Tail Lamps
LED tail lamps have LED bulbs and are integrated in the tail
lamps. The LEDs cannot be replaced; the entire tail lamp must be
replaced.
1 - Tail LSEE MORE:
Checking the engine oil level
The engine oil dipstick varies depending on the
engine type.
Fig. 148 Oil dipstick (example): checking the engine oil level
Observe the safety precautions.
Park the vehicle on a level surface.
Shut the engine off when it is warm.
Wait approximately five minutes so that the engine
oil can flow
Central Locking
Component Location Overview - Central Locking
1 - Hood Contact Switch 2 -F329-
Inside the rear lid lock
Removing and installing. Refer to
→ Chapter "Engine Hood Contact Switch -F266-, Removing and Installing".
2 - Front Passenger Door Control Module -J387-
