Audi Q3: Name Badges and Emblems
Overview - Name Badges and Emblems
Overview - Name Badges and Emblems, Vehicles through MY 2014
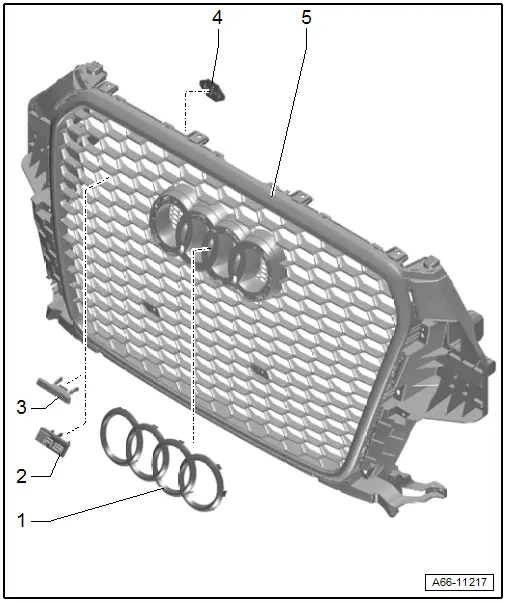
1 - Audi Rings
- Removing and installing. Refer to → Chapter "Front Emblem, Removing and Installing".
2 - RS Q3-name badge
- Equipment level
- Removing and installing. Refer to → Chapter "RS Q3 Emblem, Removing and Installing".
3 - quattro Name Badge
- Equipment level
- Removing and installing. Refer to → Chapter "Name Badges, Removing and Installing".
4 - Retaining Strip
- For RS Q3-name badge
5 - Radiator Grille
- Overview. Refer to → Chapter "Overview - Radiator Grille".
Overview - Name Badges and Emblems, Vehicles from MY 2015
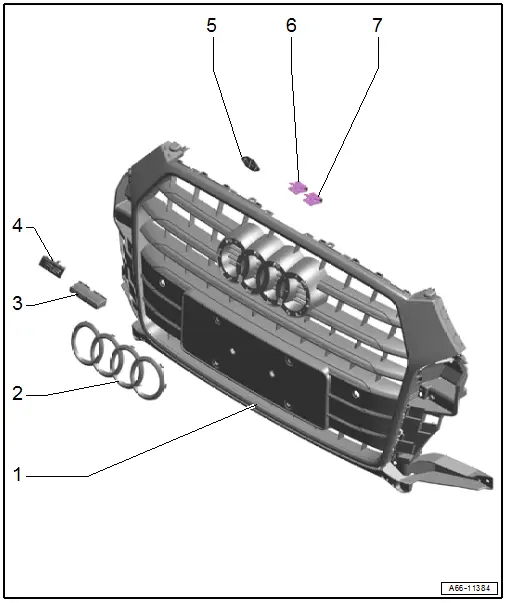
1 - Radiator Grille
- Overview. Refer to → Chapter "Overview - Radiator Grille".
2 - Audi Rings
- Removing and installing. Refer to → Chapter "Front Emblem, Removing and Installing".
3 - quattro Name Badge
- Equipment level
- Removing and installing. Refer to → Chapter "quattro Name Badge, Removing and Installing, Vehicles from MY 2015".
4 - RS Q3-Name Badge
- Equipment level
- Removing and installing. Refer to → Chapter "RS Q3 Emblem, Removing and Installing".
5 - Retaining Strip
- For RS Q3-name badge
6 - Clip
- For quattro name badge
7 - Clip
- For quattro name badge
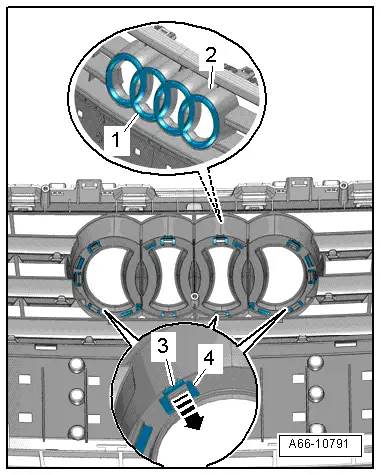
Front Emblem, Removing and Installing
Removing
- Remove the reinforcement brace. Refer to → Chapter "Reinforcement Brace, Removing and Installing, Version 1".
- Lift the tab -4- in direction of -arrow- and unlock the tabs -3-.
- Remove the Audi rings -1- from the radiator grille -2-.
Installing
Install in reverse order of removal. Note the following:
- Press on the Audi rings until you hear them click into place.
- Install the reinforcement brace. Refer to → Chapter "Reinforcement Brace, Removing and Installing, Version 1".
Name Badges, Removing and Installing
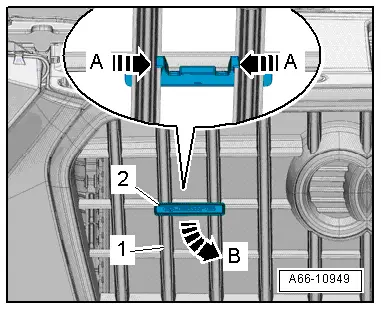
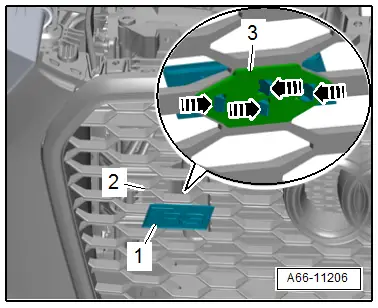
quattro Name Badge, Removing and Installing, Vehicles through MY 2014
Removing
- Remove the lock carrier cover. Refer to → Chapter "Lock Carrier Cover, Removing and Installing, Vehicles through MY 2014".
- Release the tabs -A arrows-.
- Turn the quattro name badge -2- counter-clockwise -arrow B- and remove it from the radiator grille -1-.
Installing
Install in reverse order of removal. Note the following:
- Position the quattro name badge on the radiator grille and press it on until it clicks into place.
- Install the lock carrier cover. Refer to → Chapter "Lock Carrier Cover, Removing and Installing, Vehicles through MY 2014".
quattro Name Badge, Removing and Installing, Vehicles from MY 2015
Removing
- Remove the lock carrier cover. Refer to → Chapter "Lock Carrier Cover, Removing and Installing, Vehicles through MY 2014".
- Pry out the clamps -3-.
- Remove the quattro name badge -1- from the radiator grille -2-.
Installing
Install in reverse order of removal.
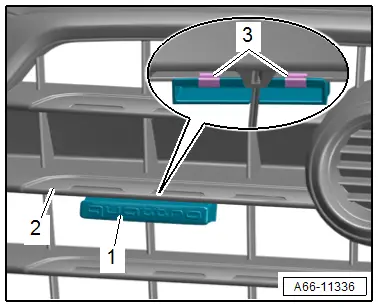
RS Q3 Emblem, Removing and Installing
Removing
- Remove the lock carrier cover. Refer to → Chapter "Lock Carrier Cover, Removing and Installing, Vehicles through MY 2014".
- Open the retainers -arrows- and remove the retaining strip -3-.
- Remove the RS Q3 name badge -1- from the radiator grille -2-.
Installing
Install in reverse order of removal. Note the following:
- Position the RS Q3 name badge on the radiator grille and press on the retaining strip until it locks into place.
- The retaining strip can only be pressed down in one position.
- Install the lock carrier cover. Refer to → Chapter "Lock Carrier Cover, Removing and Installing, Vehicles through MY 2014".
Bonded Name Badge and Emblem
 Caution
- Badges and emblems that are remove must be replaced.
- The vehicle must reach room temperature before installing the name badge and emblems.
- The adhesive surface on the body must be free of dirt and grease, as well as free of adhesive residue.
- Clean the adhesive surfaces using Cleaning Solution -D 009 401 04-.
- Warm the adhesive surfaces to approximately 40 ºC (104 ºF) using a hot air blower.
- After installing, take the roller and press the brand emblems one more time.
Special tools and workshop equipment required
- Roller -3356-
Rear Lid - Dimension

- Dimension -a- = 30 mm
- Dimension -b- = 81 mm
- Dimension -c- = 4 mm
- Dimension -d- = 564 mm
- Dimension -e- = 80 mm
- Dimension -f- = 84 mm
Market-specific
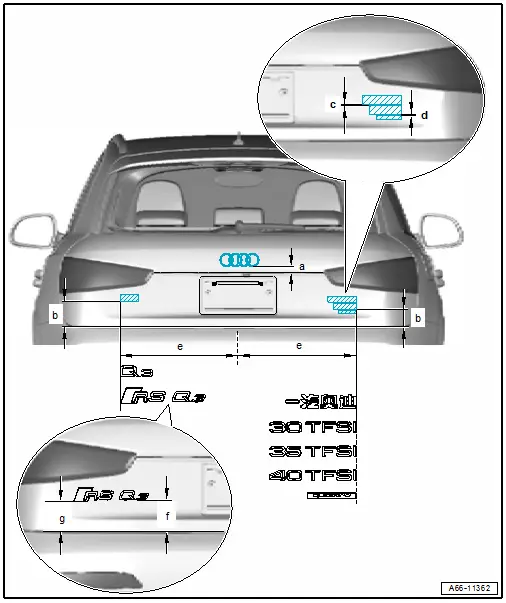
With Parking Aid
- Dimension -a- = 30 mm
- Dimension -b- = 81 mm
- Dimension -c- = 6 mm for china emblem
- Dimension -d- = 4 mm
- Dimension -e- = 564 mm
- Dimension -f- = 84 mm
- Dimension -g- = 80 mm
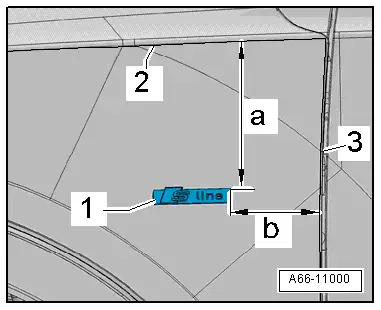
Dimension - Fender
- Dimension -a- = 66 mm
- Dimension -b- = 44 mm
-1- lettering "S Line"
-2- Cover edge in fender
-3- Fender
READ NEXT:
 Trailer Hitch
Overview - Trailer Hitch
1 - Grommet
For the cable
2 - Bolt
Quantity: 4
Tightening specification. Refer to
→ Chapter "Overview - Impact Member".
3 SEE MORE:
Driver Front Airbag Crash Sensor -G283-, Removing and Installing
Drive/Front Passenger Front Airbag Crash Sensor -G283-/-G284-, Removing
and Installing, USA and Canada Market-Specific
Removing
WARNING
Follow all safety precautions when working with
pyrotechnic components. Refer to
→ Chapter "Pyrotechnic Components Safety Precautions".
-
Component Location Overview - Luggage Compartment Trim Panels
1 - Lock Carrier Trim
Overview. Refer to
→ Chapter "Overview - Lock Carrier Trim".
2 - Luggage Compartment Floor Covering
Overview. Refer to
→ Chapter "Overview - Luggage Compartment Floor".
3 - Luggage Compartment Side Trim Panel
O