Audi Q3: Side Windows
Overview - Rear Side Window
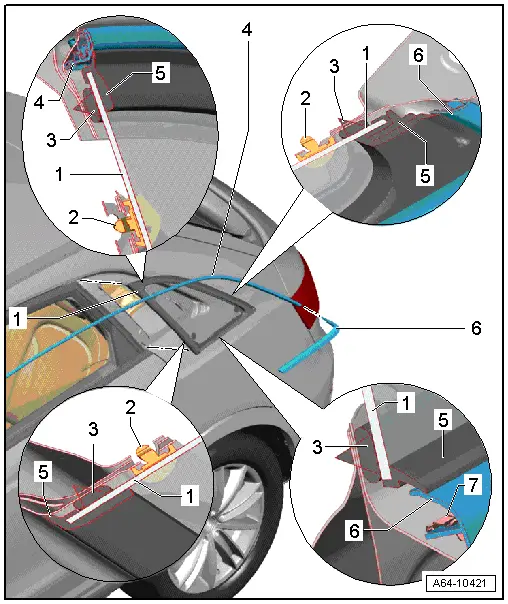
1 - Side Window
- Pull or unclip the roof trim molding in the area of the side window from the clip.
- Window glass removing and installing. Refer to → Chapter "Rear Side Window, Removing and Installing".
- When installing a new window, first press it into the "D-pillar" with the securing pin and then insert the whole thing into the window opening and let the securing pin lock into the "C-pillar".
- If a window without a securing pin was removed and is being installed again, then secure the window to the inside the window opening with tape.
2 - Locking Pin
- No replacement part
- Is cut through when removing window.
3 - Adhesive Bead
- Apply directly near the molding.
4 - Roof Trim Molding
- unclip around the side window
5 - Molding
- No replacement part
- Must not be damaged in field of vision.
6 - Side Panel Trim Molding
- Removing and installing. Refer to → Chapter "Trim Molding, Removing and Installing".
7 - Clip
Rear Side Window, Removing and Installing
Undamaged Rear Side Window, Removing
 Caution
In the window cutting area, protect the side panel and roof against paint damage with adhesive tape.
- Remove the trim strip. Refer to → Chapter "Trim Molding, Removing and Installing".
 Caution
Roof trim molding must not be bent.
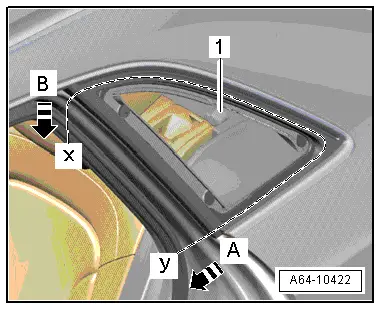
- Route the cutting wire -1- around the side window as shown in the illustration.
- Secure ends X and Y in two pull grips from Bonded Window Tool Kit -VAG 1351-.
- Pull cutting wire forward in direction of arrow -A- using light sawing motions and cut through lower adhesive sealing material at side panel and at roof frame.
- In this way, first the securing pin on the rear of the window and then the adhesive bead are cut through.
- Then pull cutting cord through in direction of arrow -B- downward through adhesive sealing material.
- Remove window from window opening.
Damaged Rear Side Window, Removing
- Protect body and interior from glass splinters.
- Bond flange all around with fabric reinforced adhesive tape.
- Remove glass pieces from adhesive material.
 WARNING
When removing a window, always wear protective eyewear and leather gloves.
- Cut through the adhesive sealing material (with glass residue) in the from window opening using Window Cutter - VAG1561A- and Cutting Blade, Bent at Right Angle - VAG1561/10-
Rear Side Window, Installing
- Installing. Refer to → Chapter "Bonded Window Glass Installation Instructions".
- Prepare the new window for installation. Refer to → Chapter "New Window Glass, Preparing for Installation".
- Prepare the undamaged window for installing. Refer to → Chapter "Undamaged Window Glass, Preparing for Installation".
- Prepare the body flange for installation. Refer to → Chapter "Body Flange, Preparing for Installation".
 Note
Note
1K Window Adhesive -DH 009 100 03- (small cartridge) is recommended when bonding a single window 2K Window Adhesive Kit -D 004 660 M2- is recommended when bonding more than one window.
- First press the new window onto the "D-pillar" with the securing pin, then insert it into the window opening and push the securing pin onto the "C-pillar".
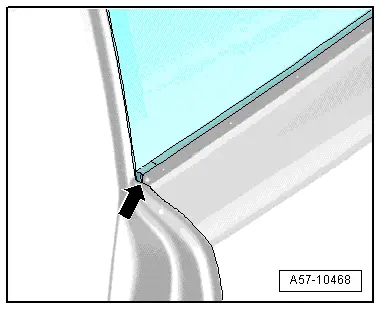
- On windows without a securing pin, align the window lengthwise to the edge on the side panel -arrow- and then insert it into the cut-out for the window.
- Secure window in window opening with adhesive tape.
- Observe the minimum curing time. Refer to → Chapter "Minimum Curing Time for Bonded Windows".
READ NEXT:
 Rear Window
Overview - Rear Window
Note
There may be connections in the rear window delivery package
that are only necessary for some optional equipment.
Remove any unnecessary cable ends direct
Door Windows
Overview - Front Door Window
1 - Door Window
Removing and installing. Refer to
→ Chapter "Front Door Window, Removing and Installing".
2 - Door
3 - DrSEE MORE:
Wheel bolts and rims
Wheel bolts
Wheel bolts must be clean and loosen/tighten
easily.
Rims
Rims with a bolted rim ring or with bolted wheel
covers consist of multiple pieces. These components
were bolted together using special bolts and a special procedure. You must not
repair or
disassemble them.
WARNING
Wheel bolts t
Driver/Front Passenger Seat Heating Element -Z6-/-Z8-, Removing and
Installing
Driver/Front Passenger Seat Heating Element -Z6-/-Z8-, Removing and
Installing, Fabric Cover Versions
Procedure
- Separate the seat cover from the seat cushion. Refer to
→ Chapter "Seat Pan Cover and Cushion, Separating".
Standard seat and folding seat:
- Disconnect the wire 