Audi Q3: Overview - Release Cable
Audi Q3 (8U) 2011-2018 Service Manual / Body / Body Exterior / Hood, Lids / Overview - Release Cable
Overview - Latch Release Cable
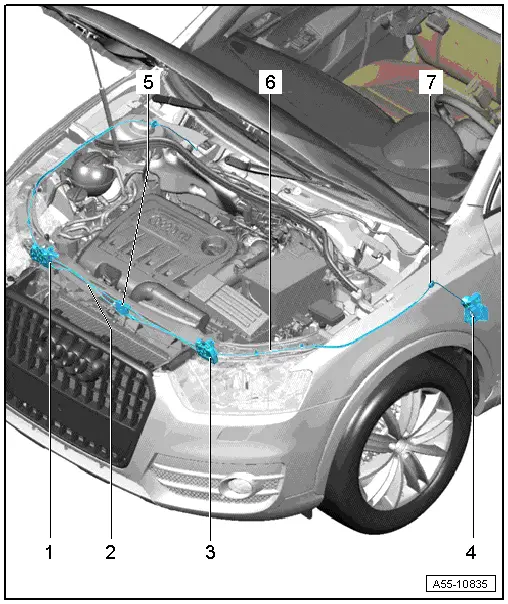
1 - Right Hood Latch
- Removing and installing. Refer to → Chapter "Hood Latch, Removing and Installing".
2 - Hood Latch Cable
- Removing and installing. Refer to → Chapter "Release Cable, Removing and Installing".
3 - Left Hood Latch
- Removing and installing. Refer to → Chapter "Hood Latch, Removing and Installing".
4 - Operating Lever
- Disengage release cable.
5 - Cable Coupling
- Disengage the release cable inside the passenger compartment before removing the lock carrier and when removing the operating lever.
6 - Hood Release Lever Cable
- Release cable to the operating lever in the vehicle interior.
7 - Grommet
- Make sure it fits correctly when installing it. The grommet must be pushed all the way into the bulkhead.
Overview - Operating Lever, Cover
Hood Release Lever Cover
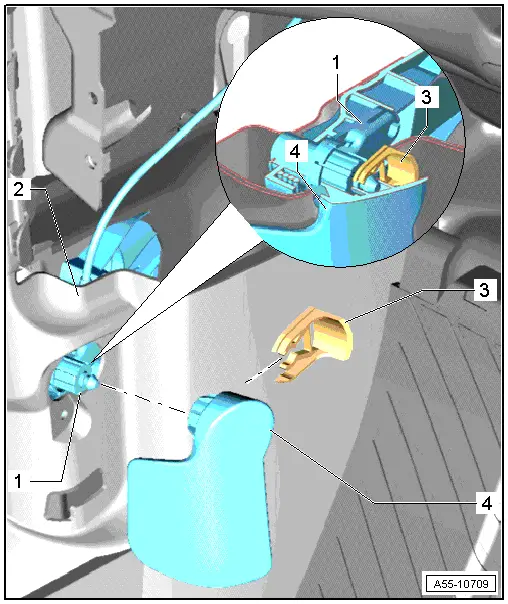
1 - Operating Lever
- For lid latch
- Removing and installing.
2 - Front Sill Panel Strip
- Removing and Installing. Refer to → Body Interior; Rep. Gr.70; Passenger Compartment Trim; Sill Panel Strip, Removing and Installing.
3 - Clip
- Press in completely, it must engage.
4 - Hood Release Lever Cover
- Removing and installing. Refer to → Chapter "Hood Release Lever, Removing and Installing".
Operating Lever
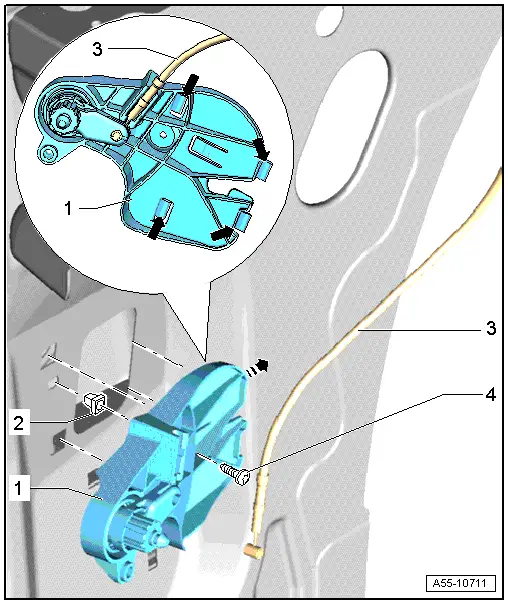
1 - Hood Release Lever Bracket
- The hood release lever cover is removed.
- The front sill panel strip is removed. Refer to → Body Interior; Rep. Gr.70; Passenger Compartment Trim; Sill Panel Strip, Removing and Installing.
- Remove the screws -3- and disengage the cable -1-.
2 - Clip
3 - Release Cable
4 - Bolts
- 2 Nm
READ NEXT:
 Hood, Adjusting
Special tools and workshop equipment
required
Gauge - Gap Adjustment -3371-
Gap Dimensions for Hood
Note
All dimensions are in mm with a +- 0.5 mm tolerance.
Dimension -A- =
Release Cable, Removing and Installing
Release Cable Coupling
- Remove clips -1- and lift the release
cables -8- and -9-
on both sides toward the hood latches.
- To remove the coupling -2-, release the
retainers -arrows
Hinges, Removing and Installing
1 - Hood Hinge
Removing
Before removing a hood hinge, support the hood or secure it against
falling.
Remove the gas-filled strut. Refer to
→ Chapter "Gas-Filled Strut,
SEE MORE:
Changing a tire
Preparation
You must complete the preparation before
changing a tire.
Read and follow the important safety precautions.
Set the parking brake.
Select the "P" position.
When towing a trailer: disconnect the trailer
from your vehicle.
Lay out the vehicle tool kit and the
spare tire.
Switch th
Special Tools
Special tools and workshop equipment required
Bearing Installer - Wheel Hub/Bearing Kit -T10205-
Torque Wrench 1332 40-200Nm -VAG1332-
Hydraulic Press -VAS6178-
Pneumatic/Hydraulic Foot Pump -VAS6179-
Hydraulic Press - Bushing Tool Kit -VAS6779-
Shock Absorber Set -T10001-
© 2019-2026 Copyright www.auq3.net
