Audi Q3: Hinges, Removing and Installing
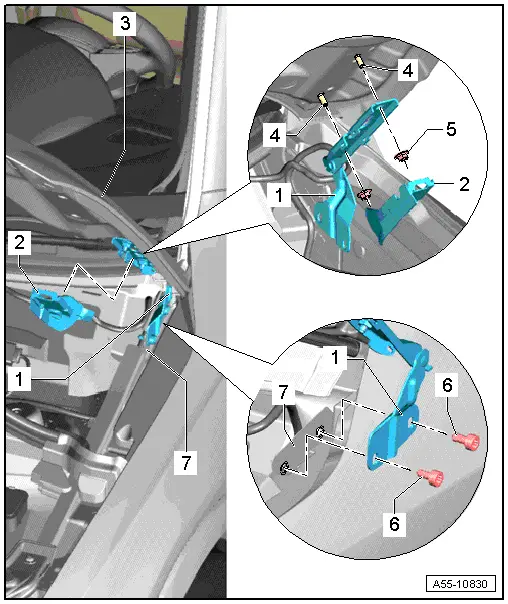
1 - Hood Hinge
- Removing
- Before removing a hood hinge, support the hood or secure it against falling.
- Remove the gas-filled strut. Refer to → Chapter "Gas-Filled Strut, Removing and Installing".
- Unclip and remove the cover from the lid hinges.
- Remove the bolts -6- and nuts -5-.
- Installing
- Align with the markings -arrows- in reverse order.
2 - Cover
3 - Hood
4 - Threaded Pins
5 - Nut
- 25 Nm
6 - Bolt
- 21 Nm
7 - Fender Flange
Insulation, Removing and Installing
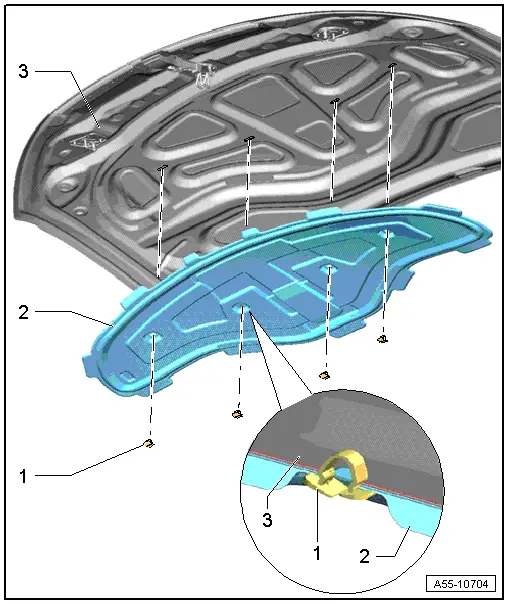
1 - Clip
2 - Insulation
- Installation:
- Slide the insulation over the tabs on the rear edge into the holes provided on the inner panel.
- Slide the tabs on the front edge and the sides into place.
- The clips must engage audibly when pressing in.
3 - Hood
Gas-Filled Strut, Removing and Installing
Removing
- Support the lid or secure it against falling.
- Using a small screwdriver, lift the securing spring -arrow- slightly and remove the gas-filled strut -1- from the upper ball stud -2-.
- Repeat procedure on lower ball stud.
Installing
 Note
Note
After complete removal of the gas-filled strut ensure correct positioning during installation: the gas-filled strut tube must be attached on the lid side.
- Press gas-filled strut onto ball stud and engage.

Gas-Filled Strut, Releasing Gas
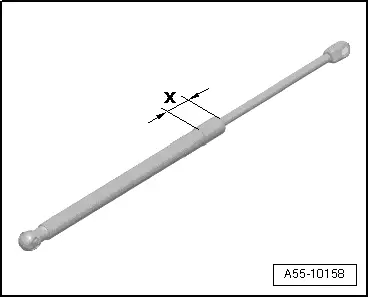
- Clamp gas-filled strut in a vise in area -x- = 50 mm.
 WARNING
- Clamp only within this area, otherwise accidents could occur!
- Wear protective eyewear when sawing.
 Note
Note
Cover area of sawn portion with a rag to absorb oil spraying out.
- Cut through the gas-filled strut cylinder within the first third of the overall cylinder length using the piston rod end of the cylinder as a reference point.
READ NEXT:
 Overview - Rear Lid
Overview - Rear Lid
1 - Rear Lid
Removing and installing. Refer to
→ Chapter "Rear Lid, Removing and Installing".
Rear Lid Seal, Removing and Installing. Refer to
→&nbs
Rear Lid, Removing and Installing
Rear Lid, Removing and Installing
A second technician will be needed during removal and
installation to support and to hold the rear lid.
Removing:
Note
Mark the position of the re
Actuator, Removing and Installing
Rear Lid Motor 1 and 2 -V444-/-V445-, Removing and Installing
WARNING
After removing and installing, the Rear Lid Motor 1
- V444- or Rear Lid Motor 2 -V445- must be adapted via
Guided SEE MORE:
Ignition key
Applies to: vehicles with ignition lock
Fig. 80 Steering column: ignition lock
Starting the engine
Press the brake pedal.
Insert the ignition key into the ignition lock.
Turn the key briefly to position 2. The ignition
key automatically returns to position 1. Do not
press the accelerator peda
Adaptive cruise assist
General information
Applies to: vehicles with adaptive cruise assist
Depending on the vehicle equipment, the adaptive
cruise assist may consist of the following
functions:
Within the limits of the system, the adaptive
speed assist assists the driver in controlling the
speed and the set distance to t