Audi Q3: Overview - Rear Lid
Overview - Rear Lid
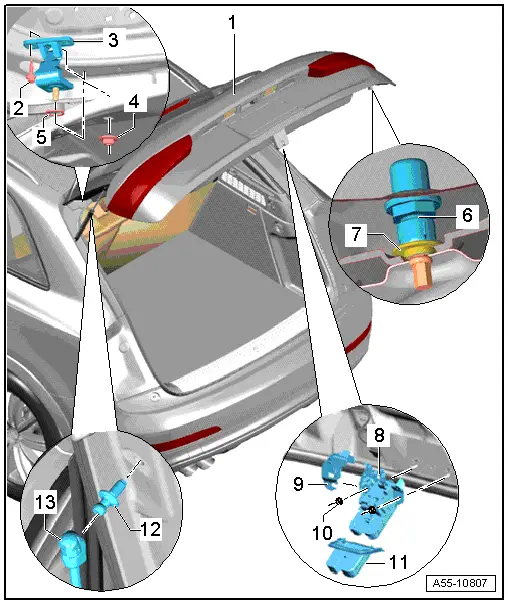
1 - Rear Lid
- Removing and installing. Refer to → Chapter "Rear Lid, Removing and Installing".
- Rear Lid Seal, Removing and Installing. Refer to → Chapter "Rear Lid Seal, Removing and Installing".
2 - Bolt
- 12 Nm
3 - Lid Hinge
- Removing and installing. Refer to → Chapter "Hinges, Removing and Installing".
4 - Nuts
- 25 Nm
5 - Seal
- Replace
6 - Adjusting Buffer
- Body-side, adjustment
7 - Stop
8 - Rear Lid Latch
- Removing and installing. Refer to → Chapter "Lid Latch, Removing and Installing".
9 - Cover for Lid Latch
10 - Nuts
- 21 Nm
11 - Cover
12 - Ball Stud
- Tightening specification → Chapter "Gas-Filled Strut, Removing and Installing".
13 - Gas-Filled Strut
Overview - Rear Lid, Stop and Adjusting Buffer
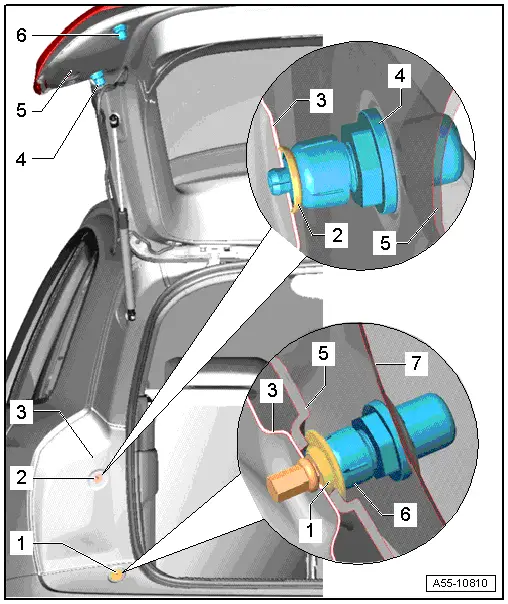
1 - Lower Stop Buffer
- 1.5 Nm
2 - Upper Stop Buffer
- To remove push the clamping pin and remove the stop buffer.
- Remove the clamping pin from the side panel.
- Install the stop buffer with an expanding clip and push the clamping pin in flush.
3 - Side Panel
4 - Upper Adjusting Buffer
- Removing and installing → Chapter "Adjusting Buffer, Removing and Installing"
5 - Rear Lid
6 - Lower Adjusting Buffer
- Removing and installing → Chapter "Adjusting Buffer, Removing and Installing"
7 - Side Panel
Overview - Rear Lid, Rear Lid Lock Cylinder Unlock Button -F248-
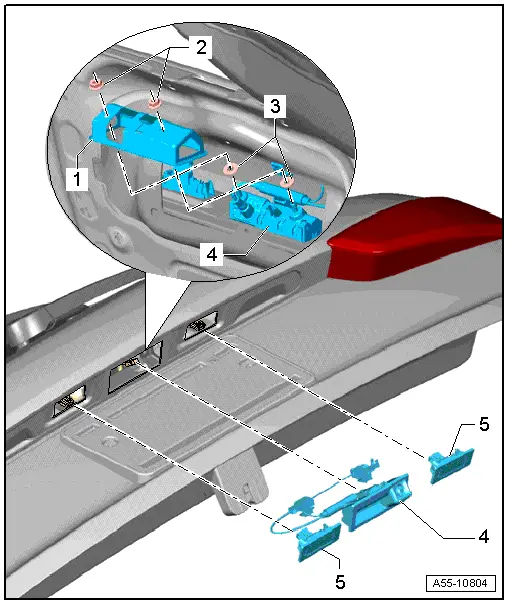
1 - Anti-theft Protection
2 - Nut
- Tightening specification. Refer to → Electrical Equipment; Rep. Gr.96; Controls; Component Location Overview - Luggage Compartment Controls
3 - Seal
4 - Rear Lid Lock Cylinder Unlock Button -F248-
- Removing and Installing. Refer to → Electrical Equipment; Rep. Gr.96; Controls; Rear Lid Lock Cylinder Unlock ButtonF248, Removing and Installing.
5 - License Plate Lamp
- Removing and installing. Refer to → Electrical Equipment; Rep. Gr.94; License Plate Light; License Plate LampX4/X5 Removing and Installing.
Overview - Rear Lid, Rear Lid Motor
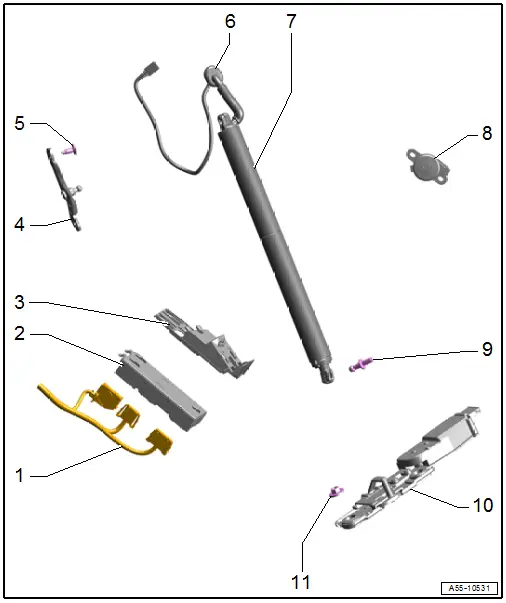
1 - Connectors
2 - Rear Lid Control Module -J605-
- Removing and installing. Refer to → Chapter "Rear Lid Control Module -J605-, Removing and Installing".
3 - Bracket
- For Rear Lid Control Module -J605-
4 - Mount
- With ball pin
5 - Bolt
- 30 Nm
- Quantity: 2
6 - Grommet
7 - Rear Lid Motor
- Rear Lid Motor 1 -V444- with Sensor in Rear Lid Motor 1 -G745-
- Rear Lid Motor 2 -V445- with Sensor in Rear Lid Motor 2 -G746-
- Removing and installing. Refer to → Chapter "Rear Lid Motor 1 and 2 -V444-/-V445-, Removing and Installing".
8 - Rear Lid Warning Buzzer -H32-
- Removing and installing. Refer to → Electrical Equipment; Rep. Gr.96; Controls; Rear Lid Warning BuzzerH32, Removing and Installing.
9 - Ball Pin
- 21 Nm
10 - Rear Lid Lock Unit -F256-
- With a Rear Lid Closing Assist Motor -V382-
- Removing and installing. Refer to → Chapter "Catch, Removing and Installing, Vehicles with Rear Lid Lock Unit -F256-".
- Adjusting.
11 - Nut
- 21 Nm
- Quantity: 2
READ NEXT:
 Rear Lid, Removing and Installing
Rear Lid, Removing and Installing
A second technician will be needed during removal and
installation to support and to hold the rear lid.
Removing:
Note
Mark the position of the re
Actuator, Removing and Installing
Rear Lid Motor 1 and 2 -V444-/-V445-, Removing and Installing
WARNING
After removing and installing, the Rear Lid Motor 1
- V444- or Rear Lid Motor 2 -V445- must be adapted via
Guided
Rear Lid Seal, Removing and Installing
1 - Rear Lid
2 - Rear Lid Seal
To remove, remove seal from body flange.
When installing, align the seal with the joint
-arrow- with the marking in the center of the vehi
SEE MORE:
Roof Antenna, Removing and Installing
The Roof Antenna -R216- has up to three connectors.
The antenna wires are connected directly to the base of the
Roof Antenna -R216-.
The headliner must be lowered in order to remove the Roof
Antenna -R216-.
Removing
- Turn off the ignition and all electrical equipment and
remove the i
Rubber Valve
1 - Valve body
2 - Valve Insert
3 - Valve cap
1. The Valve Body
The rubber valve for tubeless tires is designed to seal
air-tight in the hole in the rim. The elastic material of the
rubber body presses itself tightly into the hole in the rim.
