Audi Q3: Rear Lid, Removing and Installing
Rear Lid, Removing and Installing
- A second technician will be needed during removal and installation to support and to hold the rear lid.
Removing:
 Note
Note
Mark the position of the rear lid on the rear lid hinge with a felt-tip pen before removing.
- Remove the rear lid trim panel. Refer to → Body Interior; Rep. Gr.70; Luggage Compartment Trim Panels; Rear Lid Upper Trim Panel, Removing and Installing
- Disconnect the electric wires on the connectors and pull them out of the rear lid.
- Remove the top bolt on the rear lid side first.
- Remove the bolts on both sides of the rear lid and then remove the rear lid. Refer to → Chapter "Hinges, Removing and Installing".
Install in reverse order of removal.
Adjusting:
- Adjust the front height and the position of the hood lengthwise using the hood hinge.
- Adjust the height of the back of the rear lid by adjusting the rear lid latch.
- Align the rear lid so it is centered according to the gap dimensions. Refer to → Chapter "Rear Lid, Adjusting".
- Adjusting buffer stops.
Adjusting Buffer, Removing and Installing
Removing
- Release the adjusting buffer by pushing and turning left with a 24 mm socket on the hex fitting and remove.
Installing
Install in reverse order of removal. Note the following:
- To install the adjusting buffer insert in the correct position on the rear lid and lock with a 24 mm socket turning right in the direction of the -arrow-.
Rear Lid, Adjusting
Special tools and workshop equipment required
- Gauge - Gap Adjustment -3371-
Gap Dimensions
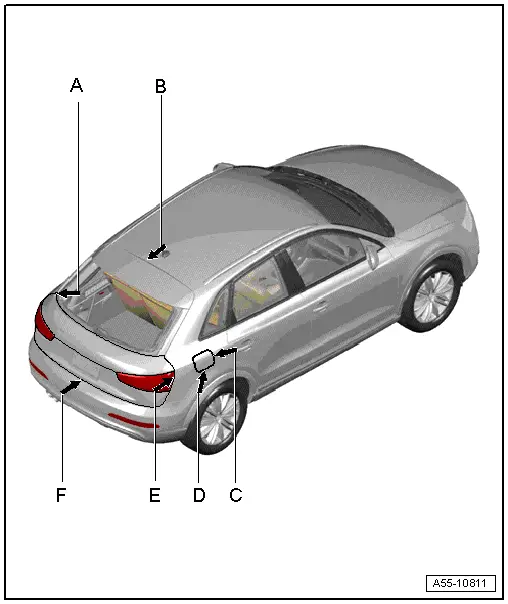
The gap dimensions can be checked with the Adjustment Gauge -3371-.
- Dimension -A- = 4.5 mm
- Dimension -B- = 5.5 mm
- Dimension -C- = 2.3 mm
- Dimension -D- = 2.5 mm
- Dimension -E- = 5.0 mm
- Dimension -F- = 5.3 mm
Adjusting via the Hinge
- The roof spoiler is removed. Refer to → Chapter "Roof Edge Spoiler, Removing and Installing".
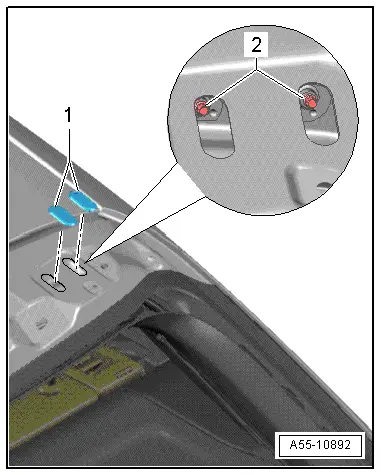
- Remove the seal -1-.
To ensure that it is water tight, after installing the seal coat it completely with Adhesive/Sealant - D 511 500 A2-.
- Loosen the bolts on the lid -2- from the inside at the hex fitting.
- Close the rear lid and align it with the body contour.
- Fasten the bolts -2- to the lid retainer with an outer torx socket E5 to the left to maximum of 7 Nm.
- Open the rear lid and tighten the bolts on the bolts on the hex fitting. Refer to -item 2-.
- Install the rear spoiler.
Adjustment using Lid Catch, vehicle with Fixed Catch
- Remove the lock carrier trim panel. Refer to → Body Interior; Rep. Gr.70; Luggage Compartment Trim Panels; Lock Carrier Trim Panel, Removing and Installing.
 Note
Note
- Before adjusting, install the adjusting buffer on the rear lid side completely → Fig. "Adjusting Screw for Adjusting Buffer".
- The rear height can be adjusted by sliding the locking plate.
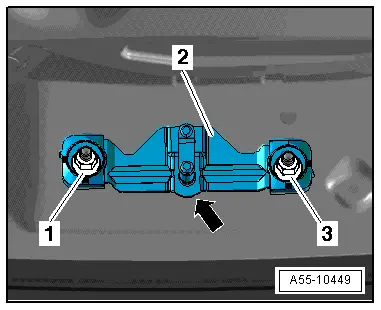
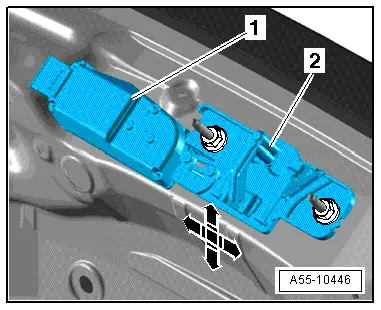
- Loosen nuts -1- and -3-. The catch -2- must be movable.
- Close the rear lid and check the position.
- If necessary adjust the striker pin the in upper adjusting buffer.
- Rear lid latch must be engaged in main detent (second retainer) during this.
- Tighten the nuts on the striker pin to the tightening specification. Refer to -10-.
- Turn the lower adjusting buffer until the closed rear lid with the adjusting buffer comes into contact position on the stop buffers in the body.
- Check whether rear lid still closes easily, repeat adjustment at adjusting buffer if necessary.
- If rear lid is difficult to close, tighten the adjusting buffer slightly.
Adjust using Catch, vehicles with Rear Lid Lock Unit
- Remove the lock carrier trim panel. Refer to → Body Interior; Rep. Gr.70; Luggage Compartment Trim Panels; Lock Carrier Trim Panel, Removing and Installing.
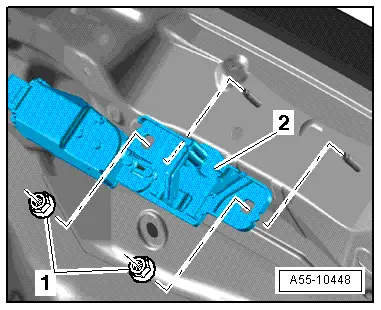
- Loosen the nuts. The rear lid lock unit -1- and striker pin -2- must still be movable.
- For easier installation, there are markings in the rear lid end piece to help adjust the rear lid lock unit.
 Caution
Risk of damage!
- To adjust the rear lid, the striker pin must be in the "rear lid closed" position (lower end position).
- Striker pin cannot be installed in position not visible in drawing (upper end position) -1- because rear lid can block contact when closing and can be damaged.
- Do not use the Door Closing Assist Control Module to adjust the power rear lid.
- Turn the upper section of the rear lid side of the adjusting buffer completely before adjusting the rear lid. Refer to → Fig. "Adjusting Screw for Adjusting Buffer".
- Close the rear lid and check the position.
- If necessary adjust the striker pin the in upper adjusting buffer.
- Rear lid latch must be engaged in main detent (second retainer) during this.
- Tighten the nuts -1- on the Rear Lid Lock Unit -2- to the tightening specification. Tightening specification: Refer to → Chapter "Overview - Rear Lid, Rear Lid Motor".
- Remove the lower adjusting buffer until the closed rear lid with the adjusting buffers comes into contact with the stop buffers in the body.
- See if rear lid still closes easily, continue adjusting the adjusting buffer if necessary.
- If rear lid is difficult to close, tighten the adjusting buffer slightly.
Adjusting Buffer, Adjusting
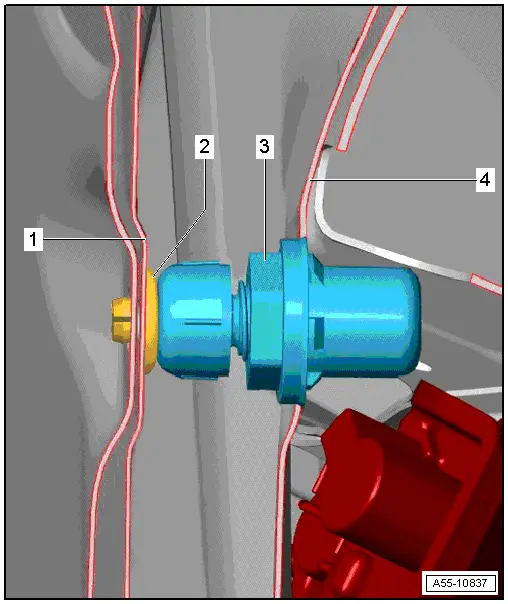
1 - Side Panel
2 - Stop
- Removing and Installing. Refer to → Chapter "Adjusting Buffer, Removing and Installing".
3 - Adjusting Buffer
- Removing and Installing
- There is an adjusting screw for adjusting the height.
- When rear lid is adjusted correctly, adjusting buffer must make contact with light pre-tension with stop on rear lid side.
4 - Rear Lid
- When adjusted correctly, adjusting buffer -3- must contact stop buffer -2- with light pretension when rear lid is closed.
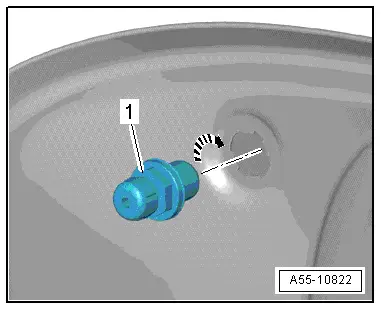
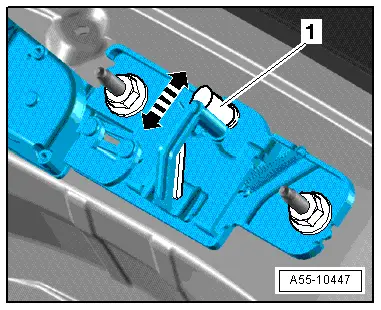
Adjusting Screw for Adjusting Buffer
- Before adjusting rear lid, install adjusting screw -2- with protective cap -1- completely in adjusting buffer -3-
- Remove the adjusting screw -2- just enough until the cap -1- makes contact with light pre-tension with stop on rear lid side when the rear lid is closed.
- Check whether lid sits without play and in flush position by pushing or pulling on the side edge of rear lid below rear window.
- Repeat the adjustment if necessary.

Lid Latch, Removing and Installing
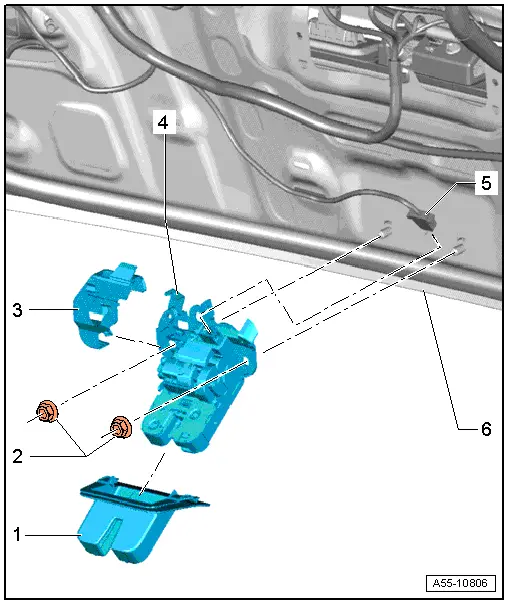
1 - Cover
- After removing, remove the lid trim from the lid lock.
2 - Nut
- 21 Nm
3 - Cover for Lid Latch
- When installing, cover must engage audibly in lid latch.
4 - Lid Latch
- Before removal, remove the lid latch cover.
- The rear lid lower trim panel is removed. Refer to → Body Interior; Rep. Gr.70; Luggage Compartment Trim Panels; Rear Lid Lower Trim Panel, Removing and Installing.
- Disconnect the connector.
- Remove nuts and remove lid latch.
- Remove the lid latch with the clip from the centering hole.
5 - Connector
6 - Rear Lid
READ NEXT:
 Actuator, Removing and Installing
Rear Lid Motor 1 and 2 -V444-/-V445-, Removing and Installing
WARNING
After removing and installing, the Rear Lid Motor 1
- V444- or Rear Lid Motor 2 -V445- must be adapted via
Guided
Rear Lid Seal, Removing and Installing
1 - Rear Lid
2 - Rear Lid Seal
To remove, remove seal from body flange.
When installing, align the seal with the joint
-arrow- with the marking in the center of the vehi
Fuel Filler Door Unit
Overview - Fuel Filler Door Unit
Overview - Fuel Filler Door Unit
1 - Drain Hose
Make sure the routing is correct. Refer to
→ Chapter "Overview - Fuel Filler Door Unit DrainSEE MORE:
Overview - Cover and Cushion
Overview - Cover and Cushion, Sport Bench Seat
1 - Seat Frame
With the molded piece
2 - Upholstery Clip
For attachment of seat cover to seat cushion
Replace
Install at the same location with Upholstery Clip Pliers -VAG1634-.
3 - Wire
Embedded in
General Information
Vehicles with a High Voltage System (Hybrid Vehicles)
Extremely Dangerous Due to High-Voltage
The high-voltage system is under high-voltage. Death or serious
bodily injury by electric shock.
- Individuals with electronic/medical life- and health sustaining
machines in or on their person 