Audi Q3: Rear Lid Seal, Removing and Installing
Body Exterior / Body / Audi Q3 (8U) 2011-2018 Service Manual / Rear Lid Seal, Removing and Installing
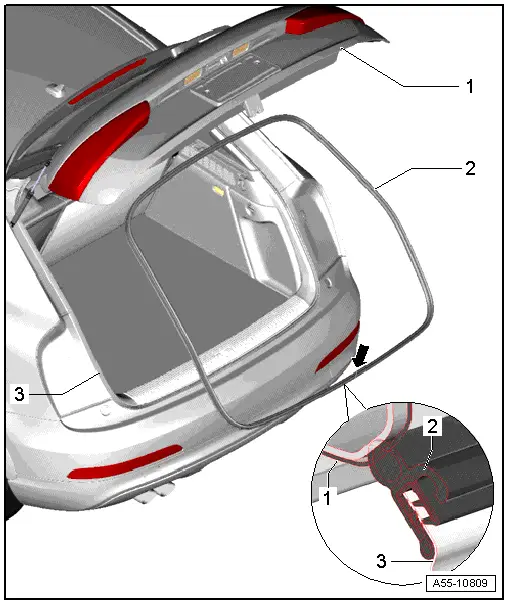
1 - Rear Lid
2 - Rear Lid Seal
- To remove, remove seal from body flange.
- When installing, align the seal with the joint -arrow- with the marking in the center of the vehicle.
- Beginning at the seam, press the seal all around onto the body flange.
3 - Body Flange
Gas-Filled Strut, Removing and Installing

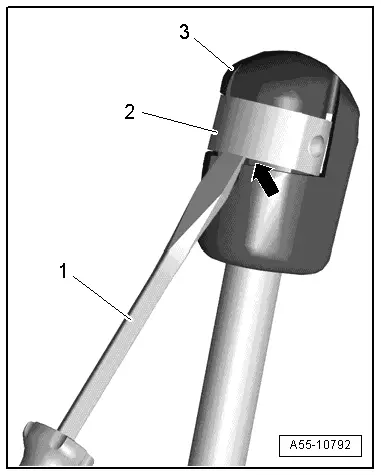
1 - Gas-Filled Strut
 Note
Note
- After completely removing gas-filled strut, ensure correct position when installing.
- Noise insulation element must be engaged in rear lid side.
- Open and support the rear lid when removing.
- Using screwdriver, lift retaining spring -2- as shown and remove gas-filled strut -1- from upper ball head pin -3-.
2 - Rear Lid
3 - Ball Stud
- 21 Nm
 Note
Note
Should the ball head pin have to be removed or adjusted, then replace it.
4 - Locking Spring
- Refer to → Fig. "Unlocking the Locking Spring"To remove the gas-filled strut, slightly lift the retaining spring -arrow- with a small screwdriver.
Installing
Install in reverse order of removal while noting the following:
- To install push the gas-filled struts with a light rotational movement on the ball stud.
Unlocking the Locking Spring
- Remove retaining spring -2- with small screwdriver -1- and disengage gas-filled strut-3- , that can finally be removed from ball stud.
READ NEXT:
 Fuel Filler Door Unit
Overview - Fuel Filler Door Unit
Overview - Fuel Filler Door Unit
1 - Drain Hose
Make sure the routing is correct. Refer to
→ Chapter "Overview - Fuel Filler Door Unit Drain
Overview - Door
1 - Door
Removing and installing. Refer to
→ Chapter "Door, Removing and Installing".
2 - Bolt
45 Nm
Note
The bolt is a fitting bolt so it is SEE MORE:
Online media
Applies to: vehicles with Audi connect Infotainment and online
media
You can play and operate various online media
services, such as music streaming services, using
the MMI.
Requirement: a supported online media service
must be available in the country where the vehicle
is being operated. you must
Hinges, Removing and Installing
1 - Hood Hinge
Removing
Before removing a hood hinge, support the hood or secure it against
falling.
Remove the gas-filled strut. Refer to
→ Chapter "Gas-Filled Strut, Removing and Installing".
Unclip and remove the cover from the lid hinges.
Remove the bolts -
© 2019-2026 Copyright www.auq3.net | 0.0106
