Audi Q3: Actuator, Removing and Installing
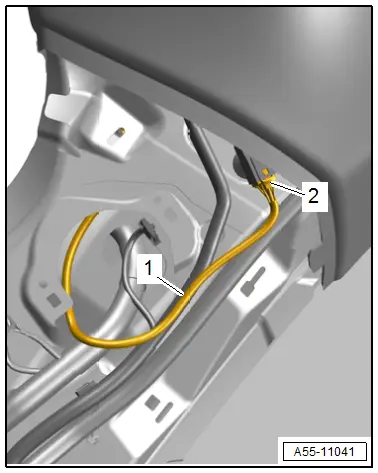
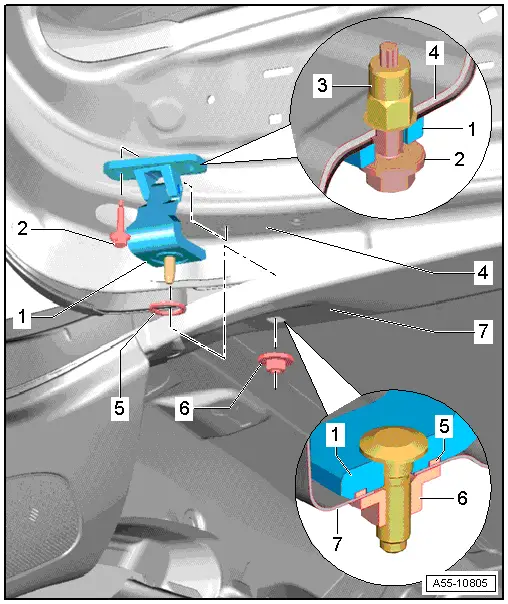
Rear Lid Motor 1 and 2 -V444-/-V445-, Removing and Installing
 WARNING
After removing and installing, the Rear Lid Motor 1 - V444- or Rear Lid Motor 2 -V445- must be adapted via Guided Functions using the Vehicle Diagnostic Tester → Vehicle diagnostic tester.
Removing
- Remove D-pillar trim panel. Refer to → Body Interior; Rep. Gr.70; Passenger Compartment Trim Panels; D-Pillar Trim Panel, Removing and Installing.
- If equipped, remove the speaker. Refer to → Communication; Rep. Gr.91; Component Location Overview - Sound System.
- Disconnect the connector -2-.
- Free up the wiring harness -1-.
 Caution
To prevent personal injuries or damaging the rear lid and/or the vehicle body, place a support under the rear lid to keep it from falling down.
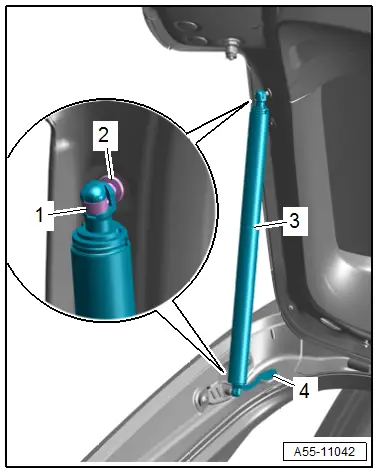
- Support rear lid.
- Lift the locking spring -1- gently with a small screwdriver and remove the spindle motor -3- from the ball pin -2-.
- Remove the grommet -4- from the body and guide the wiring harness out through the opening.
Installing
Install in reverse order of removal. Note the following:
 Caution
- Do not hold the motor on the cable when installing.
- The rear lid being completed must be guided by hand, since the motor can destroy the rear lid when the weight is too low.
- The ball sockets on the motor must not strike the ball pins, but rather they must be placed at an angle and be pressed on through a rotational movement.
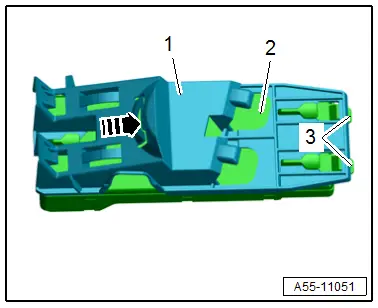
Rear Lid Control Module -J605-, Removing and Installing
Removing
- Remove the left luggage compartment side trim panel. Refer to → Body Interior; Rep. Gr.70; Luggage Compartment Trim Panels; Luggage Compartment Side Trim Panel, Removing and Installing.
- Release the retainers -1- and pull the bracket -3- out of the mount -2- toward the rear -arrow-.
- Disconnect the connectors -4 and 5-.
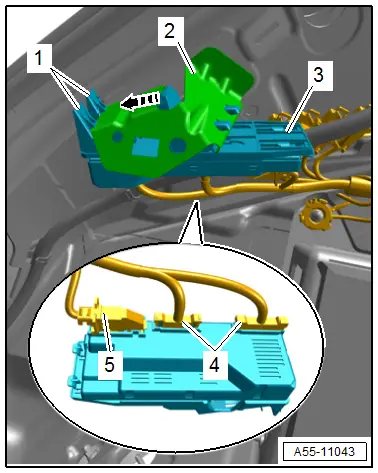
- To disconnect the connector, press the retainer -1-, turn the bracket in direction of -arrow- and disconnect the connector.
- Release the retainers -3- and remove the Rear Lid Control Module -2- from the bracket -1- in the direction of the -arrow-.
Installing
Install in reverse order of removal.
Hinges, Removing and Installing
 Note
Note
- Remove and install the left and right hinges one after the other when replacing the hinges on both sides.
- Mark the position of the hinges on the rear lid before removing them.
1 - Lid Hinge
Removing:
- Remove the trim on the D-pillars. Refer to → Body Interior; Rep. Gr.70; Interior Trim; D-Pillar Trim Panel Removing and Installing.
- Remove the rear roof grab handles. Refer to → Body Interior; Rep. Gr.68; Equipment; roof Grab Handle Removing and Installing.
- Lower the rear headliner in the area of the nut for the lid hinges.
 Note
Note
Support the rear lid to keep it from falling down and too prevent damage the rear lid or the vehicle body.
- First remove the bolts -2- from the lid hinge.
- Remove the nut -6- on the roof.
Installing:
- Align the hinge to the markings and tighten the upper bolts -2- on the rear lid to the tightening specification.
- Install the nut -6-.
- Adjust the gap between the rear lid and the roof, and tighten the nut to the tightening specification.
2 - Bolt
- 12 Nm
3 - Internally Threaded Pop Rivet
4 - Rear Lid
5 - Seal
- Replace
6 - Nut
- 25 Nm
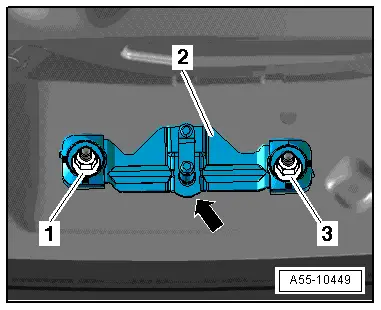
Catch, Removing and Installing
Catch, Removing and Installing
Removing
- Remove the lock carrier trim panel. Refer to → Body Interior; Rep. Gr.70; Luggage Compartment Trim Panels; Lock Carrier Trim Panel, Removing and Installing.
- Remove the nuts -1- and -3- and remove the striker pin -2-.
Installing
Install in reverse order of removal. Note the following:
- Insert the catch on the proper side.
- The round side -arrow- on the catch faces upward.
- Adjust the catch → Chapter "Rear Lid, Adjusting".
Catch, Removing and Installing, Vehicles with Rear Lid Lock Unit -F256-
Removing
- Remove the lock carrier trim panel. Refer to → Body Interior; Rep. Gr.70; Luggage Compartment Trim Panels; Lock Carrier Trim Panel, Removing and Installing.
- Remove nuts -2 and 4- and remove the Rear Lid Lock Unit -3-.
- Disconnect the connector -1-.
Installing
Install in reverse order of removal. Note the following:
 Note
Note
- The striker pin must only be installed in the "Closed rear lid" position.
- A new striker pin will always be in the "Closed rear lid" position.
- If the same striker pin is reinstalled, connect the connector to the Door Closing Assist Control Module, and when the rear lid is open, close the rotary latch in the rear lid latch with, for example, a screwdriver.
- Closing aid operates in "Closed rear lid" position = basic position.
- Disconnect the connector on the Door Closing Assist Control Module.
- Open the latch again via the Rear Lid Lock Cylinder Unlock Button.
- Adjust the catch.

READ NEXT:
 Rear Lid Seal, Removing and Installing
1 - Rear Lid
2 - Rear Lid Seal
To remove, remove seal from body flange.
When installing, align the seal with the joint
-arrow- with the marking in the center of the vehi
Fuel Filler Door Unit
Overview - Fuel Filler Door Unit
Overview - Fuel Filler Door Unit
1 - Drain Hose
Make sure the routing is correct. Refer to
→ Chapter "Overview - Fuel Filler Door Unit DrainSEE MORE:
Front Three-Point Seat Belt, Removing and Installing
Front Three-Point Seat Belt, Removing and Installing
Removing
WARNING
Follow all safety precautions when working with
pyrotechnic components. Refer to
→ Chapter "Pyrotechnic Components Safety Precautions".
Follow all regulations when disposing of pyrotechnic
components
Battery Charger -VAS5903- Support Mode
General Information
The support mode provides the vehicle electrical system with
voltage when the Battery -A- is removed or disconnected.
For more information. Refer to the Battery Charger -VAS5903-
Operating Instructions.
The support mode is used for the following situations:
Vehicle ele