Audi Q3: Instrument Panel Vent, Removing and Installing
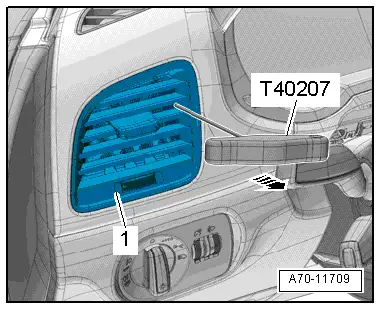
Side Instrument Panel Vent, Removing and Installing
Special tools and workshop equipment required
- Hook Tool -T40207-
Removing
 Note
Note
The vent has a hole on inside for attaching the Hook Tool -T40207-.
- Carefully insert the Hook Tool -T40207- between the slats and hook it into the side of the vent.
- Carefully remove the vent -1- from the installation opening -arrow-.
- Disconnect the connector and remove the instrument panel vent.
Installing
Install in reverse order of removal.
Installation notes, for example tightening specifications, replacing components. Refer to → Chapter "Overview - Instrument Panel".
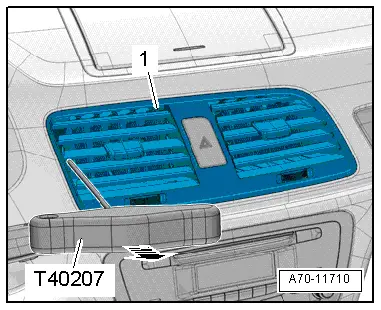
Center Instrument Panel Vent, Removing and Installing
Special tools and workshop equipment required
- Hook Tool -T40207-
Removing
 Note
Note
The vent has a hole on both sides for attaching the Hook Tool -T40207-.
- Carefully insert the Hook Tool -T40207- between the slats and hook it into the side of the vent.
- Alternating between the sides, carefully remove the vent -1- from the installation opening -arrow-.
- Disconnect the connectors and remove the instrument panel vent.
Installing
Install in reverse order of removal.
Installation notes, for example tightening specifications, replacing components. Refer to → Chapter "Overview - Instrument Panel".
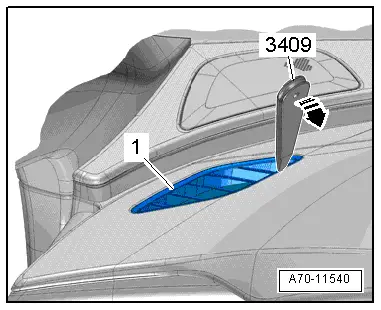
Front Center Defroster Vent, Removing and Installing
Special tools and workshop equipment required
- Trim Removal Wedge -3409-
- Wedge Set -T10383-
Removing
- Pry the defroster vent -1- with the Wedge -T10383/1- and the Trim Removal Wedge - 3409- from the instrument panel -arrows- and remove toward the rear.
- Remove the defroster vent until it is possible to disconnect the Sunlight Photo Sensor -G107-.
Installing
Install in reverse order of removal.
Installation notes, for example tightening specifications, replacing components. Refer to → Chapter "Overview - Instrument Panel".

Side Defroster Vent, Removing and Installing
Special tools and workshop equipment required
- Trim Removal Wedge -3409-
Removing
- Remove the defroster vent -1- from the instrument panel -arrow- using a Trim Removal Wedge -3409-.
Installing
Install in reverse order of removal.
Installation notes, for example tightening specifications, replacing components. Refer to → Chapter "Overview - Instrument Panel".
READ NEXT:
 Instrument Panel Central Tube
Overview - Instrument Panel Central Tube
1 - Bolt
20 Nm
2 - Nut
23 Nm
Quantity: 2
Always replace if removed
3 - Threaded Pin
20 Nm
Component Location Overview - Passenger Compartment Trim
1 - Cover
Overview. Refer to
→ Chapter "Overview - C-Pillar Trim Panel".
2 - Rear Sill Panel Strip
Overview. Refer to
→ Chapter "Overview - Rear Sill
Overview - A-Pillar Trim Panel
1 - Lower Clamp
Without hooks
Replace damaged or deformed clips
Insert in the trim panel
Remove any remaining clips in the body mounting points using the
Omega Clip Tool -T4028SEE MORE:
Advanced airbag system
Fig. 64 Headliner: indicator light to display the
status of the front passenger's airbag
The Advanced Airbag System in your vehicle has
been certified to comply with the requirements
of the United States Federal Motor Vehicle Safety
Standard (FMVSS) 208, as well as Canada Motor
Vehicle Safety Stan
Overview - Lower Control Arm and Ball Joint
1 - Control Arm
Control arm with mounting bracket, removing and installing. Refer to
→ Chapter "Lower Control Arm, Removing and Installing".
2 - Bonded Rubber Bushing
Replacing. Refer to
→ Chapter "Lower Control Arm Bonded Rubber Bushing, Replacing".