Audi Q3: Door, Removing and Installing
Removing
- Disconnect the door connector on the A-pillar. Refer to → Electrical Equipment; Rep. Gr.97; Connectors.
 Note
Note
Secure the A-pillar in the area of the door arrester using adhesive tape, so that the paint will not be damaged.
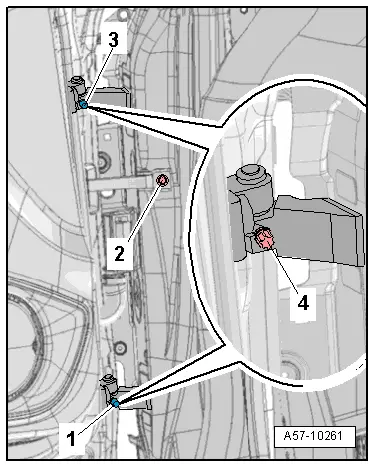
- Remove the door arrester bolt -2-.
- Remove the cover caps -1- and -3- from the stud bolts.
- Remove the stud bolts -4- on the upper and lower door hinge.
 Caution
There is a risk of damaging the paint.
Protect the painted surfaces on the door or on the side panel from damage.
- Carefully remove the door upward out of the door hinges.
Installing
- Gap dimensions.
- Tightening specification: Refer to → Chapter "Overview - Door".
Install in reverse order of removal. Note the following:
 Note
Note
Do not make any adjustments after installing the door.
Door Arrester, Removing and Installing
Removing
 Note
Note
Secure the A-pillar in the area of the door arrester using adhesive tape, so that the paint will not be damaged.
- Move the door window into the "closed" position.
- Remove the door trim panel. Refer to → Body Interior; Rep. Gr.70; Front Door Panels; Front Door Panel, Removing and Installing.
- Remove the lower speaker. Refer to → Communication; Rep. Gr.91; Component Location Overview - Sound System.
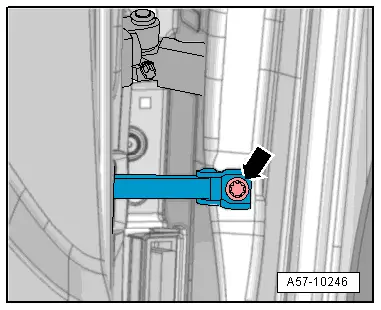
- Remove the door arrester bolt -arrow-.
- If equipped, remove the door arrester cover -1- from the door opening.
- Remove the bolt -arrows- and remove the door arrester -2- inward.

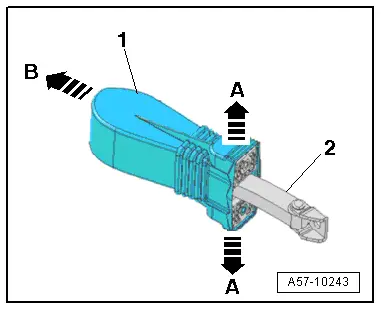
- Pull the rubber grommet -1- on the door arrester to the side slightly -A arrows-.
- Remove the rubber grommet from the door arrester -2--arrow B-.
Installing
Install in reverse order of removal. Note the following:
- Push the rubber seal on the door arrester, while doing so pay attention to the allocation of the rubber seal.
- The name badge for the left or right side must be readable at the top.
- Install the lower speaker. Refer to → Communication; Rep. Gr.91; Component Location Overview - Sound System.
- Install the door trim panel. Refer to → Body Interior; Rep. Gr.70; Front Door Trim Panels; Front Door Trim Panel, Removing and Installing.
READ NEXT:
 Door, Adjusting
Special tools and workshop equipment
required
Gauge - Gap Adjustment -3371-
Door Adjustment Template -T40038 /16-
Check the height adjustment using the Door Adjustment
Template -T40038 /1
Inner Door Seal, Removing and Installing
Removing
- Remove the upper A-pillar trim. Refer to
→ Body Interior; Rep. Gr.70; Passenger Compartment Trim;
A-Pillar Trim, Removing and Installing.
- Remove the front
Overview - Window Regulator
1 - Door
2 - Clip
For the window regulator cable
3 - Lower Double-Bolt
4 - Window Regulator
Removing and installing. Refer to
→ Chapter SEE MORE:
Switching lane guidance on and off
Applies to: vehicles with adaptive cruise assist and lane guidance
Fig. 101 Turn signal lever: button for lane guidance and
lane departure warning
Within the limits of the system, lane guidance
provides corrective steering to assist the driver
with keeping the vehicle in the center of the lane
as m
Drive Axle, Removing and Installing, Drive Axle with Bolted CV Joint VL
107
Removing
- Loosen the drive axle threaded connection on the wheel side.
Refer to
→ Chapter "Drive Axle Threaded Connection, Loosening and
Tightening".
- Remove the front wheel. Refer to
→ Chapter "Wheels and Tires".
- Remove the noise insulation -1-.
Refer t