Audi Q3: Overview - Window Regulator
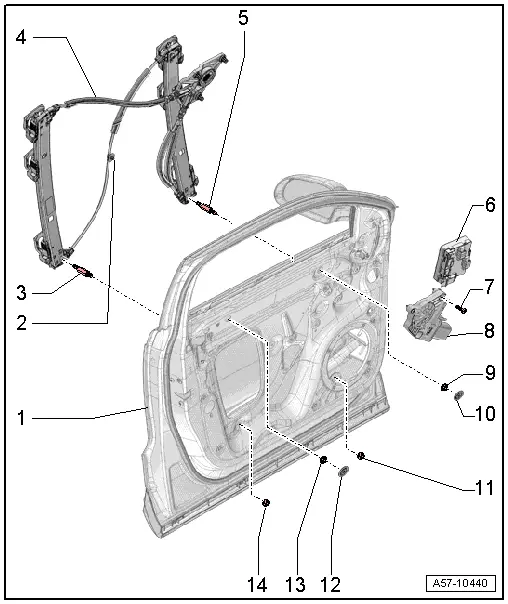
1 - Door
2 - Clip
- For the window regulator cable
3 - Lower Double-Bolt
4 - Window Regulator
- Removing and installing. Refer to → Chapter "Window Regulator, Removing and Installing".
5 - Lower Double-Bolt
6 - Door Control Module
- Driver Door Control Module -J386-
- Front Passenger Door Control Module -J387-
- Overview. Refer to → Chapter "Component Location Overview - Central Locking".
7 - Bolt
- 3.5 Nm
- Quantity: 3
8 - Window Regulator Motor
- Driver Window Regulator Motor -V147-
- Front Passenger Window Regulator Motor -V148-
- Removing and installing. Refer to → Chapter "Window Regulator Motor, Removing and Installing".
9 - Nut
- 6 Nm
10 - Cap
11 - Nut
- 6 Nm
12 - Cap
13 - Nut
- 6 Nm
14 - Nut
- 6 Nm
Overview - Window Guides and Window Shaft Strips
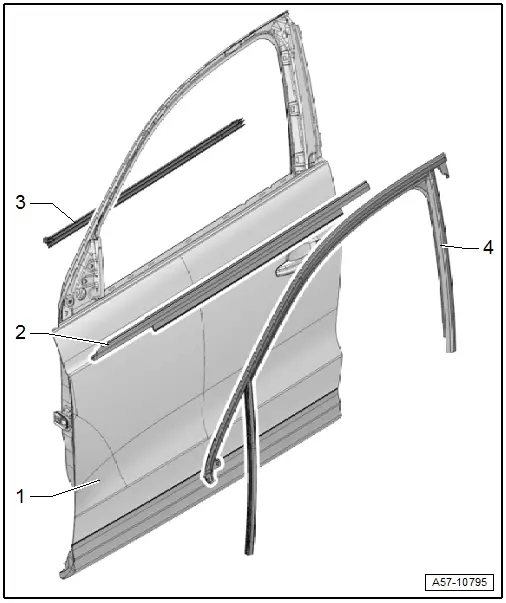
1 - Door
2 - Outer Window Shaft Strip
- Removing and installing. Refer to → Chapter "Outer Window Shaft Strip, Removing and Installing".
3 - Inner Window Shaft Strip
- Removing and installing. Refer to → Chapter "Inner Window Shaft Strip, Removing and Installing".
4 - Window Guide
- Removing and installing. Refer to → Chapter "Window Guide, Removing and Installing".
Overview - Door Handle and Door Lock
Overview - Door Handle and Door Lock, Exterior Door Handle and Mounting Bracket
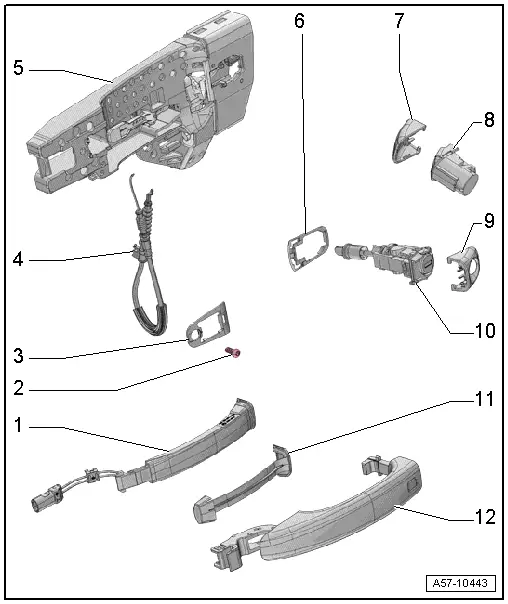
1 - Outside Door Handle Sensor
- Equipment levels
- In the exterior door handle
- Left Front Exterior Door Handle Touch Sensor -G605-, Right Front Exterior Door Handle Touch Sensor -G606-
- Removing and Installing. Refer to → Electrical Equipment; Rep. Gr.94; Overview - Keyless Access Authorization System Exterior Door Handle.
2 - Bolt
- 2.5 Nm
3 - Front Backing
- Removing and installing. Refer to → Chapter "Door Handle, Removing and Installing".
4 - Operating Cable
- For the door lock
 Caution
There is a risk of malfunctions.
The door lock must be removed and installed together with the bracket to prevent over-bending the cable when disengaging and engaging it.
The cable must be disconnected from/attached to lever on the door lock outside of the door.
- Removing and installing. Refer to → Chapter "Door Lock Cable, Removing and Installing".
5 - Bracket
- Removing and installing. Refer to → Chapter "Bracket, Removing and Installing".
6 - Rear Backing
- Removing and installing. Refer to → Chapter "Door Handle, Removing and Installing".
7 - Passenger Side Cap
- Closed version
- Removing and installing. Refer to → Chapter "Lock Cylinder Cap/Housing, Removing and Installing".
8 - Housing
- For the front passenger door
- Removing and installing. Refer to → Chapter "Lock Cylinder, Removing and Installing".
9 - Cap - Driver Side
- For lock cylinder
- Removing and installing. Refer to → Chapter "Lock Cylinder Cap/Housing, Removing and Installing".
10 - Install the Lock Cylinder
- For the driver door
- Removing and installing. Refer to → Chapter "Lock Cylinder, Removing and Installing".
11 - Exterior Door Handle Trim
- Vehicle versions for vehicles without a convince key
- Removing and installing. Refer to → Chapter "Door Handle Trim, Removing and Installing".
12 - Exterior Door Handle
- Removing and installing. Refer to → Chapter "Door Handle, Removing and Installing".
Overview - Door Handle and Door Lock, Door Lock and Catch
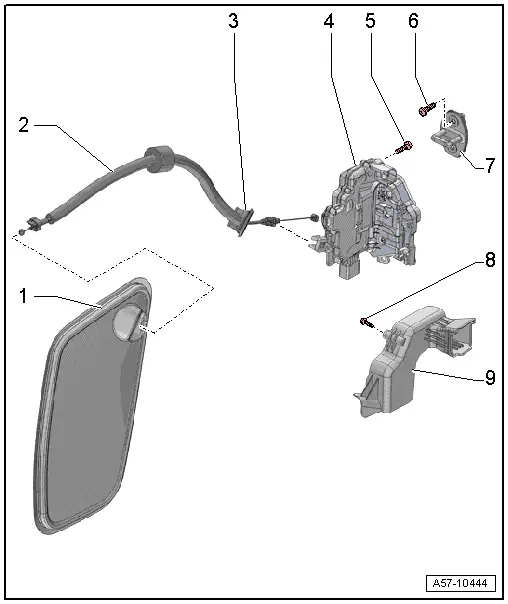
1 - Door Inner Cover
- Removing and installing. Refer to → Chapter "Door Inner Cover, Removing and Installing".
2 - Door Opener Cable
- Removing and installing. Refer to → Chapter "Door Opener Cable, Removing and Installing".
3 - Grommet
- Cannot be replaced separately
4 - Door Lock
- Removing and installing. Refer to → Chapter "Door Lock, Removing and Installing".
5 - Bolt
- 19 Nm
- Quantity: 2
6 - Bolt
- 25 Nm
- Quantity: 2
7 - Catch
- Removing and installing. Refer to → Chapter "Catch, Removing and Installing".
8 - Bolt
- 1.5 Nm
9 - Guide
- For lock cylinder
- Removing and installing. Refer to → Chapter "Lock Cylinder Guide, Removing and Installing".
READ NEXT:
 Window Regulator Motor, Removing and Installing
Removing
Note
The window regulator motor can be removed or installed with
the motor or door window in any position.
- Remove the front door trim panel. Refer to
→ Body Inter
Inner Window Shaft Strip, Removing and Installing
Removing
- Remove the front window frame trim panel. Refer to
→ Body Interior; Rep. Gr.70; Front Door Trim; Window Frame Trim
Removing and Installing.
- Remove the wind
Door Inner Cover, Removing and Installing
Special tools and workshop equipment
required
Wedge Set -T10383-
Removing
- Remove the door trim panel. Refer to
→ Body Interior; Rep. Gr.70; Front Door Panels; FrontSEE MORE:
Using adaptive cruise assist
Applies to: vehicles with adaptive cruise assist
Fig. 99 Lever: using adaptive cruise
assist
Fig. 100 Operating lever: changing the speed
Switching on
To switch on the adaptive cruise assist, pull the
lever up to position 1 until it engages.
Storing the speed and activating regulation
If you
Map
Map function
Applies to: vehicles with navigation system
Fig. 131 Active route quidance
Fig. 132 Marked map object
Opening the map
Applies to: MMI: Press NAVIGATION on the
home screen.
If necessary, press to
display the map.
The following list gives an overview of the information
displaye