Audi Q3: Inner Door Seal, Removing and Installing
Removing
- Remove the upper A-pillar trim. Refer to → Body Interior; Rep. Gr.70; Passenger Compartment Trim; A-Pillar Trim, Removing and Installing.
- Remove the front sill panel strip. Refer to → Body Interior; Rep. Gr.70; Passenger Compartment Trim; Sill Panel Strip, Removing and Installing.
- Remove the lower B-pillar trim. Refer to → Body Interior; Rep. Gr.70; Passenger Compartment Trim; B-Pillar Trim, Removing and Installing.
- Remove the inner door seal from the body flange.
Installing
Install in reverse order of removal. Note the following:
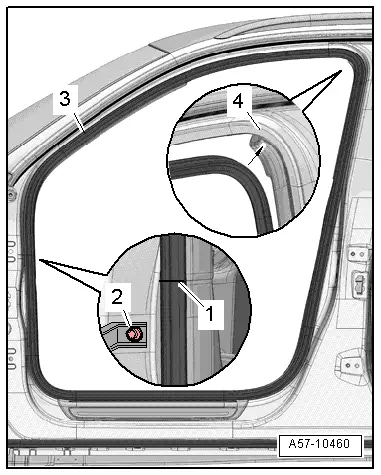
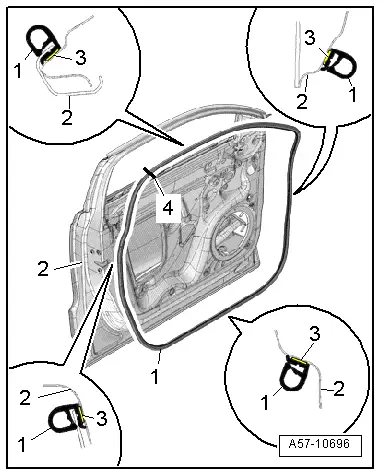
- Install the inner door seal molded piece -3- with the vulcanized point -1- between the upper door hinge and door arrester -2- on the body surface.
- Place the inner door seal molding piece in the area of the upper B-pillar on the body surface -4--arrow-.
- Place the inner door seal molding piece on the complete body surface and press in.
- Install the lower B-pillar trim. Refer to → Body Interior; Rep. Gr.70; Passenger Compartment Trim; B-Pillar Trim, Removing and Installing.
- Install the front sill panel strip. Refer to → Body Interior; Rep. Gr.70; Passenger Compartment Trim; Sill Panel Strip, Removing and Installing.
- Install the upper A-pillar trim. Refer to → Body Interior; Rep. Gr.70; Passenger Compartment Trim; A-Pillar Trim, Removing and Installing.
Outer Door Seal, Removing and Installing
 Note
Note
- The door outer seal is completely bonded and can only be replaced.
- The vehicle and the outer door seal must be at room temperature.
- The adhesive surfaces must free of dust and grease. Clean with Cleaning Solution -D 009 401 04-.
- Apply Bonding Agent -D 355 205 A2- on the surface on the body side using the Applicator -D 009 500 25- and let dry.
- The water drain hole is found on the underside of the door if it was installed correctly.
Special tools and workshop equipment required
- Roller -3356-
- Adhesive Strip Remover -VAS6349-
- Cleaning Solution -D 009 401 04-
Removing
- Remove the front window frame trim panel. Refer to → Body Interior; Rep. Gr.70; Front Door Trim; Window Frame Trim Removing and Installing.
- Mark the position of the outer door trim on the door frame using adhesive tape.
- Mark the position of the outer door seal in the area of the door lock with adhesive tape.
 Note
Note
Secure the A-pillar in the area of the door arrester using adhesive tape, so that the paint will not be damaged.
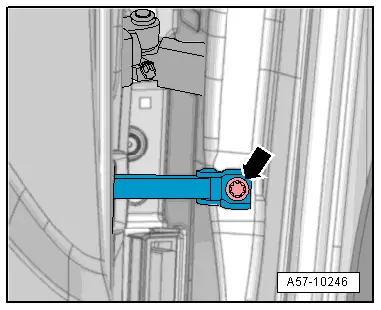
- Remove the door arrester bolt -arrow-.
- Remove the outer door seal from the door frame a bit and cut with commercially available scissors.
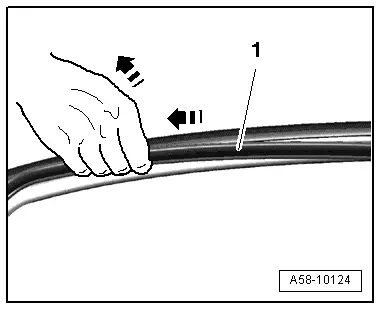
- Turn the outer door seal lengthwise -arrow- in steps and remove as shown in the illustration.
 Note
Note
Pulling the seal laterally will loosen the adhesive and then it is possible to remove the door outer seal from the door without any leftover adhesive on it.
- Remove the door seal completely.
Installing
Install in reverse order of removal. Note the following:
- Remove the adhesive residue using Adhesive Strip Remover -VAS6349-.
- Clean the adhesive surface on the door with Cleaning Solution -D 009 401 04-.
- Apply Bonding Agent -D 355 205 A2- on the adhesive surface of the door using the Applicator -D 009 500 25- and let dry.
 Caution
There is a risk of damaging the door seal.
- If the Adhesive -D 355 205 A2- dries longer than 3 hours, then it must be primed again.
- The vehicle must be in room temperature.
- Do not stretch the seal when installing it.
- The seal may come off wherever it is stretched or crushed along the bottom or on the B-pillar and C-pillar.
- So that the outer door seal does not loosen or slide, do not close the door for two hours.
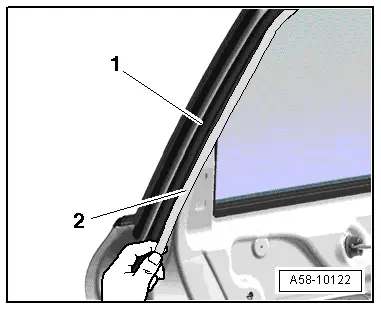
- The start marking -4- of the outer door seal -1- must be placed on the door B-pillar -2- at the top.
- When the outer door seal is positioned correctly the drain holes in the seal are at the bottom.
- Remove the protective film from the adhesive tape -3-.
- Adhere a new seal and press on using Roller -3356-.
- Resting time of the vehicle is a minimum of two hours with the doors open at room temperature.
- Install the door arrester. Refer to → Chapter "Door Arrester, Removing and Installing".
- Install the front window frame trim panel. Refer to → Body Interior; Rep. Gr.70; Front Door Trim; Window Frame Trim Removing and Installing.
READ NEXT:
 Overview - Window Regulator
1 - Door
2 - Clip
For the window regulator cable
3 - Lower Double-Bolt
4 - Window Regulator
Removing and installing. Refer to
→ Chapter
Window Regulator Motor, Removing and Installing
Removing
Note
The window regulator motor can be removed or installed with
the motor or door window in any position.
- Remove the front door trim panel. Refer to
→ Body Inter
Inner Window Shaft Strip, Removing and Installing
Removing
- Remove the front window frame trim panel. Refer to
→ Body Interior; Rep. Gr.70; Front Door Trim; Window Frame Trim
Removing and Installing.
- Remove the windSEE MORE:
Adjusting the display
Fig. 6 Center display: adjusting the display
Switching the view
Applies to: Audi virtual cockpit
Press the VIEW button to switch between the
default view 1 and the enhanced view 2.
Adjusting the layout
Applies to: Audi virtual cockpit
Depending on the vehicle equipment, various layouts
may be a
Glossary of tire and loading
terminology
Accessory weight
means the combined weight (in
excess of those standard items
which may be replaced) of automatic
transmission, power steering,
power brakes, power windows,
power seats, radio, and
heater, to the extent that these
items are available as factory-installed
equipment (whether installed
