Audi Q3: Front Center Armrest
Overview - Front Center Armrest
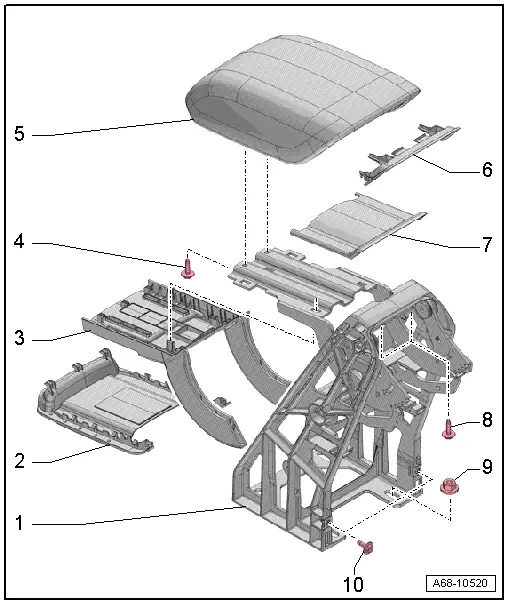
1 - Front Center Armrest
- Removing and installing. Refer to → Chapter "Front Center Armrest, Removing and Installing".
2 - Lower Cover
- For the center armrest cushion
- Engage in the front of the center armrest cushion and press on it until it engages audibly.
3 - Lower Trim Panel
- For the center armrest
- available as a replacement part only with -item 1-
- Clipped in the center armrest
4 - Bolt
- 2.2 Nm
- Quantity: 2
5 - Center Armrest Padding
- Removing and installing. Refer to → Chapter "Center Armrest Upper Section, Removing and Installing".
6 - Rear Cover
- For the center armrest cushion
- available as a replacement part only with -item 5-
- Clipped in the center armrest cushion
7 - Upper Trim Panel
- For the center armrest
- Available as a replacement part only with -item 1-
- Clipped in the center armrest
8 - Bolt
- 3 Nm
- Quantity: 2
9 - Nut
- 10 Nm
- Quantity: 4
10 - Bolt
- 3 Nm
- Quantity: 2
Front Center Armrest, Removing and Installing
Removing
- Move the front seats all the way forward.
- Remove the center console rear cover. Refer to → Chapter "Center Console Rear Trim, Removing and Installing".
- Vehicles with a rear vent: Remove the rear vent air duct. Refer to → Heating, Ventilation, and Air Conditioning; Rep. Gr.87; Air Ducts; Air Distribution Channels, Removing and Installing.
- Versions with Telephone Baseplate -R126-: Disengage the connector from the center armrest and free up the wire.
- Versions with External Audio Source Connection -R199-: disengage the connector on the center armrest and free up the wire.
- Remove the center armrest nuts -1-.
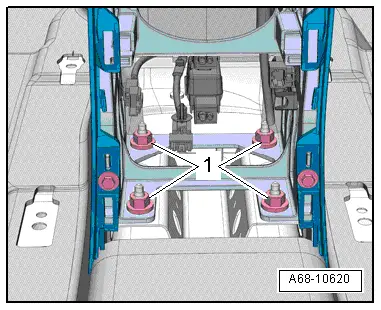
- Remove the bolts -1- and -2-.
- Slightly fold up the center armrest cushion and disengage the center console retaining tabs -B- from the center armrest.
- Push the rear center console on the sides outward from the center armrest by disengaging the center console from the retaining tabs -A-.
- At the same time, tip the center armrest -3- toward the rear at the top to lift it from the threaded pins and remove it to the rear.
Installing
- Insert the center armrest from behind into the center console and onto the threaded pins.
- Make sure that the center armrest and the center console are engaged properly in the retaining tabs -A- and -B-.
Install in reverse order of removal.
Installation notes, for example tightening specifications, replacing components. Refer to → Chapter "Overview - Front Center Armrest".

Center Armrest Upper Section, Removing and Installing
Special tools and workshop equipment required
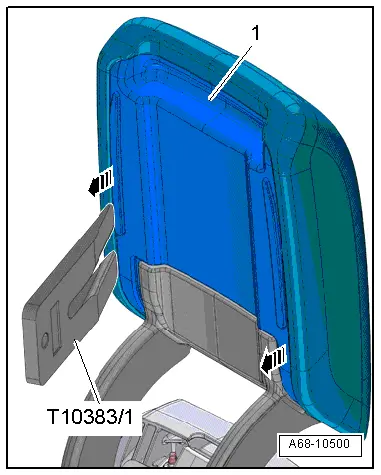
- Wedge Set -T10383-
Removing
- Carefully unclip the cover -1- starting at the sides from the center armrest cushion using the Wedge -T10383/1--arrows-.
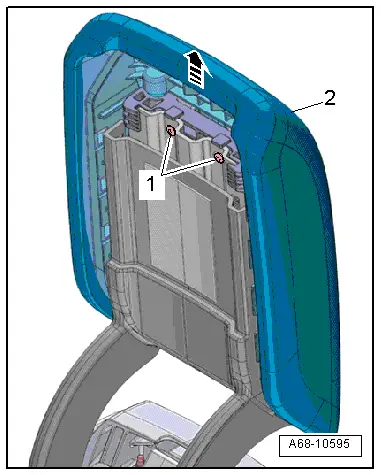
- Remove the screws -1- and remove the center armrest cushion -2- upward from the center armrest -arrow-.
Installing
- Install the center armrest cushion -2- on the center armrest and tighten the screws -1-.
Install in reverse order of removal.
Installation notes, for example tightening specifications, replacing components. Refer to → Chapter "Overview - Front Center Armrest".
READ NEXT:
 Overview - Interior Rearview Mirror
Overview - Interior Rearview Mirror, Version 1
1 - Front Cover
For the mirror base
Removing and installing. Refer to
→ Chapter "Interior Rearview Mirror, Removing and Insta
Interior Rearview Mirror, Removing and Installing
Removing
- Turn interior rearview mirror at the mirror base
-1- counterclockwise
-arrow- as far as the stop and
remove from the retaining plate.
Interior Rearview Mirror without Optional SEE MORE:
Safety belts
General information
Each seat is equipped with a three-point safety
belt. Safety belts that are worn correctly are the
most effective way to reduce the risk of serious or
fatal injuries in a collision. Therefore, wear your
safety belt correctly and make sure that all vehicle
passengers are also wear
Check Valve, Checking
Check valve is removed, refer to
→ Chapter "Check Valve, Removing and Installing".
Note
The check valve is installed directly in front of the vacuum
pump.
Valve must allow air to flow in direction of arrow.
Valve must remain closed in opposite direction.
