Audi Q3: Windshield
Overview - Windshield
 Caution
On vehicles equipped with lane assist, the camera must be recalibrated if the windshield has been replaced. Refer to → Suspension, Wheels, Steering; Rep. Gr.44; Driver Assistance Systems Front Camera; Driver Assistance Systems Front Camera, Calibrating.
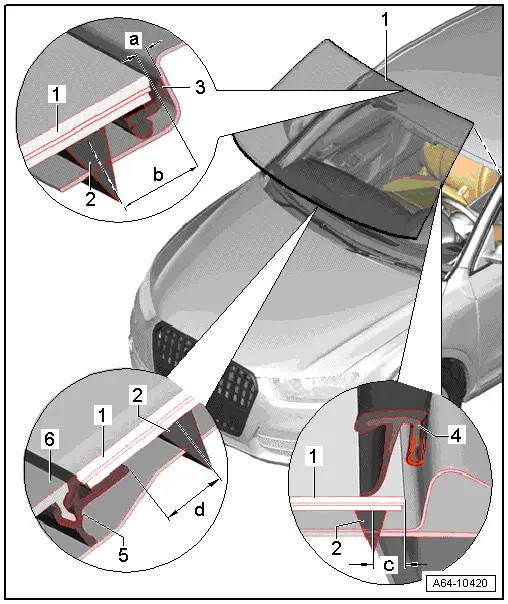
1 - Windshield
- Distance to the roof, dimension -a- = 2 mm
- Align distance at sides.
- There are different versions. When replacing on versions with Driver Assistance Systems Front Camera -R242- determine the version, refer to → Fig. "Allocation of the windshield to the Driver Assistance Systems Front Camera -R242-."; allocation. Refer to the Parts Catalog .
2 - Adhesive Bead
- Applying adhesive. Refer to → Chapter "New Window Glass, Preparing for Installation"
- Observe the minimum curing time. Refer to → Chapter "Minimum Curing Time for Bonded Windows".
- Distances measured from the window edge to the center of the bead of adhesive:
- Dimension -b- = 17 mm +- 2 mm
- Dimension -c- = 8 mm+- 2 mm
- Dimension -d- = 12 mm+- 2 mm
3 - Gap Cover
- No replacement part
4 - Drip Rail
- Removing and installing. Refer to → Chapter "Drip Rail, Removing and Installing".
5 - Plenum Chamber Cover Frame
- No replacement part
- With a new window, protective piping must first be removed before installing plenum chamber cover.
6 - Plenum Chamber Cover
- Press into retaining strip only after window adhesive minimum curing time is complete (3 hours).
Allocation of the windshield to the Driver Assistance Systems Front Camera -R242-.
Before ordering a new windshield on vehicle version with a Driver Assistance Systems Front Camera -R242- the version must be determined.
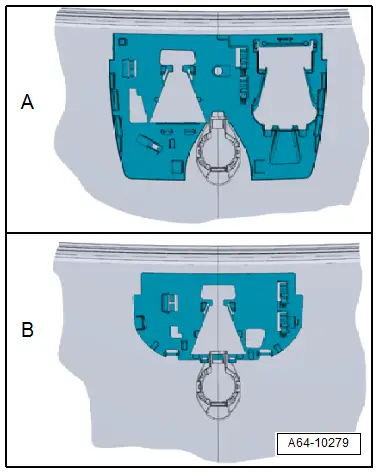
- Retaining plate for the Driver Assistance Systems Front Camera -R242- older version ⇒ windshield older version allocation
- Retaining plate for the Driver Assistance Systems Front Camera -R242- newer version ⇒ windshield newer version allocation
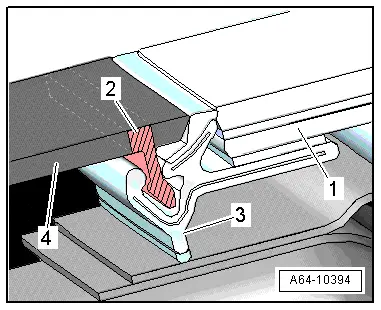
Protective Piping, Removing
- With a new windshield -1-, protective piping -2- must be removed from clamping strip -3- before installing the plenum chamber cover -4-.
Windshield, Removing and Installing
- Remove the windshield wiper arms. Refer to → Electrical Equipment; Rep. Gr.92; Windshield Wiper System; Wiper Arms, Removing and Installing.
- Remove the plenum chamber cover. Refer to → Chapter "Plenum Chamber Cover, Removing and Installing".
- Remove the left and right sun visor. Refer to → Body Interior; Rep. Gr.68; Equipment; Sun Visor, Removing and Installing.
- Remove the interior rearview mirror. Refer to → Body Interior; Rep. Gr.68; Interior Rearview Mirror; Interior Rearview Mirror, Removing and Installing.
- Remove the A-pillar upper left and right trim. Refer to → Body Interior; Rep. Gr.70; Passenger Compartment Trim; A-Pillar Trim, Removing and Installing.
 WARNING
Always wear protective eyewear and leather gloves when removing a window glass.
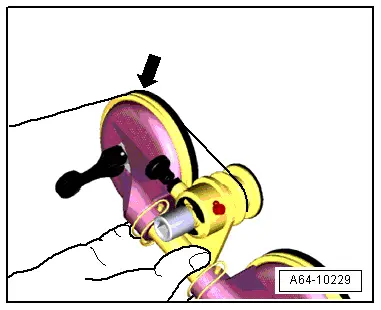
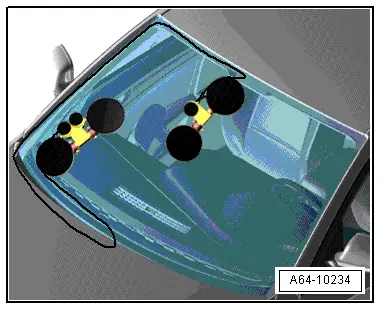
- Unroll with the Cutting Tool for Bonded Windows - Wire Reel -VAS6452/1- approximately 6.5 meters of cutting wire (approximately six turns) and cut it.
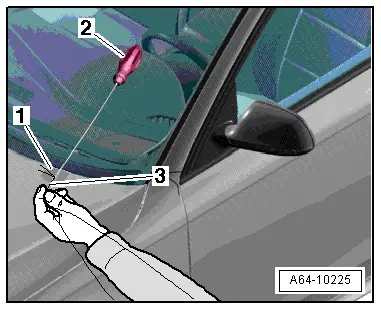
- Cover the awl outlet under the body flange with tape -1- to prevent damaging it.
- Poke the awl through the bead of adhesive from the inside to the outside as illustrated.
- Feed both cutting wire ends -3- into the awl -2- and pull it in.
- Place the cutting wire all the way around under the windshield as illustrated.
 Caution
The ends of the wire must not be twisted when cutting through the adhesive -arrow-.
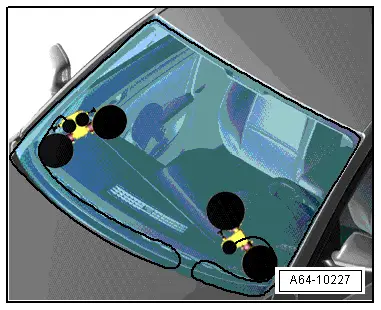
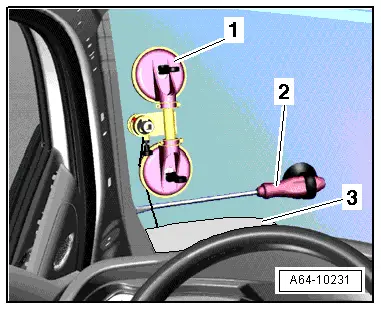
- Mount both reel devices on the inside of the windshield as illustrated.
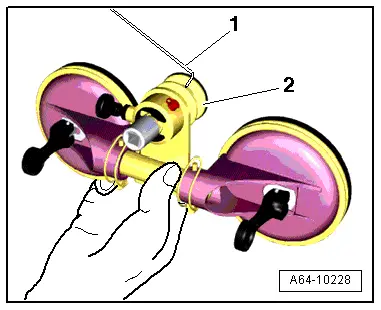
- Insert the ends of the cutting wire -1- into the reel device -2-
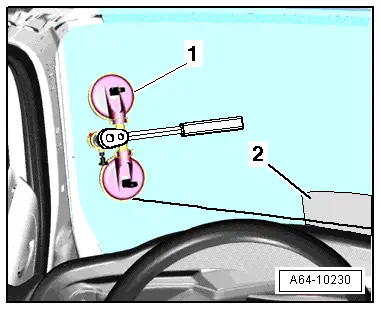
- Tension the cutting wire and place the protective foil -2- between the instrument panel and the wire
- Cut the first section open, while doing this, the wire is guided into the integrated roller -arrow- on the reel device.
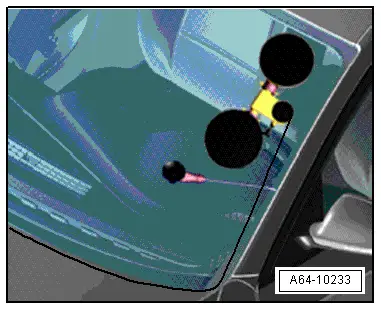
- Insert an additional guide awl -2- into the adhesive and secure it to the windshield with the suction cup as illustrated to make sure that the wire runs as close to the windshield as possible.
- If necessary, move the protective film -3- along with the wire and cut the windshield free with the reel device -1-.
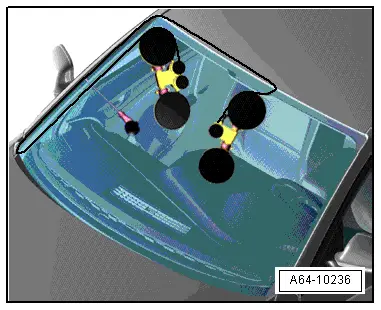
- Move the reel device and the guide awl as illustrated and cut free the section along the "A-pillar".
- Moved the reel device and guide awl approximately to the center of the windshield.
- Cut free the windshield up to about the center.
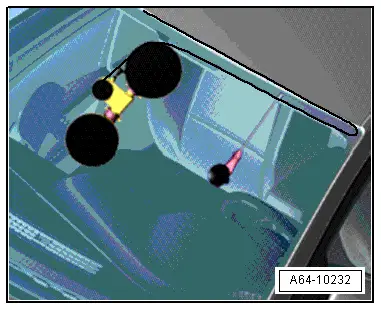
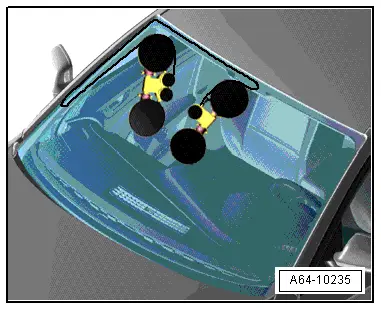
- Cut free the bottom of the windshield with the second reel device.
- Move the reel device upward and insert the guide awl as illustrated.
- Cut the windshield free moving upward along the "A-pillar".
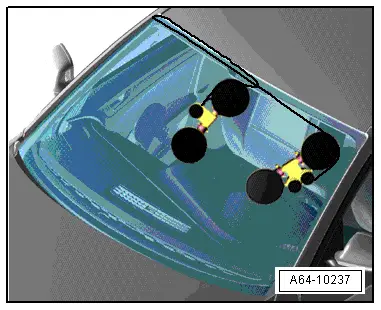
- Move the reel device over the center of the windshield and over the first reel device as illustrated and cut free the rest of the windshield along the top.
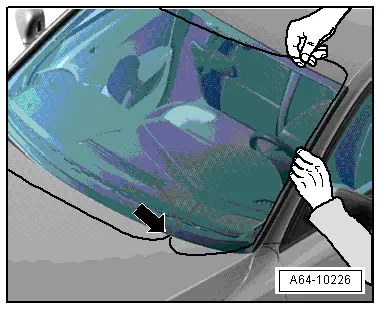
- Remove the windshield from the vehicle with the suction cups.
Installing
- Installing. Refer to → Chapter "Bonded Window Glass Installation Instructions".
- Prepare the undamaged window for installing. Refer to → Chapter "Undamaged Window Glass, Preparing for Installation".
- Prepare the new window for installation. Refer to → Chapter "New Window Glass, Preparing for Installation".
- Prepare the body flange for installation. Refer to → Chapter "Body Flange, Preparing for Installation".
- Place the windshield in the window opening using suction lifters and align on the sides.
- Distance from the window edge to the roof frame. Refer to -item 1-.
- Secure the window to the top of the roof with adhesive tape.
- Before installing plenum chamber cover, first remove protective profile -2- from the frame.
- Observe the minimum curing time. Refer to → Chapter "Minimum Curing Time for Bonded Windows".
 Note
Note
For new windshield before installing the plenum chamber cover protective piping must be removed from the retaining strip on the lower window edge → Fig. "Protective Piping, Removing".
READ NEXT:
 Side Windows
Overview - Rear Side Window
1 - Side Window
Pull or unclip the roof trim molding in the area of the side window
from the clip.
Window glass removing and installing. Refer to
→
Rear Window
Overview - Rear Window
Note
There may be connections in the rear window delivery package
that are only necessary for some optional equipment.
Remove any unnecessary cable ends direct
Door Windows
Overview - Front Door Window
1 - Door Window
Removing and installing. Refer to
→ Chapter "Front Door Window, Removing and Installing".
2 - Door
3 - DrSEE MORE:
Fastening and unfastening safety belts
Fig. 60 Belt buckle and belt latch
Fig. 61 Releasing the belt buckle from the belt latch
Fastening the safety belt
Pull the safety belt by the belt buckle evenly
across your chest and lap.
Insert the belt buckle in the belt latch belonging
to the seat until it audibly engages
fig. 60.
Pull
Overview - Rear Lid
Overview - Rear Lid
1 - Rear Lid
Removing and installing. Refer to
→ Chapter "Rear Lid, Removing and Installing".
Rear Lid Seal, Removing and Installing. Refer to
→ Chapter "Rear Lid Seal, Removing and Installing".
2 - Bolt
12 Nm
3 - 