Audi Q3: Window Regulator Motor, Removing and Installing
Removing
 Note
Note
The window regulator motor can be removed or installed with the motor or door window in any position.
- Remove the rear door trim panel. Refer to → Body Interior; Rep. Gr.70; Rear Door Trim Panels; Rear Door Trim Panel, Removing and Installing.
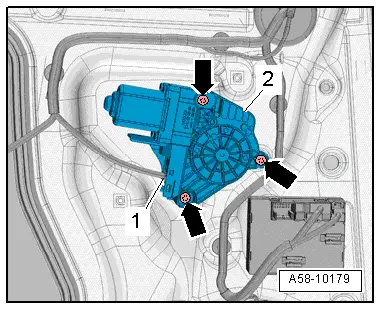
- Disconnect the connector -1-.
- Remove the bolts -arrows- and remove the window regulator motor -2- from the window regulator.
Installing
Install in reverse order of removal. Note the following:
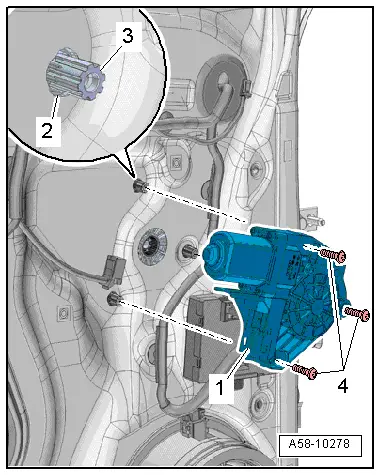
- The clips -2- for the window regulator motor threaded connection -3- must be engaged in the inner door panel.
- Slide the window regulator motor -1- onto the threaded pins and tighten the bolts -4-.
- Install the rear door trim panel. Refer to → Body Interior; Rep. Gr.70; Rear Door Trim Panels; Rear Door Trim Panel, Removing and Installing.
Window Regulator, Removing and Installing
Removing
- Remove the window regulator motor. Refer to → Chapter "Window Regulator Motor, Removing and Installing".
- Remove the door window. Refer to → Chapter "Rear Door Window, Removing and Installing".
- Remove the bass speaker. Refer to → Communication; Rep. Gr.91; Component Location Overview - Sound System.
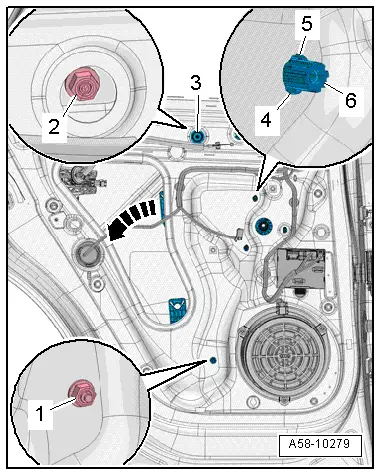
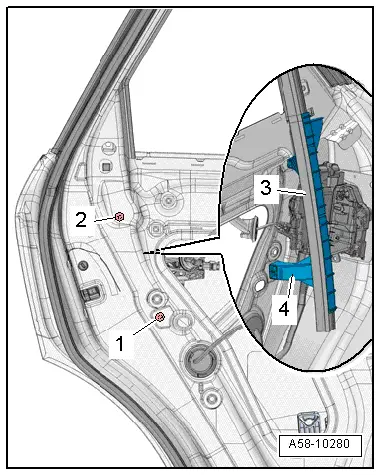
- Open the clips -4 and 5- on the threaded pin -6- for the window regulator using an 11 mm socket. To do this, place the socket on the threaded pins.
- Remove the plug -3-.
- Loosen the nut -2- three turns.
- Remove the nut -1-.
- Guide the window regulator back out of the opening -arrow-.
Installing
Install in reverse order of removal. Note the following:
- The clips for the window regulator threaded pins must be latched into the inner door panel.
- Install the bass speaker. Refer to → Communication; Rep. Gr.91; Sound System; Component Location Overview - Sound System.
- Install the door window. Refer to → Chapter "Rear Door Window, Removing and Installing".
- Install window regulator motor. Refer to → Chapter "Window Regulator Motor, Removing and Installing".
Window Guide, Removing and Installing
Window Guide, Removing and Installing
Removing
- Remove the rear window frame trim panel. Refer to → Body Interior; Rep. Gr.70; Front Door Trim; Window Frame Trim Removing and Installing.
- Remove the rear door window. Refer to → Chapter "Rear Door Window, Removing and Installing".
- Remove the C-pillar door trim. Refer to → Chapter "C-Pillar Door Trim, Removing and Installing".
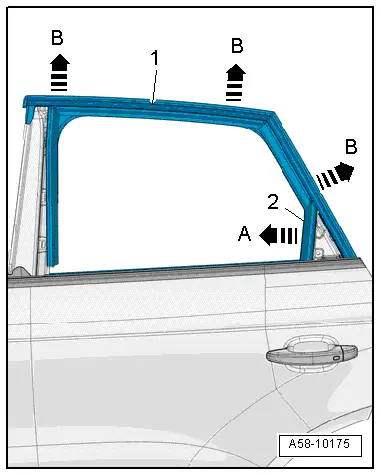
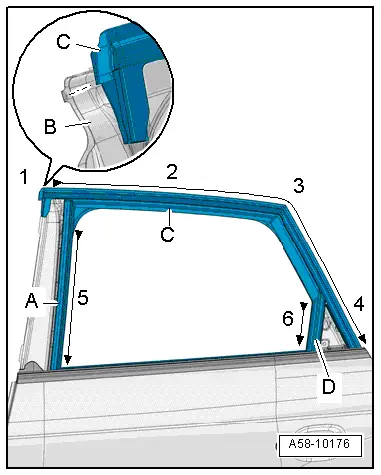
- Remove the seal -2- form the guide rail -arrow A-.
- Remove the window guide -1- upward -B arrows-.
Installing
Install in reverse order of removal. Note the following:
- Attach the window guide to the door flange in sequence -1 through 6-, as illustrated.
- Position the upper edge of the window guide -C- on the B-pillar door flange -B-.
- Slide the window guide rearward.
- Place the upper window guide on the C-pillar edge.
- Press the window guide working down on the door flange.
- Align the window guide on the B-pillar guide rail and place the seal -A- in the guide rail.
- Align the window guide on the C-pillar guide rail and place the seal -D- in the guide rail.
- Install the C-pillar triangular trim. Refer to → Chapter "C-Pillar Door Trim, Removing and Installing".
- Install the rear window frame trim panel. Refer to → Body Interior; Rep. Gr.70; Front Door Trim; Window Frame Trim Removing and Installing.
- Install the rear door window. Refer to → Chapter "Rear Door Window, Removing and Installing".
Door Window Guide Rail, Removing and Installing
Removing
- Move the door window into the "closed" position.
- Remove the door inner cover. Refer to → Chapter "Door Inner Cover, Removing and Installing".
- Remove the door window seal -3- from the guide rail -4-.
- Remove the bolts -1 and 2-.
- Remove the guide rail.
Installing
Install in reverse order of removal. Note the following:
- Install the door inner cover. Refer to → Chapter "Door Inner Cover, Removing and Installing".
READ NEXT:
 Inner Window Shaft Strip, Removing and Installing
Removing
- Remove the rear window frame trim panel. Refer to
→ Body Interior; Rep. Gr.70; Rear Door Trim Panels; Window Frame
Trim Panel, Removing and Installing.
- Rem
Door Handle, Removing and Installing
Housing, Removing and Installing
Removing
- Remove the sealing plugs.
- Remove the clamping screw -3-
until it stops using a screwdriver -4-.
- Press the housing retaining brack
Door Lock, Removing and Installing
Door Lock, Removing and Installing
Caution
There is a risk of malfunctions.
The door lock must be removed and installed together
with the bracket to prevent over-bending the cable when
SEE MORE:
Audi drive select
Introduction
Applies to: vehicles with Audi drive select
Drive select makes it possible to experience different
types of vehicle characteristics in one vehicle.
With different driving modes, the driver can
switch the setting, for example from sporty to
comfortable. This allows you to adjust the set
Tires, Mounting, Run-Flat Tires
Caution
It is mandatory for run-flat tires to have a tire
pressure monitoring system in the vehicle.
- Coat rim flanges, tire beads and inside of upper tire beads
thoroughly with tire mounting paste.
WARNING
The minimum mounting temperature for a tire may not
be be
