Audi Q3: Inner Window Shaft Strip, Removing and Installing
Removing
- Remove the rear window frame trim panel. Refer to → Body Interior; Rep. Gr.70; Rear Door Trim Panels; Window Frame Trim Panel, Removing and Installing.
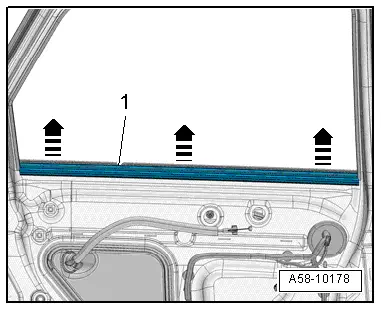
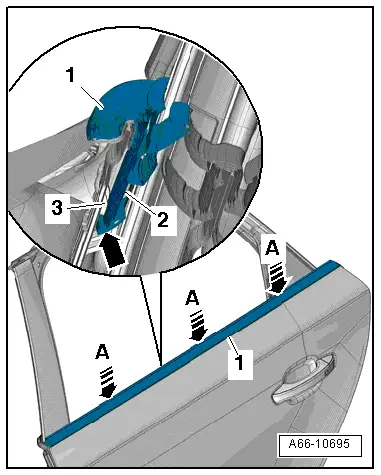
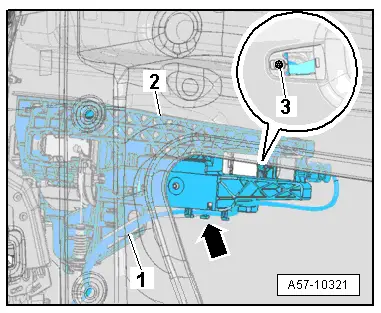
- Remove the window shaft strip -1- upward -arrows-.
Installing
Install in reverse order of removal. Note the following:
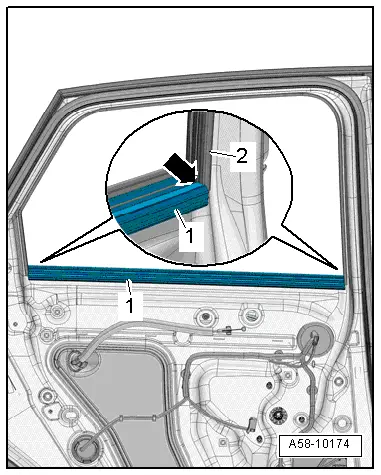
- Place the inner window shaft strip -1- on both ends on the window guide -2--arrow- and press to the center of the door fold.
- Install the rear window frame trim panel. Refer to → Body Interior; Rep. Gr.70; Front Door Trim; Window Frame Trim Removing and Installing.
Outer Window Shaft Strip, Removing and Installing
Special tools and workshop equipment required
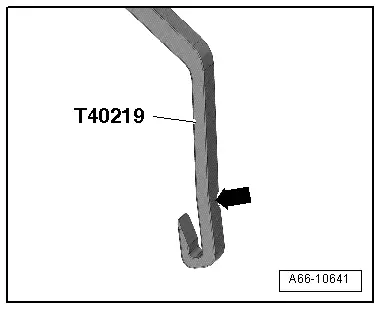
- Window Slot Seal Tool -T40219-
Window Slot Seal Tool -T40219- preparing:
- To remove the window shaft strip, pull the Window Slot Seal Tool -T40219- carefully at the marked location -arrow- so that it can be inserted behind the strip.
Removing
- Remove the rear door window. Refer to → Chapter "Rear Door Window, Removing and Installing".
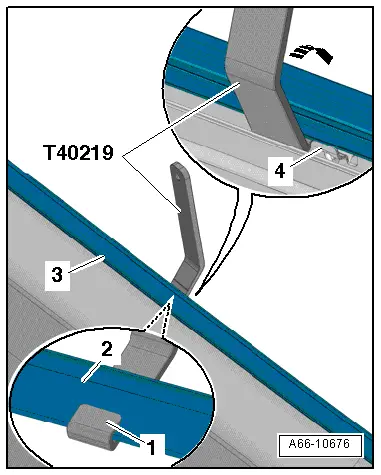
- Insert the Window Slot Seal Tool -T40219- next to the guide-4- for the window shaft strip -3- and hold it on the strip -2-.
- The front section -1- of the Window Slot Seal Tool -T40219- must be positioned as illustrated.
- Push the Window Slot Seal Tool -T40219- gently in direction of -arrow- to release it.
- The retaining strip must audibly unlock.
- Remove the window shaft strip upward from the door flange using the Window Slot Seal Tool -T40219-.
- Remove the window shaft strip.
Installing
Install in reverse order of removal. Note the following:
 Note
Note
When installing, the lower edge of the window shaft strip can be coated with tire mounting paste.
- Position the window shaft strip -1- on the B-pillar trim on the door fold and press on it evenly -arrows A-. When doing this, the strip -2- must audibly engage.
- The retaining strip must fit -arrow- under the retaining plate -3-.
- Install the rear door window. Refer to → Chapter "Rear Door Window, Removing and Installing".
Door Inner Cover, Removing and Installing
Special tools and workshop equipment required
- Wedge Set -T10383-
Removing
- Remove the door trim panel. Refer to → Body Interior; Rep. Gr.70; Rear Door Trim Panels; Rear Door Trim Panel, Removing and Installing.
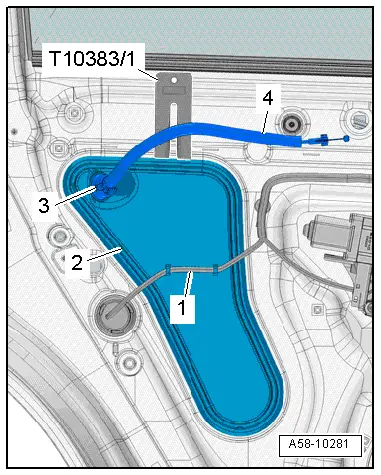
- Free up the wiring harness -1-.
- Remove the cover -2- using the Wedge Set -T10383/1- from the inner door panel.
- Disengage the grommet -3- for the cable -4- for the interior door mechanism from the inner door trim.
Installing
Install in reverse order of removal. Note the following:
- Push in the interior door trim until it engages audibly.
- Interior door trim must be installed flush.
- Install the door trim panel. Refer to → Body Interior; Rep. Gr.70; Rear Door Trim Panels; Rear Door Trim Panel, Removing and Installing.
Catch, Removing and Installing
Removing
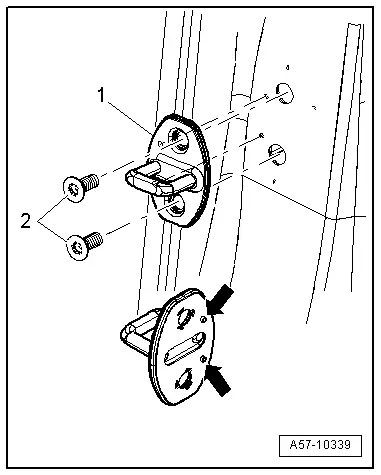
- Remove the bolts -2- and the catch -1-.
Installing
Install in reverse order of removal. Note the following:
- Adjust the catch. Refer to → Chapter "Door, Adjusting".
Bracket, Removing and Installing
 Caution
There is a risk of malfunctions.
The door lock must be removed and installed together with the bracket to prevent over-bending the cable when disengaging and engaging it.
The cable must be disconnected from/attached to the lever on the door lock outside of the door.
Special tools and workshop equipment required
- Pry Lever -80 - 200-
Removing
- Remove the door inner cover. Refer to → Chapter "Door Inner Cover, Removing and Installing".
- Remove the door window guide rail. Refer to → Chapter "Door Window Guide Rail, Removing and Installing".
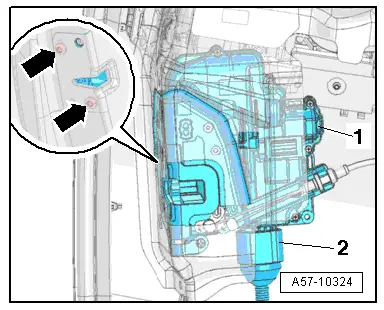
- Disconnect the connector -2-.
- Remove the bolts -arrows- from the door lock.
- Remove the outside door handle. Refer to → Chapter "Door Handle, Removing and Installing".
- Remove the bolt -3- and the mounting bracket -2-.
- Push the bracket and door lock downward and remove at eh same time from the door.
- Disengage the operating cable from the operating lever on the door lock.
Installing
Install in reverse order of removal. Note the following:
- The bracket and the door lock are still removed.
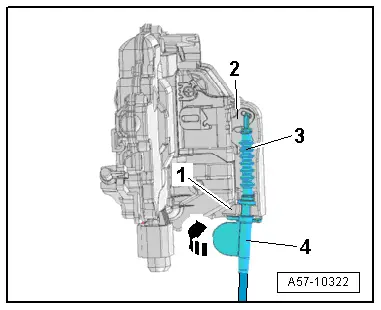
- Engage the operating cable -3- in the door lock operating lever -2-.
- Insert the operating cable in the cable bracket -1- and rotate the lever -4- 90º -arrow-.
- The lever must engage audibly with the locking tab on the cable bracket.
- Install the exterior door handle and the bracket together. Refer to → Chapter "Door Lock, Removing and Installing".
READ NEXT:
 Door Handle, Removing and Installing
Housing, Removing and Installing
Removing
- Remove the sealing plugs.
- Remove the clamping screw -3-
until it stops using a screwdriver -4-.
- Press the housing retaining brack
Door Lock, Removing and Installing
Door Lock, Removing and Installing
Caution
There is a risk of malfunctions.
The door lock must be removed and installed together
with the bracket to prevent over-bending the cable when SEE MORE:
Tachometer
The tachometer 2 displays the engine
speed in revolutions per minute (RPM). The beginning
of the red zone in the tachometer indicates
the maximum permissible engine speed for
all gears once the engine has been broken in. Before
reaching the red zone, you should shift into
the next higher gear, selec
Legal information
General information
Information on the software licenses can be
found online at www.audi.com/softwareinfo.
Multi Media Interface
Applies to: MMI: Select on the home screen:
SETTINGS > General.
Legal notes
Possible options:
Software information
About Audi connect
Smartphone interface
Appli