Audi Q3: Voltage Regulator, Valeo Generator from 2001, Removing and Installing
Removing
- Remove the generator. Refer to → Electrical Equipment; Rep. Gr.27; Generator; Generator, Removing and Installing.
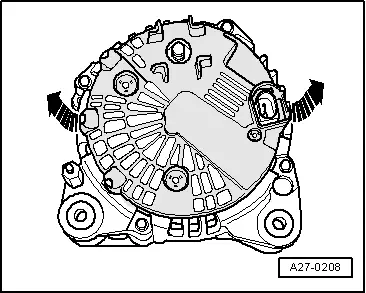
- Press the cover on the rear side of the generator off of the threaded pins -arrows-.
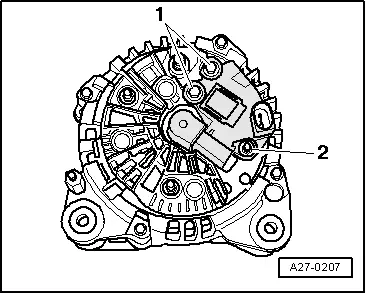
- Remove the bolts -1- and the double bolt -2-.
- Remove voltage regulator.
Installing
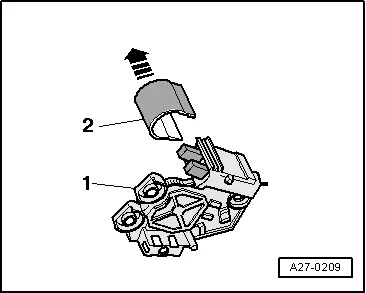
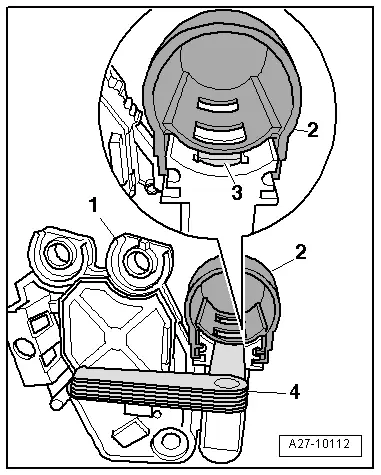
- Press the protective cap -2- off of the voltage regulator -1- in direction of -arrow-.
- When installing the voltage regulator, make sure the carbon brushes rest correctly on the slip rings.
- Install the protective cap with the voltage regulator installed.
Install in reverse order of removal, observing the following:
- Install the generator. Refer to → Electrical Equipment; Rep. Gr.27; Generator; Generator, Removing and Installing.
Carbon Brushes, Valeo Generator from 2001, Checking
Procedure
- Remove voltage regulator. Refer to → Chapter "Voltage Regulator, Valeo Generator from 2001, Removing and Installing".
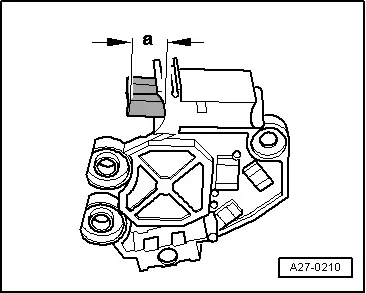
- Check the length -a- of the carbon brushes.
- Wear limit: -a- = 5 mm.
- Install the voltage regulator. Refer to → Chapter "Voltage Regulator, Valeo Generator from 2001, Removing and Installing".
Voltage Regulator, Removing and Installing, Valeo Generator from 2007
Special tools and workshop equipment required
- Feeler gauge 0.3 mm
Removing
- Remove the generator. Refer to → Electrical Equipment; Rep. Gr.27; Generator; Generator, Removing and Installing.
- Press the cover on the rear side of the generator off of the threaded pins -arrows-.

- Remove the bolts -1- and the double bolt -2-.
- Remove voltage regulator.

Installing
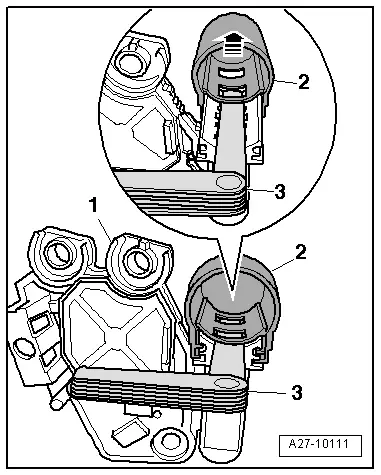
- Push a feeler gauge 0.3 mm -4- between the protective cap -2- and the carbon brushes -3-.
- Pull the protective cap off until the bar of the protective cap presses the carbon brushes down.
- After installation of the voltage regulator, press the protective cap all the way on.
Install in reverse order of removal, observing the following:
- Install the generator. Refer to → Electrical Equipment; Rep. Gr.27; Generator; Generator, Removing and Installing.
Carbon Brushes, Checking, Valeo Generator from 2007
Special tools and workshop equipment required
- Feeler gauge 0.3 mm
Procedure
- Remove voltage regulator. Refer to → Chapter "Voltage Regulator, Removing and Installing, Valeo Generator from 2007".
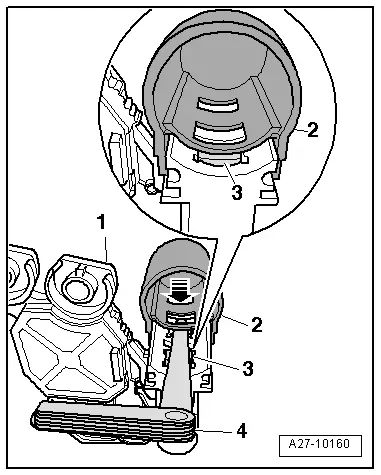
- Push a feeler gauge 0.3 mm -3- between the protective cap -2- and the carbon brushes.
- Remove the protective cap from voltage regulator -1--arrow-.
- Check the length -a- of the carbon brushes.
- Wear limit: -a- = 5 mm.

- With protective cap -2- installed, use feeler gauge -4- to press carbon brushes -3- down.
- Push the protective cap off -arrow- until the bar of the protective cap presses the carbon brushes down.
- Install the voltage regulator. Refer to → Chapter "Voltage Regulator, Removing and Installing, Valeo Generator from 2007".
READ NEXT:
 Ribbed Belt Pulley without Freewheel, Removing and Installing
Special tools and workshop equipment
required
Generator Belt Socket -3310-
Inner hex socket 8 mm or TORX
T50
Removing
- Remove the generator if necessary. Refer to
→ Electri
Windshield Wiper/Washer System
Washer Fluid Hoses
Washer Fluid Line Hose Connections, Disconnecting and Connecting
Various hose couplings are used to connect the hoses to the
washer fluid pumps and spray jets or as coupling poi
Exterior Lights, Switches
HID Headlamp Usage and Safety Precautions
Never replace bulbs if you are not familiar with the
procedures, safety precautions and tools.
WARNING
Danger to life due to high voltage.
SEE MORE:
Bumper Cover Lower Section, Removing and Installing, Audi Q3
Removing
- Remove the front bumper cover. Refer to
→ Chapter "Bumper Cover, Removing and Installing".
- Remove the front bumper cover end plate. Refer to
→ Chapter "Front Bumper Cover End Plate, Removing and
Installing".
- If equipped, disconnect the connector
Midrange Speaker Trim, Removing and Installing
Special tools and workshop equipment
required
Wedge Set -T10383-
Removing
- Pry out the speaker trim -1-
along the door trim seam -arrow-
using the Wedge -T10383/1- and remove it.
Installing
Install in reverse order of removal.
Installation notes, for example tightening specifi