Bumper Cover Lower Section, Removing and Installing, Audi Q3
Removing
- Remove the front bumper cover. Refer to → Chapter "Bumper Cover, Removing and Installing".
- Remove the front bumper cover end plate. Refer to → Chapter "Front Bumper Cover End Plate, Removing and Installing".
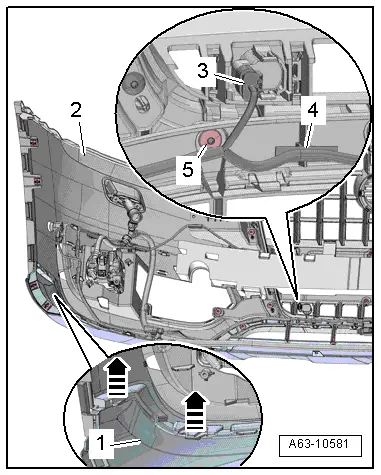
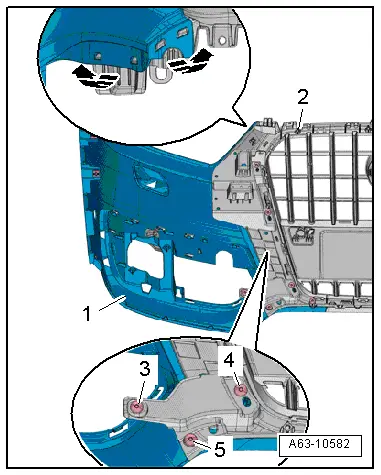
- If equipped, disconnect the connector -3- on the parking aid sensor and disengage the wiring harness -4-.
- Remove the bolts -5-.
- Open the tab -arrows- and remove the bumper cover lower section -1- rearward from the bumper cover -2-.
Installing
Install in reverse order of removal. Note the following:
- Install the front bumper cover end plate. Refer to → Chapter "Front Bumper Cover End Plate, Removing and Installing".
- Install the front bumper cover. Refer to → Chapter "Bumper Cover, Removing and Installing".
Bumper Cover Lower Section, Removing and Installing, Audi Q3 Offraod
Removing
- Remove the air intake grille. Refer to → Chapter "Air Intake Grille, Removing and Installing, Vehicles through MY 2014".
- Remove the center grill. Refer to → Chapter "Center Grille. Removing and Installing, Audi Q3 Offroad".
- Remove the molded foam part. Refer to → Chapter "Molded Foam Part, Removing and Installing, Audi Q3 through MY 2014".
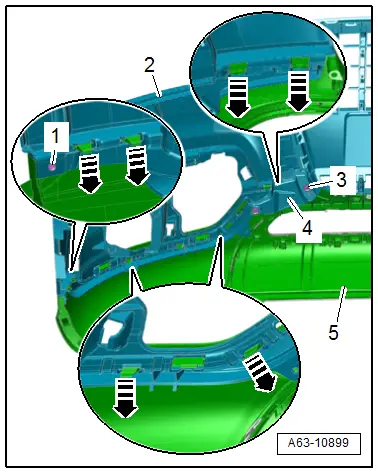
- Remove the bolts -1 and 3-.
- Release the catch -arrows- and remove the bumper cover lower section -5- forward from the bumper cover -2- and from the radiator grille -4-.
Installing
Install in reverse order of removal. Note the following:
- Install the center grille. Refer to → Chapter "Center Grille. Removing and Installing, Audi Q3 Offroad".
Bumper Cover Lower Section, Removing and Installing, Audi Q3 from MY 2015
Removing
- Remove the center grill. Refer to → Chapter "Center Grille, Removing and Installing, Audi Q3 from MY 2015".
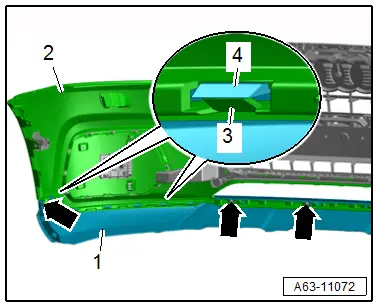
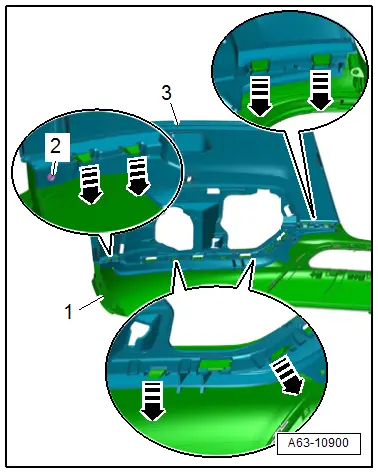
- Remove the bolts -arrows-.
- Lift the securing tab -3- and release the tab -4-.
- Remove the bumper cover lower section -1- forward from the bumper cover -2-.
Installing
Install in reverse order of removal.
Bumper Cover Center Part, Removing and Installing
Removing
- Remove the lower section of the bumper cover. Refer to → Chapter "Bumper Cover Lower Section, Removing and Installing, Audi Q3".
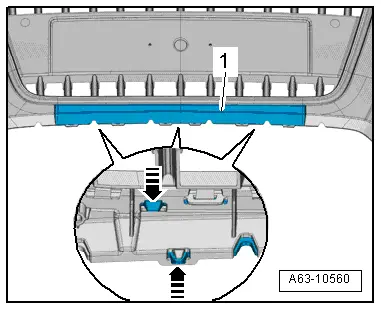
- Open the tab -arrows- and remove the bumper cover center part -1- forward.
Installing
Install in reverse order of removal. Note the following:
- Install the bumper cover lower section. Refer to → Chapter "Bumper Cover Lower Section, Removing and Installing, Audi Q3".
Bumper Cover Outer Panel, Removing and Installing, Audi Q3
Removing
- Remove the bumper cover center part. Refer to → Chapter "Bumper Cover Center Part, Removing and Installing".
- Remove the bolts -3, 4 and 5-.
- Disengage the upper bumper cover outer panel -1- in the area of the radiator grille -2--arrows- and remove.
- If the bumper cover is replaced:
- Remove the fog lamp. Refer to → Electrical Equipment; Rep. Gr.94; Fog Lamp; Fog Lamp Removing and Installing.
- Remove the headlamp washer system spray nozzles. Refer to → Electrical Equipment; Rep. Gr.92; Headlamp Washer System; Spray Nozzles, Removing and Installing.
- Remove the air intake grille trim. Refer to → Chapter "Air Intake Grille Trim, Removing and Installing".
Installing
Install in reverse order of removal. Note the following:
- Install the bumper cover center part. Refer to → Chapter "Bumper Cover Center Part, Removing and Installing".
Bumper Cover Outer Panel, Removing and Installing, Audi Q3 Offraod
Removing
- Remove the air intake grille. Refer to → Chapter "Air Intake Grille, Removing and Installing, Vehicles through MY 2014".
- Remove the radiator grille. Refer to → Chapter "Radiator Grille, Removing and Installing, Audi Q3 Offroad/S-line".
- Remove the bolt -2-.
- Release the striker pin and remove the bumper cover outer panel -3- rearward from the bumper cover lower section -1-.
- If the bumper cover is replaced:
- Remove the fog lamp. Refer to → Electrical Equipment; Rep. Gr.94; Fog Lamp; Fog Lamp Removing and Installing.
- Remove the headlamp washer system spray nozzles. Refer to → Electrical Equipment; Rep. Gr.92; Headlamp Washer System; Spray Nozzles, Removing and Installing.
Installing
Install in reverse order of removal. Note the following:
- Install the radiator grille. Refer to → Chapter "Radiator Grille, Removing and Installing, Audi Q3 Offroad/S-line".
- Install air intake grille. Refer to → Chapter "Air Intake Grille, Removing and Installing, Vehicles through MY 2014".
READ NEXT:
 Molded Foam Part, Removing and Installing, Audi Q3 through MY 2014
Removing
- Remove the front bumper cover. Refer to
→ Chapter "Bumper Cover, Removing and Installing".
- Guide the molded foam piece -2-
at the top out of the bracket -arrow-
a
Air Intake Grille Trim, Removing and Installing
Removing
- Remove the air intake grille. Refer to
→ Chapter "Air Intake Grille, Removing and Installing, Vehicles
through MY 2014".
- Remove the front bumper cover. Refer to
â
Side Air Intake Trim, Removing and Installing, Audi RS Q3 through MY 2014
Removing
- Left: remove the front bumper cover. Refer to
→ Chapter "Bumper Cover, Removing and Installing".
- Right: remove the front wheel housing liner and wheel
spoiler. ReferSEE MORE:
Luggage compartment lid
General information
WARNING
Applies to: vehicles with anti-theft alarm
system: When the vehicle is locked from the
outside, no one, especially children, should
remain in the vehicle, because the windows
can no longer open from the inside. Locked
doors make it more difficult for emergency
wor
Ignition key
Applies to: vehicles with ignition lock
Fig. 80 Steering column: ignition lock
Starting the engine
Press the brake pedal.
Insert the ignition key into the ignition lock.
Turn the key briefly to position 2. The ignition
key automatically returns to position 1. Do not
press the accelerator peda