Audi Q3: Spoiler
Overview - Spoiler
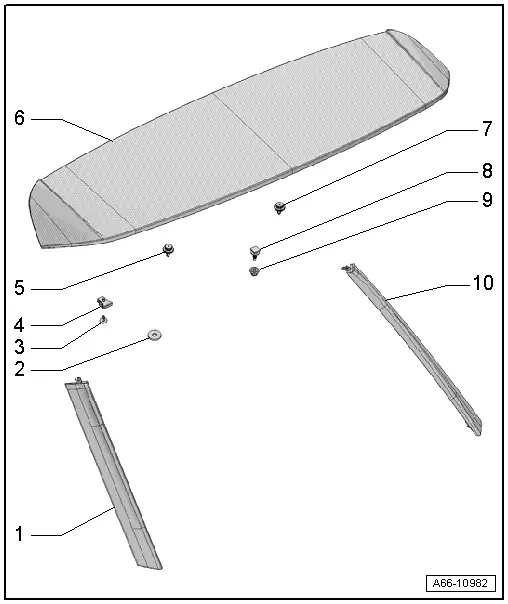
1 - Left Spoiler
- Removing and installing. Refer to → Chapter "Rear Window Spoiler, Removing and Installing".
2 - Clip
- With foam seal
- Quantity: 3
- There are different versions. Refer to the Parts Catalog.
3 - Bolt
- 2.5 Nm
- Quantity: 2
4 - Metal Nut
- Quantity: 2
5 - Clip
- With foam seal
- Quantity: 2
- There are different versions. Refer to the Parts Catalog.
6 - Spoiler on Roof Edge
- Removing and installing. Refer to → Chapter "Roof Edge Spoiler, Removing and Installing".
7 - Clip
8 - Threaded Pin
- Quantity: 2
9 - Nut
- 4 Nm
- Quantity: 2
10 - Right Spoiler
- Removing and installing. Refer to → Chapter "Rear Window Spoiler, Removing and Installing".
Spoiler, Removing and Installing
Rear Window Spoiler, Removing and Installing
Special tools and workshop equipment required
- Roller -3356-
- Hot Air Blower VAG1416 -VAG1416-
- Wedge Set -T10383-
- Cleaning Solution -D 009 401 04-
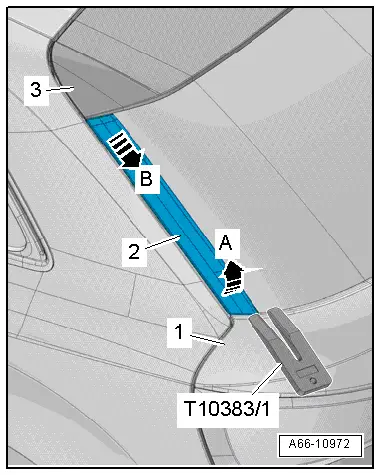
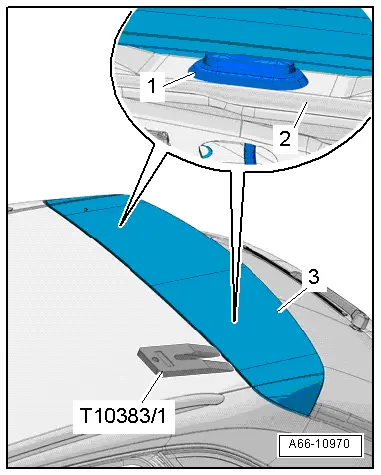
Removing
- Carefully warm the spoiler -2- using the Hot Air Blower -VAS1978/14A-.
- Pry up the spoiler using the Trim Removal Wedge -3409- from the rear lid -1--arrow A- and remove downward from the spoiler on the edge of the roof -3--arrow B-.
- Remove the spoiler.
Installing
Install in reverse order of removal. Note the following:
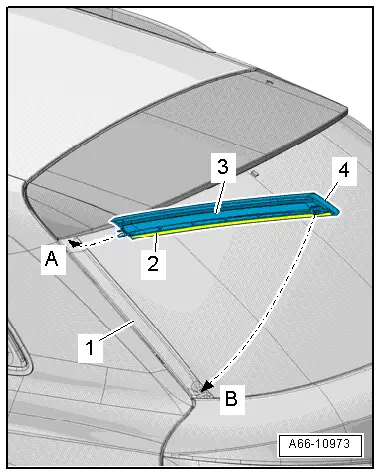
- Check the foam seal -2- for damage.
- Clean the adhesive surface of the spoiler using Cleaning Solution -D 009 401 04-.
- Remove the protective film from the adhesive tape -3-.
- Place the spoiler -4- on the spoiler on the edge of the roof -arrow A- and push in the rear lid -1- until it engages audibly -arrow B-.
- Push in the spoiler along the entire length using the roller -3356-.
Roof Edge Spoiler, Removing and Installing
Special tools and workshop equipment required
- Roller -3356-
- Hot Air Blower VAG1416 -VAG1416-
- Wedge Set -T10383-
- Cleaning Solution -D 009 401 04-
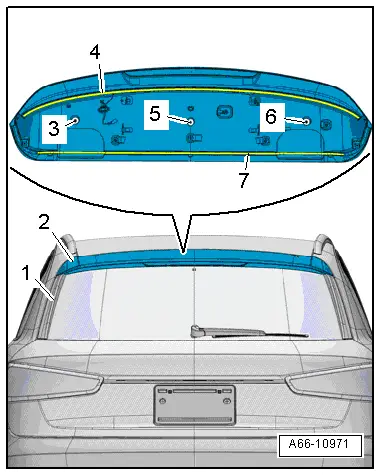
Removing
- Remove the rear lid upper trim panel. Refer to → Body Interior; Rep. Gr.70; Luggage Compartment Trim Panels; Rear Lid Upper Trim Panel, Removing and Installing
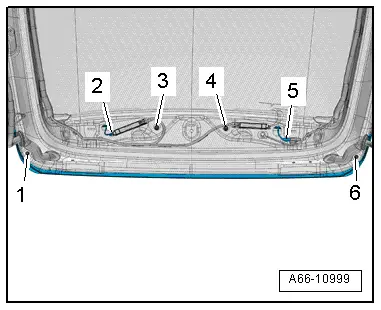
- Disconnect the connectors -2 and 5-.
- Remove the nuts -3 and 4- and bolts -1 and 6-.
- Carefully warm the spoiler on the edge of the roof -3- in the front area using the Hot Air Blower -VAS1978/14A-.
- Pry the spoiler on the edge of the roof using the Trim Removal Wedge -3409- from the rear lid -2-.
- Pry out the grommets -1- and guide out the wiring harness from the body opening.
- Remove the spoiler on the edge of the roof.
Installing
Install in reverse order of removal. Note the following:
 Note
Note
- Check the foam seal -4- for damage.
- Pay attention that the foam seals -3, 5 and 6- are on the locating pins.
- Clean the adhesive surface of the spoiler on the edge of the roof using Cleaning Solution -D 009 401 04-.
- Remove the protective film from the adhesive tape -7-.
- Place the spoiler on the edge of the roof -2- on the rear lid -1- and push in until it engages audibly.
- Push in the spoiler on the edge of the roof along the entire length using the roller -3356-.
- Install the rear lid upper trim panel. Refer to → Body Interior; Rep. Gr.70; Luggage Compartment Trim Panels; Rear Lid Upper Trim Panel, Removing and Installing
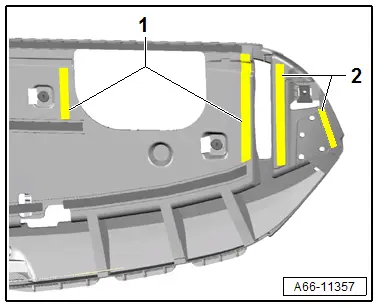
Overview - Spoiler on the Edge of the Roof RS Q3
 Note
Note
- Removing and installing is performed like the spoiler on the edge of the roof in the standard version. Refer to → Chapter "Roof Edge Spoiler, Removing and Installing".
- The outer panel for the spoiler on the edge of the roof RS Q3 must be painted before installing and then assembled.
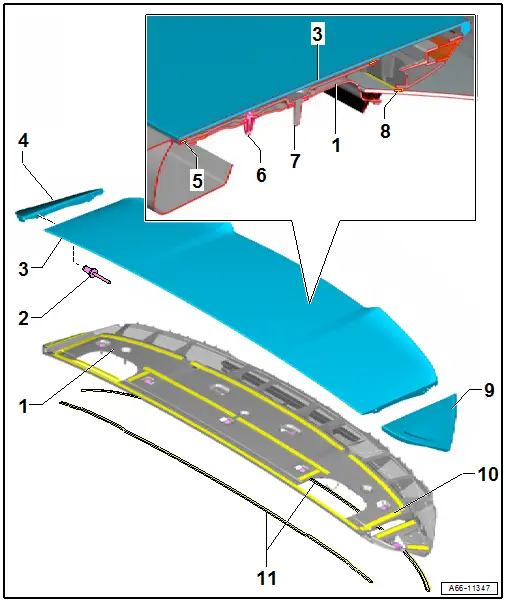
1 - Spoiler on the Edge of the Roof Inner Part
2 - Blind Rivet
- Quantity 3 on each side.
3 - Spoiler on the Edge of the Roof Outer Panel
- Pant before assembly.
- After painting rivet the left and right cover with the outer panel.
- Clean the outer panel on the inner side with Cleaning Solution -D 009 401 04- on the sealing surfaces for adhesive tape.
- Push on the lower section together with the cover.
4 - Right Cover
5 - Foam Seal
- After removing the spoiler replace
6 - Clip
7 - Centering Pin
8 - Foam Seal
- After removing the spoiler replace
9 - Left Cover
10 - Adhesive Tape
- Remove the protective film by the removal tabs after installing the outer and inner section one after the other.
11 - Foam Seal
- After removing the spoiler replace
- Apply to the markings in the inner section
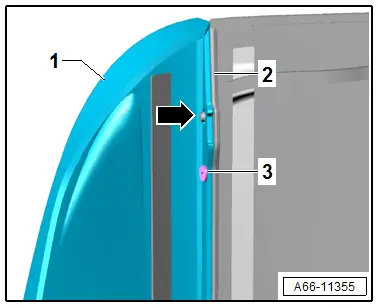
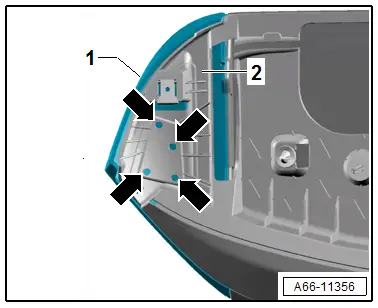
Secure The left and Right Covers
- Install the covers -1- on both sides over the centering mounts -arrow- and on the spoiler on the edge of the roof outer panel -2- and rivet with the blind rivet -3-.
- From the Plastic Repair Kit - D 007 700-Clean the marked adhesive surface -arrows- on the cover -2- and the spoiler on the edge of the roof inner part -1- with Plastic Cleaner - D 195 850 A1- and prime with Bonding Agent for Plastic - D 822 150 A1-.

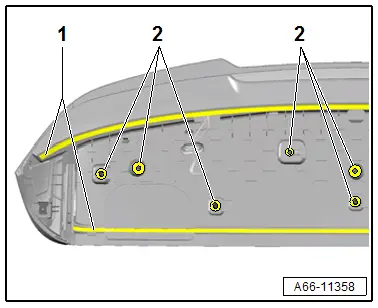
- Remove the protective film only from the adhesive tape -1- and -2-.
- For all other adhesive tape do not remove the protective film.
- On the opposite side clean the adhesive tape on the outer panel adhesive surface with Cleaning Solution -D 009 401 04-.
- Align the center outer panel and push the inner part from the rear to the front.
- Install the left and right cover.
- Remove the retainers on the removal tabs -1-.
- Using the removal tabs remove the protective film after each other between the adhesive tape and the outer panel.
- Push the upper section by hand using force on the adhesive tape over the entire spoiler area in stages.

- Push 2K Plastic Repair Adhesive -D 180 KU2 A1- through the openings -arrows- and glue the outer part to the inner part.
- Glue the foam seal as shown on the spoiler lower section.
- The continued assembly on the rear lid is the same as a standard spoiler. Refer to → Chapter "Spoiler, Removing and Installing".
READ NEXT:
 Overview - Trim Molding and Covers
1 - Front Door Gap Cover
Removing and installing. Refer to
→ Chapter "Door Gap Cover, Removing and Installing".
2 - Clip
Quantity: 5
3 - Grommet
Trim Molding, Removing and Installing
Special tools and workshop equipment
required
Wedge Set -T10383-
Removing
Note
Do not twist or bend the side window trim molding.
- Removing the roof trim molding. Refer to
Wheel Cover, Removing and Installing
Front Wheel Cover, Removing and Installing
Special tools and workshop equipment
required
Hot Air Blower VAG1416 -VAG1416-
Wedge Set -T10383-
Cleaning Solution -D 009 401 04-
Removing
-&SEE MORE:
Park assist
General information
Applies to: vehicles with park assist
The park assist helps you when parking and exiting
parking spaces after the parking space search. The park assist takes over the
steering of
the vehicle while the driver accelerates, brakes,
and monitors the vehicle's surroundings. Park assi
Name Badges and Emblems
Overview - Name Badges and Emblems
Overview - Name Badges and Emblems, Vehicles through MY 2014
1 - Audi Rings
Removing and installing. Refer to
→ Chapter "Front Emblem, Removing and Installing".
2 - RS Q3-name badge
Equipment level
Removing and installi