Audi Q3: Overview - Trim Molding and Covers
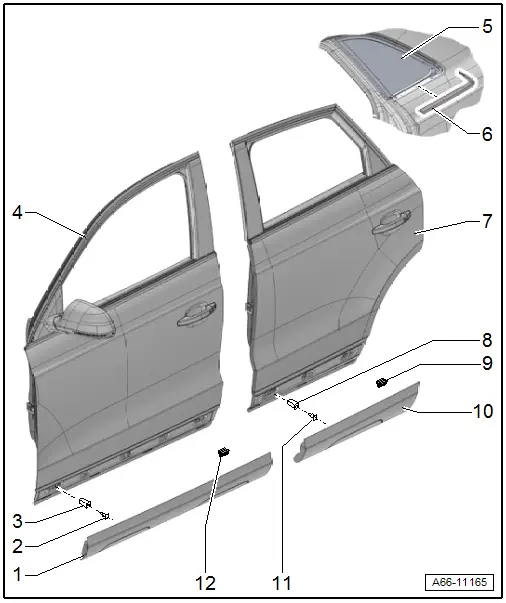
1 - Front Door Gap Cover
- Removing and installing. Refer to → Chapter "Door Gap Cover, Removing and Installing".
2 - Clip
- Quantity: 5
3 - Grommet
- For the clip
4 - Front Door
5 - Side Window
6 - Trim Strip
- Removing and installing. Refer to → Chapter "Trim Molding, Removing and Installing".
7 - Rear Door
8 - Grommet
- For the clip
9 - Rubber Buffer
- Quantity: 3
10 - Rear Door Gap Cover
- Removing and installing. Refer to → Chapter "Door Gap Cover, Removing and Installing".
11 - Clip
- Quantity: 7
12 - Rubber Buffer
- Quantity: 4
Overview - Sill Panel Trim
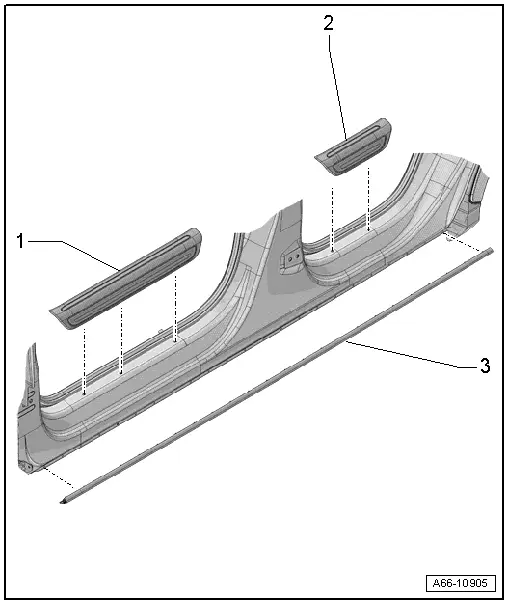
1 - Front Sill Panel Trim
- There are different versions. Refer to the Parts Catalog.
- Removing and installing. Refer to → Chapter "Sill Panel Trim, Removing and Installing".
2 - Rear Sill Panel Trim
- There are different versions. Refer to the Parts Catalog.
- Removing and installing. Refer to → Chapter "Sill Panel Trim, Removing and Installing".
3 - Sill Panel Trim
- Removing and installing. Refer to → Chapter "Sill Panel Trim, Removing and Installing".
Overview - B-Pillar Trim
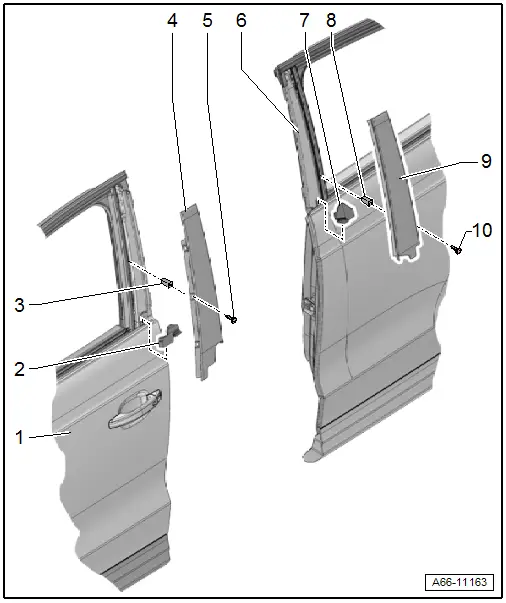
1 - Front Door
2 - Sealing Piece
- For the B-pillar front door trim
3 - Clip Nut
- Quantity: 3
4 - Front Door B-Pillar Trim
- Removing and installing. Refer to → Chapter "Front Door B-Pillar Trim, Removing and Installing".
5 - Bolt
- 2.5 Nm
- Quantity: 3
6 - Rear Door
7 - Sealing Piece
- For the B-pillar rear door trim
8 - Clip Nut
- Quantity: 3
9 - Rear Door B-pillar Trim
- Removing and installing. Refer to → Chapter "Rear Door B-Pillar Trim, Removing and Installing".
10 - Bolt
- 2.5 Nm
- Quantity: 3
Overview - C-Pillar Trim
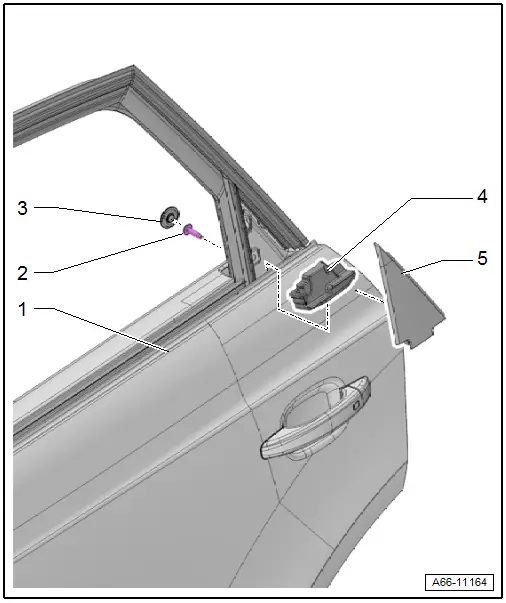
1 - Rear Door
2 - Bolt
- 2.5 Nm
3 - Grommet
4 - Sealing Piece
- For the c-pillar door trim
5 - C-pillar Door Trim
- Removing and installing. Refer to → Chapter "C-Pillar Door Trim, Removing and Installing".
Overview - Wheel Covers
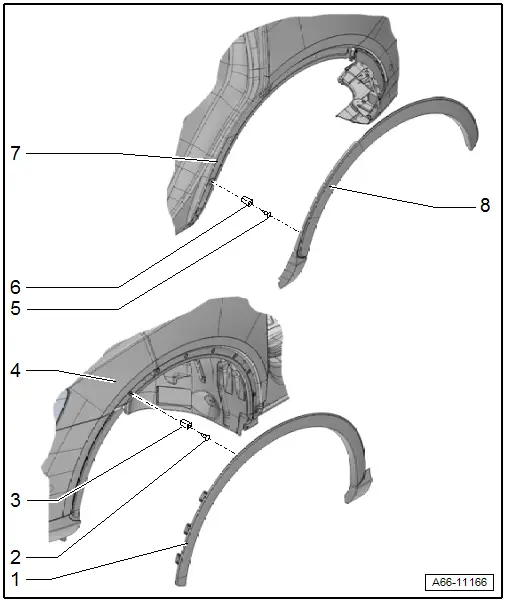
1 - Front Wheel Cover
 Caution
- In the area of the fender the protective film cannot be removed from the two-sided adhesive tape.
- The wheel cover is only glued to the bumper cover.
- Removing and installing. Refer to → Chapter "Front Wheel Cover, Removing and Installing".
2 - Clip
- Quantity: 9
3 - Grommet
- For the clip
4 - Fender
5 - Clip
- Quantity: 3
6 - Grommet
- For the clip
7 - Rear Side Panel
8 - Rear Wheel Cover
 Caution
- In the area of the side panel the protective film cannot be removed from the two-sided adhesive tape.
- The wheel cover is only glued to the bumper cover.
- Removing and installing. Refer to → Chapter "Rear Wheel Cover, Removing and Installing".
Overview - Heat Shield
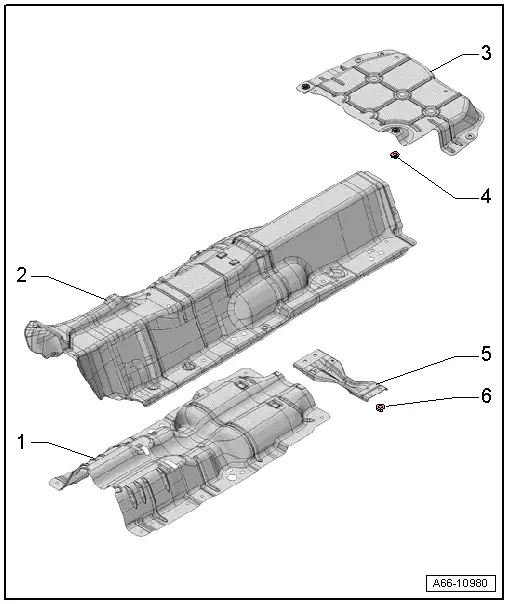
1 - Heat Shield
- For the driveshaft
- Removing and installing. Refer to → Chapter "Floor Heat Shield, Removing and Installing".
2 - Heat Shield
- For the center of the tunnel
- Removing and installing. Refer to → Chapter "Floor Heat Shield, Removing and Installing".
3 - Heat Shield
- For the rear muffler
- There are different versions. Refer to the Parts Catalog.
- Removing and installing. Refer to → Chapter "Floor Heat Shield, Removing and Installing".
4 - Lock Washer
- Quantity: 2
5 - Crossbrace
- Removing and installing. Refer to → Chapter "Tunnel Bridge, Removing and Installing".
6 - Nut
- 23 Nm
- Quantity: 4
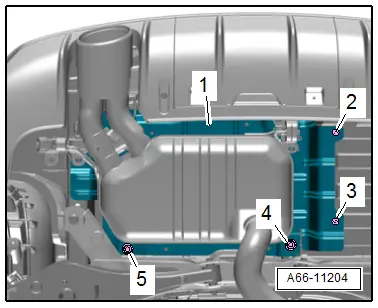
Heat shield tightening specification for rear muffler, Audi RS Q3
- Tighten bolts -2 and 3- to 2 Nm.
READ NEXT:
 Trim Molding, Removing and Installing
Special tools and workshop equipment
required
Wedge Set -T10383-
Removing
Note
Do not twist or bend the side window trim molding.
- Removing the roof trim molding. Refer to
Wheel Cover, Removing and Installing
Front Wheel Cover, Removing and Installing
Special tools and workshop equipment
required
Hot Air Blower VAG1416 -VAG1416-
Wedge Set -T10383-
Cleaning Solution -D 009 401 04-
Removing
-&
Floor Heat Shield, Removing and Installing
Center Tunnel Heat Shield, Removing and Installing
Removing
- Remove the left and right underbody cover. Refer to
→ Chapter "Underbody Panels, Removing and Installing".
- Remove t
SEE MORE:
Overview - Air Routing and Air Distribution in Passenger Compartment
Overview - Air Routing and Air Distribution in Passenger Compartment,
Front Air Guides
1 - Screw
1.5 Nm
2 - Left Footwell Vent Air Guide - Driver Side
Removing and installing. Refer to
→ Chapter "Driver Side Footwell Vent, Removing and Installing".
Settings
Telephone settings
Applies to: vehicles with telephone
Applies to: MMI: Select on the home screen:
PHONE > .
The following options may be possible, depending
on your mobile device:
Decline with text message
Edit voicemail number
Switching between two mobile devices
Requirement: phone 1 an
