Audi Q3: Wheel Cover, Removing and Installing
Front Wheel Cover, Removing and Installing
Special tools and workshop equipment required
- Hot Air Blower VAG1416 -VAG1416-
- Wedge Set -T10383-
- Cleaning Solution -D 009 401 04-
Removing
- Remove the front wheel spoiler. Refer to → Chapter "Front Wheel Spoiler, Removing and Installing".
- Loosen the from wheel housing liner in the area of the bumper cover and the fender. Refer to → Chapter "Front Wheel Housing Liner, Removing and Installing".
- Insert a 8 mm socket on the grommets on the wheel housing trim from the inside on fender and by doing this the clips underneath release.
- Carefully remove the wheel housing trim from the outside from the released clips in stages from the fender.
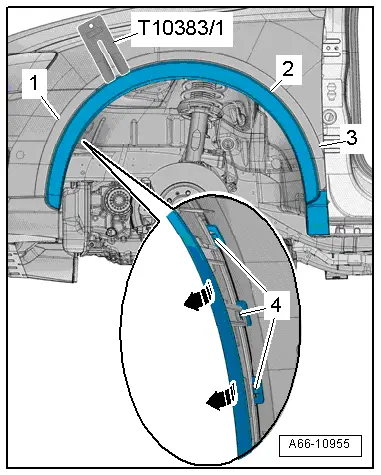
- Release the retaining tabs on the bumper -4- on the inside using a narrow screwdriver and disengage -arrows-.
- Remove the wheel cover -2- slightly from the bumper cover -1-.
- If necessary carefully warm the wheel cover using the Hot Air Blower -VAS1978/14A- and pry using the wedge -T10383/1- from the bumper cover.
Installing
 Caution
- The wheel cover two-sided adhesive tape protective film can only be removed and bonded in the bumper cover area.
- In the fender area the wheel cover protective film -C- must stay on the two-sided adhesive tape.
Install in reverse order of removal. Note the following:
- Clean the adhesive surface on the bumper cover with Cleaning Solution -D 009 401 04-.
- Check the seal -B- for damage.
- Remove the protective film from the adhesive tape -D-.
- Install the wheel cover -E- in the sequence -1 through 3-, as illustrated.
- 1. Install the lower wheel cover on the fender.
- 2. Install the wheel cover until it engages audibly on the fender.
- 3. Place the wheel cover on the bumper cover and push in until it engages audibly.
- Install the front wheel housing liner. Refer to → Chapter "Front Wheel Housing Liner, Removing and Installing".
- Install the front wheel spoiler. Refer to → Chapter "Front Wheel Spoiler, Removing and Installing".

Rear Wheel Cover, Removing and Installing
Special tools and workshop equipment required
- Hot Air Blower VAG1416 -VAG1416-
- Wedge Set -T10383-
- Cleaning Solution -D 009 401 04-
Removing
- Loosen the rear wheel housing liner in the area of the side panel and on the bumper cover. Refer to → Chapter "Rear Wheel Housing Liner, Removing and Installing".
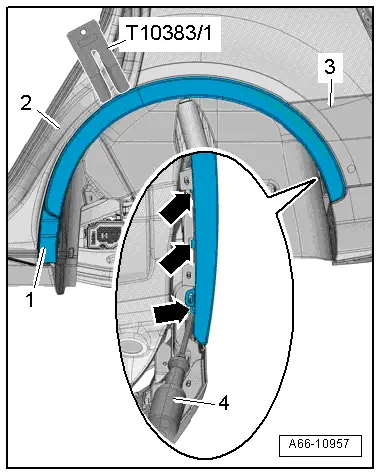
- Disengage the wheel housing trim on the side panel on the lower C-pillar beginning at the rear in steps using the Wedge Set -T10383-.
- Release the tabs on the inside with a narrow screwdriver -4- through the opening -arrows- and remove the wheel cover -1- from the outside slightly from the bumper cover -3-.
- Carefully warm the wheel cover with the Hot Air Blower -VAS1978/14A- and remove from the bumper cover.
Installing
 Caution
- The wheel cover two-sided adhesive tape protective film can only be removed and bonded in the bumper cover area.
- In the fender area the side panel protective film -C- must stay on the two-sided adhesive tape.
Install in reverse order of removal. Note the following:
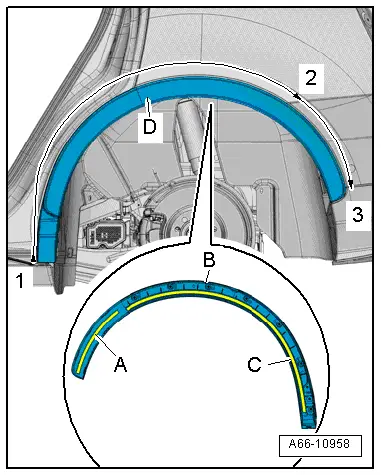
- Clean the adhesive surface on the vehicle body with Cleaning Solution -D 009 401 04-.
- Check the seal -B- for damage.
- Remove the protective film only from the adhesive tape -A-.
- Install the wheel cover -D- in the sequence -1 through 3-, as illustrated.
- 1. Install the lower wheel cover on the rear side panel.
- 2. Push the wheel cover until it engages audibly on the rear side panel.
- 3. Place the wheel cover on the bumper cover and push in until it engages audibly.
- Resting time approximately 3.5 hours at room temperature
- Install the rear wheel housing liner. Refer to → Chapter "Rear Wheel Housing Liner, Removing and Installing".
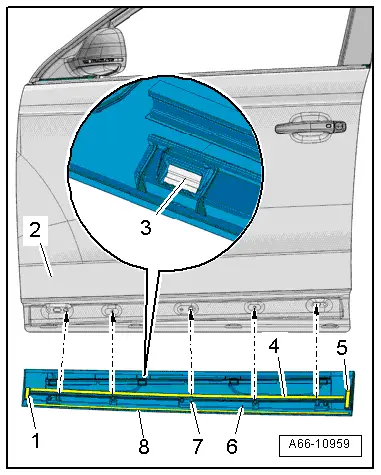
Door Gap Cover, Removing and Installing
 Note
Note
Unpainted door gap covers must be replaced.
Special tools and workshop equipment required
- Hot Air Blower VAG1416 -VAG1416-
- Wedge Set -T10383-
- Cleaning Solution -D 009 401 04-
Removing
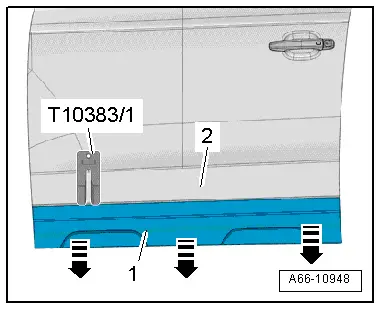
- Open the door.
- Carefully warm the door gap cover -1- using the Hot Air Blower -VAS1978/14A- and pry using the wedge -T10383/1- from the door -2- and disengage downward -arrows-.
Installing
 Note
Note
- Replace unpainted door gap covers after removal.
- Before reinstalling painted door gaps cover replace the two-sided adhesive tape at the same position with Two-Sided Adhesive Tape -D 438 515 A1- = 15 mm wide or with Two-Sided Adhesive Tape - D 438 515 A2- = 6 mm.
Install in reverse order of removal. Note the following:
- Clean the adhesive surface on the door with Cleaning Solution -D 009 401 04-.
- Check if all rubber buffers -3- are seated in their mounts.
- Remove the protective film from the adhesive tape -1, 4, 5 and 8-.
- Engage the door gap cover -6- on the bottom door -2- and over the center securing tab -7-.
- Push in the door gap cover from the outside to the inside until it engages audibly.
- Resting time approximately 3.5 hours at room temperature
READ NEXT:
 Floor Heat Shield, Removing and Installing
Center Tunnel Heat Shield, Removing and Installing
Removing
- Remove the left and right underbody cover. Refer to
→ Chapter "Underbody Panels, Removing and Installing".
- Remove t
Noise Insulation
Overview - Noise Insulation
1 - Bolt
2.5 Nm
Quantity: 3
2 - Front Noise Insulation
For the engine
Removing and installing. Refer to
→ Chapter "Noise Insu
Underbody Panel
Overview - Underbody Panels
1 - Nut
2 Nm
Quantity: 11
2 - Spring Nut
For the quick release
3 - Underbody Panel
Removing and installing. Refer to
SEE MORE:
Overview - Air Routing and Air Distribution in Passenger Compartment
Overview - Air Routing and Air Distribution in Passenger Compartment,
Front Air Guides
1 - Screw
1.5 Nm
2 - Left Footwell Vent Air Guide - Driver Side
Removing and installing. Refer to
→ Chapter "Driver Side Footwell Vent, Removing and Installing".
Overview - Door
1 - Door
Removing and installing. Refer to
→ Chapter "Door, Removing and Installing".
2 - Bolt
45 Nm
Note
The bolt is a fitting bolt so it is generally not necessary to
adjust the door using it.
If it is necessary to make an adjustment us
