Audi Q3: Overview - Radiator Grille
Overview - Radiator Grille, Vehicles through MY 2014
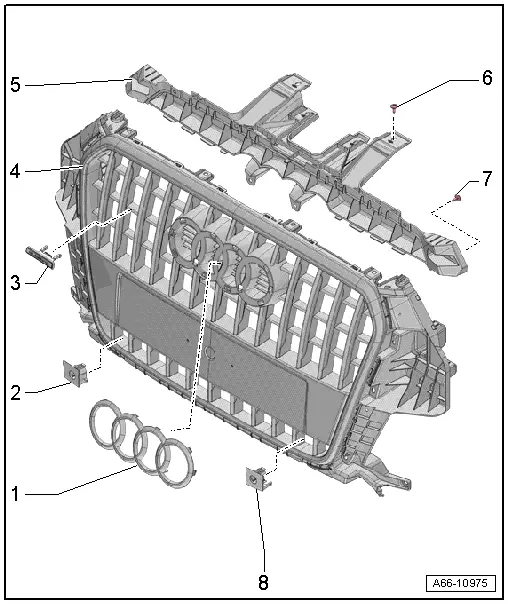
1 - Audi Rings
- Removing and installing. Refer to → Chapter "Front Emblem, Removing and Installing".
2 - Right Mount
- For the parking aid sensor
- Removing and installing. Refer to → Chapter "Front Parking Aid Sensor Mount, Removing and Installing".
3 - quattro Name Badge
- Equipment level
- Removing and installing. Refer to → Chapter "quattro Name Badge, Removing and Installing, Vehicles through MY 2014".
4 - Radiator Grille
- Removing and installing. Refer to → Chapter "Radiator Grille, Removing and Installing, Audi Q3 through MY 2014".
5 - Reinforcement Brace
- for the radiator grille
- Removing and installing. Refer to → Chapter "Reinforcement Brace, Removing and Installing, Version 1".
6 - Bolt
- 4.5 Nm
- Quantity: 4
7 - Bolt
- 1.5 Nm
- Quantity: 4
8 - Left Mount
- For the parking aid sensor
- Removing and installing. Refer to → Chapter "Front Parking Aid Sensor Mount, Removing and Installing".
Overview - Radiator Grille, Vehicles from MY 2015
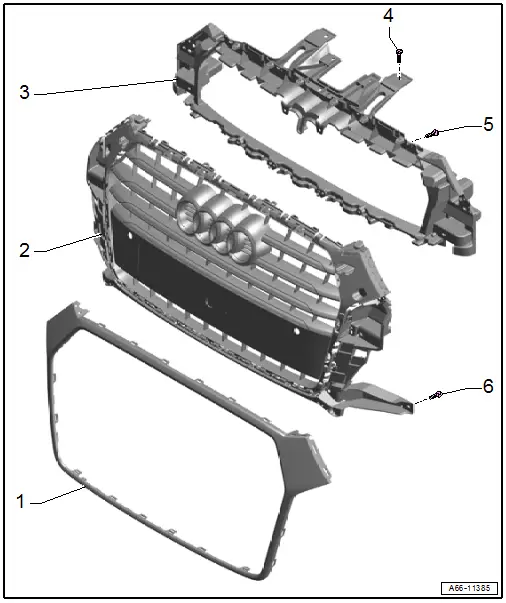
1 - Decorative Frame
- For the radiator grille
- Shared component with radiator grille. Cannot be replaced separately. Refer to the Parts Catalog.
- Removing and installing. Refer to → Chapter "Radiator Grille Decorative Frame, Removing and Installing, Vehicles from MY 2015".
2 - Radiator Grille
- Removing and installing. Refer to → Chapter "Radiator Grille, Removing and Installing, Vehicles from MY 2015".
3 - Reinforcement Brace
- For the radiator grille
- Removing and installing. Refer to → Chapter "Reinforcement Brace, Removing and Installing, Version 2".
4 - Bolt
- 4.5 Nm
- Quantity: 4
5 - Bolt
- 1.5 Nm
- Quantity: 4
6 - Bolt
- 1.5 Nm
- Quantity: 4
Overview - Radiator Grille, Audi RS Q3 through MY 2014
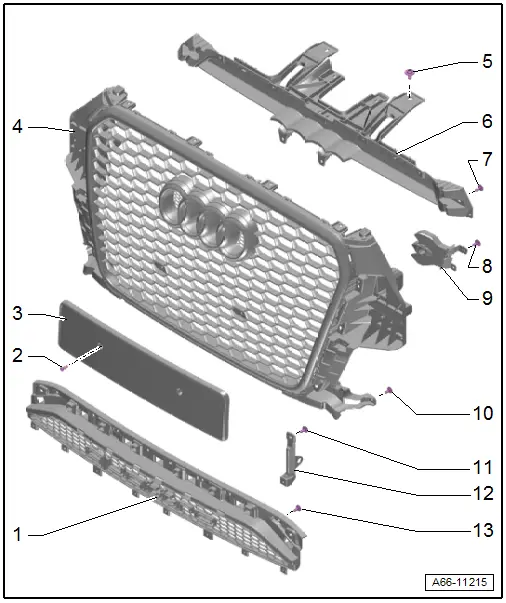
1 - Center Grille
- Removing and installing. Refer to → Chapter "Lower Center Grille, Removing and Installing, Audi RS Q3".
2 - Bolt
- 0.9 Nm
- Quantity: 2
3 - License Plate Bracket
- There are different versions. Refer to the Parts Catalog.
- Removing and installing. Refer to → Chapter "License Plate, Removing and Installing, Audi RS Q3".
4 - Radiator Grille
- Removing and installing. Refer to → Chapter "Radiator Grille, Removing and Installing, Audi RS Q3 through MY 2014".
5 - Bolt
- 4.5 Nm
- Quantity: 4
6 - Reinforcement Brace
- For the radiator grille
- Removing and installing. Refer to → Chapter "Reinforcement Brace, Removing and Installing, Version 1".
7 - Bolt
- 1.5 Nm
- Quantity: 4
8 - Bolt
- 1.5 Nm
- Quantity: 2
9 - Mount
- For the parking aid sensor
- Removing and installing. Refer to → Chapter "Front Parking Aid Sensor Mount, Removing and Installing, Audi RS Q3 through MY 2014".
10 - Bolt
- 1.5 Nm
- Quantity: 8
11 - Bolt
- 1.5 Nm
- Quantity: 4
12 - Reinforcement Brace
- For the lower radiator grille
- Quantity: 2
13 - Bolt
- 1.5 Nm
- Quantity: 12
Overview - Radiator Grille, Audi RS Q3 from MY 2015
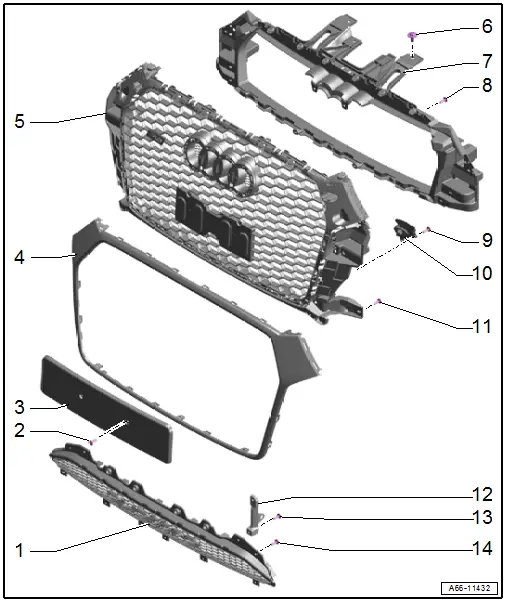
1 - Center Grille
- Removing and installing. Refer to → Chapter "Lower Center Grille, Removing and Installing, Audi RS Q3".
2 - Bolt
- 0.9 Nm
- Quantity: 2
3 - License Plate Bracket
- There are different versions. Refer to the Parts Catalog.
- Removing and installing. Refer to → Chapter "License Plate, Removing and Installing, Audi RS Q3".
4 - Decorative Frame
- For the radiator grille
- Shared component with radiator grille. Cannot be replaced separately. Refer to the Parts Catalog.
- Removing and installing. Refer to → Chapter "Radiator Grille Decorative Frame, Removing and Installing, Vehicles from MY 2015".
5 - Radiator Grille
- Removing and installing. Refer to → Chapter "Radiator Grille, Removing and Installing, Vehicles from MY 2015".
6 - Bolt
- 4.5 Nm
- Quantity: 4
7 - Reinforcement Brace
- For the radiator grille
- Removing and installing. Refer to → Chapter "Reinforcement Brace, Removing and Installing, Version 2".
8 - Bolt
- 1.5 Nm
- Quantity: 4
9 - Bolt
- 1.5 Nm
- Quantity: 2
10 - Mount
- For the parking aid sensor
- Removing and installing. Refer to → Chapter "Front Parking Aid Sensor Mount, Removing and Installing, Audi RS Q3 from MY 2015".
11 - Bolt
- 1.5 Nm
- Quantity: 8
12 - Reinforcement Brace
- For the lower radiator grille
- Quantity: 2
13 - Bolt
- 1.5 Nm
- Quantity: 4
14 - Bolt
- 1.5 Nm
- Quantity: 8
READ NEXT:
 Radiator Grille, Removing and Installing
Radiator Grille, Removing and Installing, Audi Q3 through MY 2014
Removing
- Remove the bumper cover. Refer to
→ Chapter "Bumper Cover, Removing and Installing".
- Remove the bum
Spoiler
Overview - Spoiler
1 - Left Spoiler
Removing and installing. Refer to
→ Chapter "Rear Window Spoiler, Removing and Installing".
2 - Clip
With foam seal
Qua
Overview - Trim Molding and Covers
1 - Front Door Gap Cover
Removing and installing. Refer to
→ Chapter "Door Gap Cover, Removing and Installing".
2 - Clip
Quantity: 5
3 - Grommet
SEE MORE:
Equipment
Overview - Sun Visors
1 - Sun Visor
Allocation. Refer to the Parts Catalog.
Removing and installing. Refer to
→ Chapter "Sun Visor, Removing and Installing".
Insert visor mount in the body cut-out
2 - Expanding Cap
Clipped into the sun visor
Press unt
Windshield Wiper/Washer System
Washer Fluid Hoses
Washer Fluid Line Hose Connections, Disconnecting and Connecting
Various hose couplings are used to connect the hoses to the
washer fluid pumps and spray jets or as coupling points.
Unsecured Hose Coupling
- To disconnect the connection, pull both parts of the
couplin
