Audi Q3: Equipment
Overview - Sun Visors
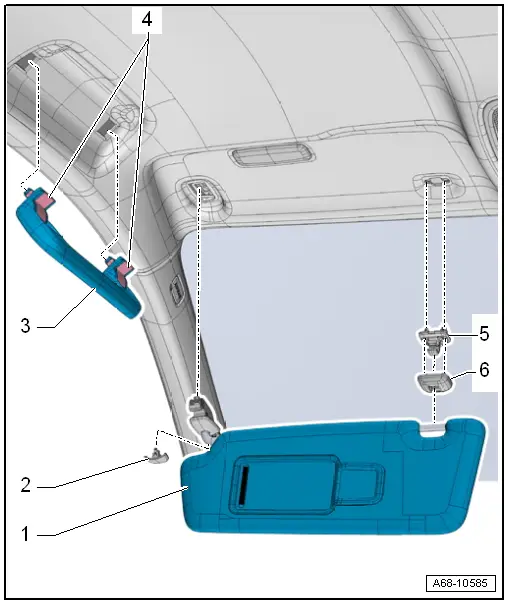
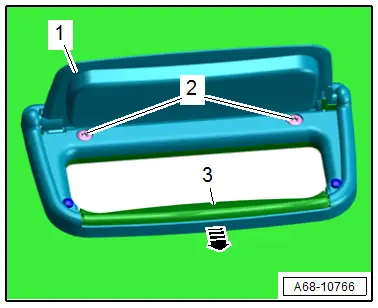
1 - Sun Visor
- Allocation. Refer to the Parts Catalog.
- Removing and installing. Refer to → Chapter "Sun Visor, Removing and Installing".
- Insert visor mount in the body cut-out
2 - Expanding Cap
- Clipped into the sun visor
- Press until it engages completely
3 - Roof Grab Handle
- Quantity: 4
- Removing and installing. Refer to → Chapter "Roof Grab Handle, Removing and Installing".
- Press until it engages completely
4 - Expanding Caps
 Caution
Only up to their lock position (do not pull them out all the way otherwise the silicone brake and spring and fall out and then the handle has to be replaced).
- Press until it engages completely
5 - Center Support
- For the sun visor
- Removing and installing. Refer to → Chapter "Sun Visor Center Support, Removing and Installing".
- Do not damage spreader clips during insertion
6 - Expanding Cap
- Clipped into the sun visor center bracket
Overview - Luggage Compartment Roll Cover
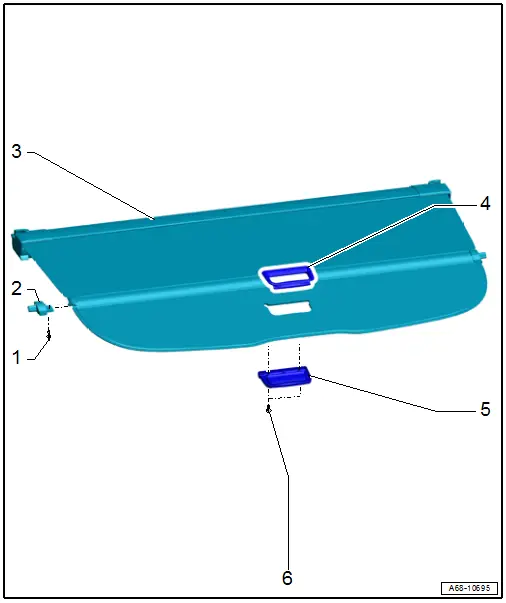
1 - Rivet
- Quantity: 1 on the left and right side
2 - Locking Pin
- Quantity: 1 on the left and right side
- Not available separately from the repair kit. Refer to Parts Catalog.
- Riveted with roller cover
3 - Luggage Compartment Roller Cover
4 - Frame
- For luggage compartment roller cover handle
- Not available separately from the repair kit. Refer to Parts Catalog.
- Replacing. Refer to → Chapter "Luggage Compartment Roller Cover Handle, Removing and Installing".
5 - Handle
- For luggage compartment roller cover
- Not available separately from the repair kit. Refer to Parts Catalog.
- Replacing. Refer to → Chapter "Luggage Compartment Roller Cover Handle, Removing and Installing".
6 - Bolt
- 1.5 Nm
- Quantity: 2
- Self-tapping
- Position the bolt by hand and tighten it until it finds the old threads. Then tighten the bolt to the specification.
Sun Visor, Removing and Installing
Removing
- Disengage the sun visor -2- at the center support -1-.
- Unclip the expanding cap -3- using a screwdriver.
- Remove the sun visor mount downward -arrow- out of the opening in the body.
- Disconnect the electrical connector and remove the sun visor.
Installing
Install in reverse order of removal.
Installation notes, for example tightening specifications, replacing components. Refer to → Chapter "Overview - Sun Visors".

Sun Visor Center Support, Removing and Installing
Special tools and workshop equipment required
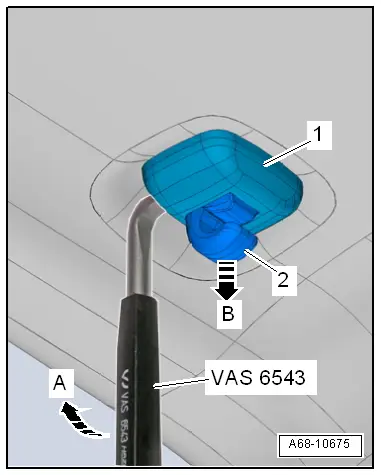
- Angled Screwdriver -VAS6543-
Removing
- Detach the sun visor at the sun visor center mount and flip to the side.
- Unclip the sun visor center bracket cover -1- by sliding the Angled Screwdriver -VAS6543- only about 1 mm under the cap -arrow A-.
 Note
Note
If the Angled Screwdriver -VAS6543- is inserted farther, it will be located under the sun visor center mount. It is not possible then to pry out the cover.
- Remove sun visor center mount -2--arrow B-.
Installing
Install in reverse order of removal.
Installation notes, for example tightening specifications, replacing components. Refer to → Chapter "Overview - Sun Visors".
Roof Grab Handle, Removing and Installing
Special tools and workshop equipment required
- Angled Screwdriver -VAS6543-
Removing
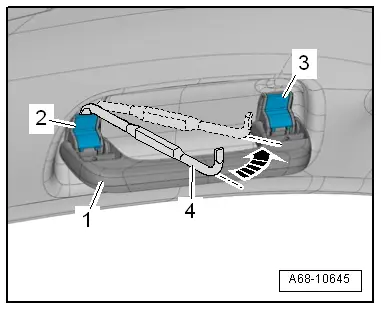
 Caution
Unclip the expanding caps -2- and -3- but only up to their lock position (do not pull them out all the way otherwise the silicone brake and spring and fall out and then the handle has to be replaced).
- Place the angled screwdriver -4- in the gap behind the clips -2-.
- Pivot the angled screwdriver -arrow-, until the clips slides audibly into the rest position.
- Repeat the procedure on the two clips -3-.
- Remove the roof grab handle -1- from the body opening.
- Leave the expanding caps in the rest position in the roof grab handle.
Installing
Install in reverse order of removal. Note the following:
- Insert the grab handle in the body cut-out.
- No clips should be between the handle and the roof trim.
- Push in the clips.
Installation notes, for example tightening specifications, replacing components. Refer to → Chapter "Overview - Sun Visors".
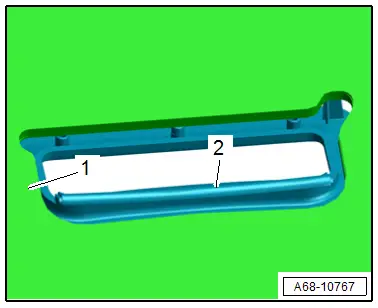
Luggage Compartment Roller Cover Handle, Removing and Installing
Removing
- Remove the luggage compartment roller cover.
- Open the lid -1- and remove the bolts -2-.
- Loosen the roller cover handle, disengage from the frame -3- in direction of the -arrow- and remove.
- Push the frame -2- out of the opening in the roller cover -1- and remove.
Installing
Install in reverse order of removal.
Installation notes, for example tightening specifications, replacing components. Refer to → Chapter "Overview - Luggage Compartment Roll Cover".
READ NEXT:
 Overview - Center Console
Overview - Center Console, Basic Equipment Level
1 - Storage Compartment
Vehicles with:
With External Audio Source Connection -R199-
Removing and installing. Refer to
→&nbs
Center Console Rear Trim, Removing and Installing
Special tools and workshop equipment
required
Wedge Set -T10383-
Removing
- Move the front seats all the way forward.
Vehicles with a Center Armrest:
- Vehicles with vents: remov
Front Center Console Storage Compartment, Removing and Installing
Front Storage Compartment, Removing and Installing
Removing
- Remove the center console insert. Refer to
→ Chapter "Center Console Insert, Removing and Installing".
- Release the SEE MORE:
Overview - Window Regulator
1 - Door
2 - Clip
For the window regulator cable
3 - Lower Double-Bolt
4 - Window Regulator
Removing and installing. Refer to
→ Chapter "Window Regulator, Removing and Installing".
5 - Lower Double-Bolt
6 - Door
Window Regulator Motor, Removing and Installing
Removing
Note
The window regulator motor can be removed or installed with
the motor or door window in any position.
- Remove the rear door trim panel. Refer to
→ Body Interior; Rep. Gr.70; Rear Door Trim Panels; Rear Door
Trim Panel, Removing and Installing.
-