Audi Q3: Overview - Front Door Trim Panel
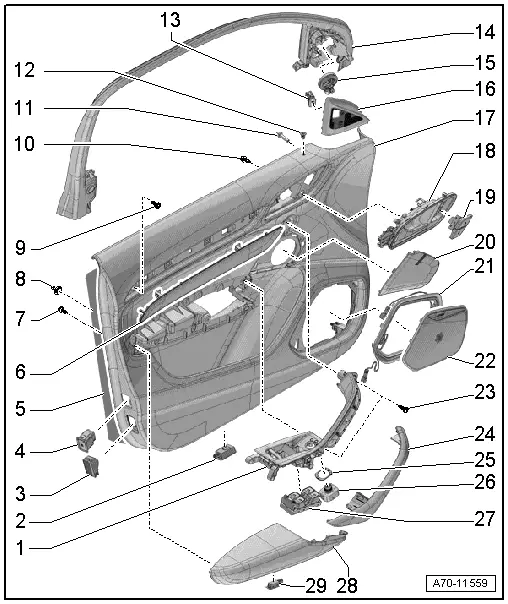
1 - Pull Handle
- With switch mount
- Removing and installing. Refer to → Chapter "Front Pull Handle, Removing and Installing".
2 - Left Front Entry Lamp -W31-
- Front passenger side: Right Front Entry Lamp -W32-.
- Equipment levels
- Removing and installing. Refer to → Electrical Equipment; Rep. Gr.96; Lamps; Front Entry Lamp W31/W32 Removing and Installing.
3 - Rear Reflector
- Driver side equipment level: Driver Door Warning Lamp -W30-
- Front passenger side equipment level: Front Passenger Door Warning Lamp -W36-
- Door warning lamps, removing and installing. Refer to → Electrical Equipment; Rep. Gr.96; Lamps; Driver Door Warning Lamp W30/Front Passenger Door Warning Lamp W36, Removing and Installing.
4 - Interior Monitoring Switch -E183-
- Equipment levels
- Removing and installing. Refer to → Electrical Equipment; Rep. Gr.96; Instrument Panel Controls.
5 - Insulation
6 - Trim Molding
- Removing and installing. Refer to → Chapter "Trim Molding, Removing and Installing".
7 - Bolt
- 1.2 Nm
- For pull handle/armrest
- Quantity: 11
8 - Clip
- With seal
- For door trim panel
- Quantity: 6 one-piece
- Quantity: 1 two-piece
- Replace any damaged two-piece clips
9 - Bolt
- 2.5 Nm
- For door trim panel
10 - Bolt
- 1.2 Nm
- For inside door release mechanism
- Quantity: 4
11 - Stop
- 6 Nm
- For door trim panel
12 - Sleeve
- For Central Locking -SAFE- Indicator Lamp -K133-
- Driver door only
- when replacing the door trim panel, a hole for the sleeve must be made in the new panel using the old panel as a sample
13 - Lane Change Assistance Button -E530-
- Equipment levels
- Removing and Installing. Refer to → Electrical Equipment; Rep. Gr.96; Lane Change Assistance; Lane Change Assistance ButtonE530 Removing and Installing.
14 - Trim Panel
- For the window frame
- Removing and installing. Refer to → Chapter "Window Frame Trim, Removing and Installing".
15 - Treble Speaker
- Removing and Installing. Refer to → Communication; Rep. Gr.91; Sound System; Left/Right Front Treble Speaker R20/R22 Removing and Installing.
16 - Speaker Trim
- For high range speaker
- Removing and installing. Refer to → Chapter "Treble Speaker Trim, Removing and Installing".
- Clip it into the window frame trim
17 - Door Trim Panel
- Removing and installing. Refer to → Chapter "Front Door Trim Panel, Removing and Installing".
- When replacing the door trim panel, a hole for the sleeve -item 12- must be made in the new panel using the old panel as a sample.
18 - Interior Door Mechanism
- Removing and installing. Refer to → Chapter "Interior Door Mechanism, Removing and Installing".
19 - Driver Interior Locking Button -E308-
- Front passenger side: Front Passenger Interior Locking Button -E309-
- Removing and installing. Refer to → Electrical Equipment; Rep. Gr.96; Controls; Driver Interior Locking ButtonE308, Removing and Installing.
20 - Speaker Trim
- For midrange speaker
- Removing and installing. Refer to → Chapter "Midrange Speaker Trim, Removing and Installing".
- Insert in the door trim panel and press on it until it engages audibly.
21 - Ambient Lighting Bulb
- Speaker Ambient Lighting Bulb 1 -L211-/Speaker Ambient Lighting Bulb 2 -L212-
- Equipment levels
- Removing and Installing. Refer to → Electrical Equipment; Rep. Gr.96; Lamps; Component Location Overview - Door Ambient Lighting.
22 - Speaker Trim
- For bass speaker
- Removing and installing. Refer to → Chapter "Bass Speaker Trim, Removing and Installing".
- Press on until it engages audibly
23 - Bolt
- 2.5 Nm
- For door trim panel
- Quantity: 2
24 - Grip Recess
- for pull handle
- Removing and installing. Refer to → Chapter "Pull Handle Grip Recess, Removing and Installing".
25 - Symbol Trim
26 - Mirror Adjusting Switch -E43-
- Vehicles equipped with: Folding Mirror Adjustment Switch -E168-
- Removing and installing. Refer to → Electrical Equipment; Rep. Gr.96; Controls; Mirror Adjusting Switch E43/ E168 removing and installing.
27 - Window Regulator Control Head
- Driver side: Left Front Window Regulator Switch -E40- Right Front Power Window Switch in Driver Door -E81- Left Rear Window Regulator Switch in Driver Door -E53- Right Rear Window Regulator Switch in Driver Door -E55- Central Window Regulator Switch in Driver Door -E189-.
- Front passenger side: Front Passenger Door Window Regulator Switch -E107-
- Removing and Installing. Refer to → Electrical Equipment; Rep. Gr.96; Controls; Front Door Controls Component Location Overview.
28 - Armrest
- Removing and installing. Refer to → Chapter "Front Armrest, Removing and Installing".
29 - Driver Door Storage Compartment Illumination Bulb -L160-
- Front passenger side: Front Passenger Door Storage Compartment Illumination Bulb -L161-
- Equipment levels
- Removing and installing. Refer to → Electrical Equipment; Rep. Gr.96; Lamps; Driver Door/Front Passenger Door Storage Compartment Illumination Bulb L160/L161 Removing and Installing.
Rear Lid Unlock Switch -E165-
- Remove the Rear Lid Unlock Switch -E165-. Refer to → Electrical Equipment; Rep. Gr.96; Controls; Component Location Overview - Front Door Controls.
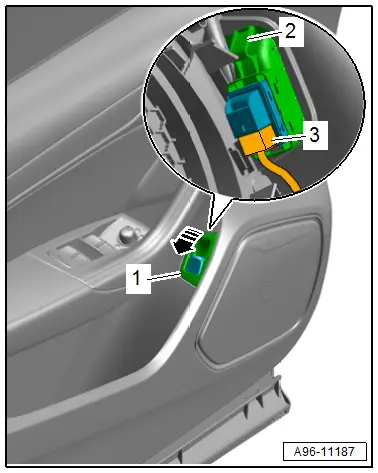
1 - Trim
2 - Clip
3 - Connector
READ NEXT:
 Midrange Speaker Trim, Removing and Installing
Special tools and workshop equipment
required
Wedge Set -T10383-
Removing
- Pry out the speaker trim -1-
along the door trim seam -arrow-
using the Wedge -T10383/1- and remove it.
Front Door Trim Panel, Removing and Installing
Special tools and workshop equipment
required
Wedge Set -T10383-
Removing
- Switch the ignition off and remove the ignition key.
- Remove the trim panel. Refer to
→ Chapt
Front Pull Handle, Removing and Installing
Front Pull Handle, Removing and Installing
Removing
- Remove the armrest. Refer to
→ Chapter "Front Armrest, Removing and Installing".
- Disconnect the connector for the window r
SEE MORE:
Service interval display
The service interval display detects when your vehicle
is due for service.
The service interval display works in two stages:
Inspection or oil change reminder: after driving
a certain distance, a message will appear in
the instrument cluster display each time the ignition
is switched on or off,
Expansion Valve, Removing and Installing
Special tools and workshop equipment
required
Engine Bung Set -VAS6122-
Removing
- Remove the refrigerant pipes from the expansion valve. Refer
to
→ Chapter "Refrigerant Lines, Disconnecting and Connecting at
Expansion Valve".
- Remove the bolts -A-.
- Remove
