Audi Q3: Front Pull Handle, Removing and Installing
Front Pull Handle, Removing and Installing
Removing
- Remove the armrest. Refer to → Chapter "Front Armrest, Removing and Installing".
- Disconnect the connector for the window regulator control head.
- Driver side: disconnect the connector for the Mirror Adjusting Switch -E43-.
- Versions with ambient lighting: disconnect the connector for the driver/front passenger door ambient lighting bulb -L164-/-L165-.
- Remove the bolts -2- and -3- from the rear of the door trim.
- Remove the pull handle -1- from the door panel.
Installing
Install in reverse order of removal.
Installation notes, for example tightening specifications, replacing components. Refer to → Chapter "Overview - Front Door Trim Panel".

Pull Handle Grip Recess, Removing and Installing
Special tools and workshop equipment required
- Wedge Set -T10383-
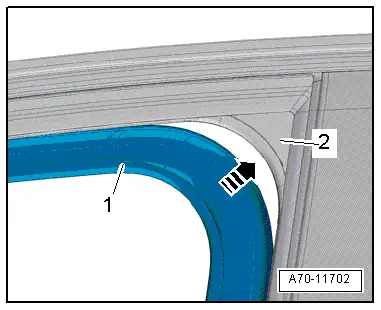
Removing
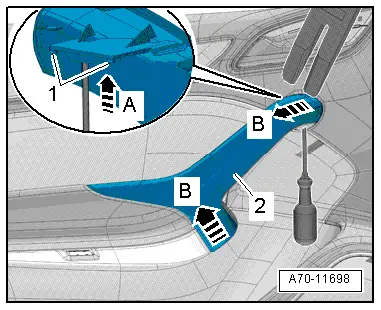
- Push a screwdriver through the opening in the pull handle and push the grip recess tabs upward -arrow A-. The retaining tabs -1- are released from this.
- Carefully pry the pull handle grip recess -2- with the Wedge -T10383/1- along the pull handle seam -B arrows-.
- Disengage the rear pull handle grip recess and remove.
Installing
Install in reverse order of removal.
Installation notes, for example tightening specifications, replacing components. Refer to → Chapter "Overview - Front Door Trim Panel".
Interior Door Mechanism, Removing and Installing
Removing
- Remove the front door trim panel. Refer to → Chapter "Front Door Trim Panel, Removing and Installing".
- Disconnect and free up the connectors and wire.
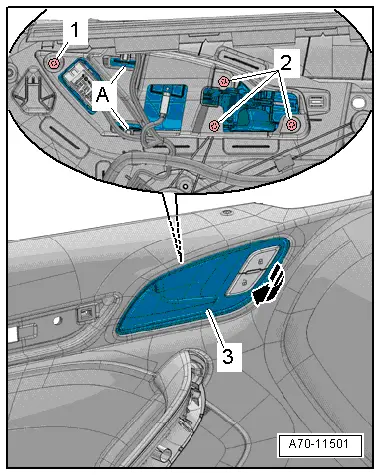
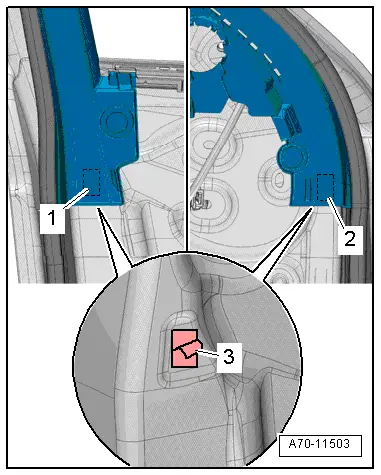
- Remove the bolts -1--2- from the rear of the door trim.
- Remove the interior door mechanism -3- from the door trim -arrow-, to do this release the catches -A-.
Installing
Install in reverse order of removal.
Installation notes, for example tightening specifications, replacing components. Refer to → Chapter "Overview - Front Door Trim Panel".
Window Frame Trim, Removing and Installing
Special tools and workshop equipment required
- Trim Removal Wedge -3409-
Removing
- Lower the door window.
- Remove the front door trim panel. Refer to → Chapter "Front Door Trim Panel, Removing and Installing".
- Remove the treble speaker trim. Refer to → Chapter "Treble Speaker Trim, Removing and Installing".
- Versions with lane change assistance: unclip and free up the Lane Change Assistance Button -E530- wires.
- Versions with treble speaker: remove the treble speaker and free up the wire.
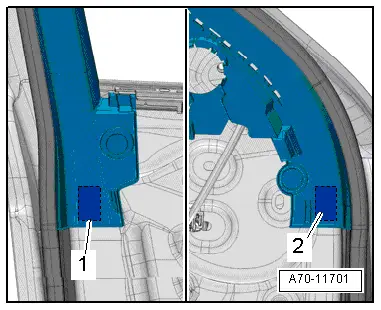
- Loosen the trim on the ends from the adhesive pads -1- and -2- from the door frame, using the Trim Removal Wedge -3409-.
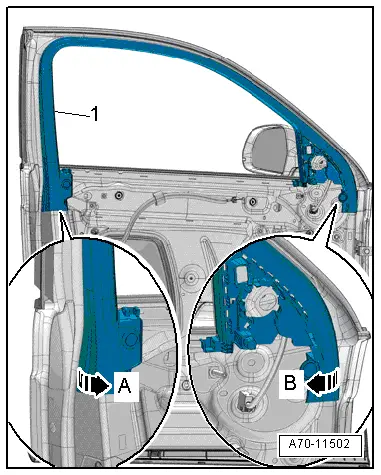
- Carefully pry off window frame trim -1- using the Trim Removal Wedge -3409- from the lower front along the length of the window guide to the upper rear -arrow B-.
- Then, carefully pry off the window frame trim at the lower rear using the Trim Removal Wedge -3409- along the length of the window guide -arrow B-.
- Pull down the window frame trim from the window frame and remove.
Installing
- Insert window frame trim -1- at upper rear in the window guide -2--arrow-.
- Install window frame trim along the entire length of the window guide.
- Attach the adhesive pads -1- and -2- on the door frame and press on door frame.
- Remove the protective film -3- from the adhesive pads.
- Push on the trim panel in the area of the adhesive pads.
Install in reverse order of removal.
Installation notes, for example tightening specifications, replacing components. Refer to → Chapter "Overview - Front Door Trim Panel".
READ NEXT:
 Overview - Rear Door Trim Panel
1 - Pull Handle
With switch mount
Removing and installing. Refer to
→ Chapter "Rear Pull Handle, Removing and Installing".
2 - Left Rear Entry Lamp -W33-
Ri
Interior Door Mechanism, Removing and Installing
Removing
- Remove the rear door trim panel. Refer to
→ Chapter "Rear Door Trim Panel, Removing and Installing".
- Remove insulation mat.
- Disconnect and free up the connecto
Component Location Overview - Instrument Panel
1 - Center Console
Overview. Refer to
→ Chapter "Overview - Center Console".
2 - Driver Side Instrument Panel Cover
Overview. Refer to
→ Chapter "Ove
SEE MORE:
General Information
Before beginning balancing, the following requirements must
be fulfilled.
Tire inflation pressure must be OK.
The tire tread must not be worn down on one side and should
be at least 4 mm deep.
The tire must not have any flat spots.
It is not possible to balance a flat spot.
The ti
General Information
Vehicles with a High Voltage System (Hybrid Vehicles)
Extremely Dangerous Due to High-Voltage
The high-voltage system is under high-voltage. Death or serious
bodily injury by electric shock.
- Individuals with electronic/medical life- and health sustaining
machines in or on their person
