Audi Q3: Midrange Speaker Trim, Removing and Installing
Special tools and workshop equipment required
- Wedge Set -T10383-
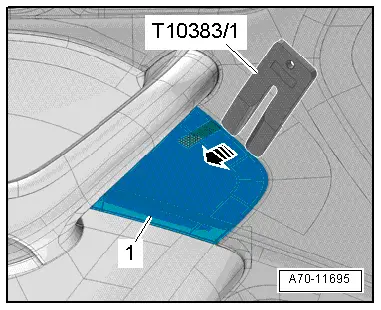
Removing
- Pry out the speaker trim -1- along the door trim seam -arrow- using the Wedge -T10383/1- and remove it.
Installing
Install in reverse order of removal.
Installation notes, for example tightening specifications, replacing components. Refer to → Chapter "Overview - Front Door Trim Panel".
Treble Speaker Trim, Removing and Installing
Special tools and workshop equipment required
- Wedge Set -T10383-
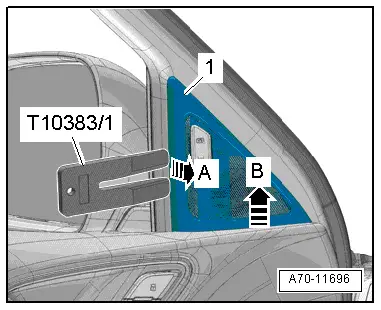
Removing
- Pry out the speaker trim -1- along the window frame trim panel seam -arrow- using the Wedge -T10383/1- and remove it.
- Pull the speaker trim from the door trim panel -arrow B- and remove.
Installing
Install in reverse order of removal.
Installation notes, for example tightening specifications, replacing components. Refer to → Chapter "Overview - Front Door Trim Panel".
Bass Speaker Trim, Removing and Installing
Special tools and workshop equipment required
- Wedge Set -T10383-
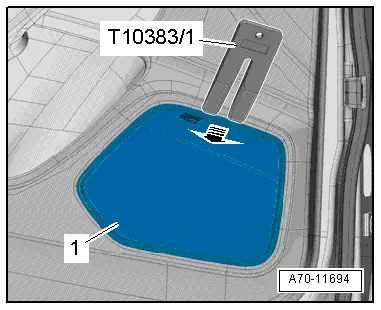
Removing
- Pry out the speaker trim -1- along the door trim seam -arrow- using the Wedge -T10383/1- and remove it.
- Versions with a Driver/Front Passenger Door Ambient Lighting Bulb -L164-/-L165-: disconnect the connector.
Installing
Install in reverse order of removal.
Installation notes, for example tightening specifications, replacing components. Refer to → Chapter "Overview - Front Door Trim Panel".
Trim Molding, Removing and Installing
Special tools and workshop equipment required
- Wedge Set -T10383-
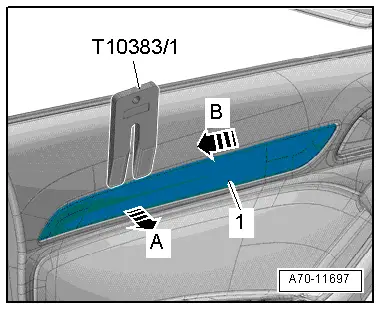
Removing
- Carefully pry the trim molding -1- out of the door trim panel along the seam using the Wedge Set -T10383/1--A arrow-.
- Slightly raise the trim molding and slide rearward -arrow B- so that the trim panel hooks on the inside can be released from the cut-out of the door trim.
Installing
Install in reverse order of removal.
Installation notes, for example tightening specifications, replacing components. Refer to → Chapter "Overview - Front Door Trim Panel".
READ NEXT:
 Front Door Trim Panel, Removing and Installing
Special tools and workshop equipment
required
Wedge Set -T10383-
Removing
- Switch the ignition off and remove the ignition key.
- Remove the trim panel. Refer to
→ Chapt
Front Pull Handle, Removing and Installing
Front Pull Handle, Removing and Installing
Removing
- Remove the armrest. Refer to
→ Chapter "Front Armrest, Removing and Installing".
- Disconnect the connector for the window r
Overview - Rear Door Trim Panel
1 - Pull Handle
With switch mount
Removing and installing. Refer to
→ Chapter "Rear Pull Handle, Removing and Installing".
2 - Left Rear Entry Lamp -W33-
Ri
SEE MORE:
Temperature Regulator Door Motor -V68-, Removing and Installing
Note
Only for vehicles with a manual climate control system (or
heater without Air Conditioning (A/C) system).
The color-coded connecting elements on the actuator for the
identification has been discontinued as a running change as of
10/2013 for those connecting elements install
Rear Brake Rotor, Removing and Installing
Brake Rotor, Removing and Installing, Brake 1KU
Removing
- Remove the brake caliper with brake carrier, refer to
→ Chapter "Brake Caliper, Removing and Installing, Brake 1KU".
- Remove bolt -3- and remove the
brake rotor.
Installing
Install in reverse order of removal. Not
