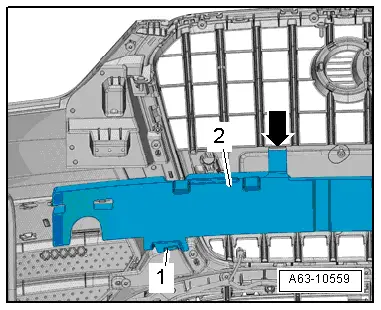
Molded Foam Part, Removing and Installing, Audi Q3 through MY 2014
Removing
- Remove the front bumper cover. Refer to → Chapter "Bumper Cover, Removing and Installing".
- Guide the molded foam piece -2- at the top out of the bracket -arrow- and at the bottom out of the holder -1-.
Installing
Install in reverse order of removal. Note the following:
- Install the front bumper cover. Refer to → Chapter "Bumper Cover, Removing and Installing".
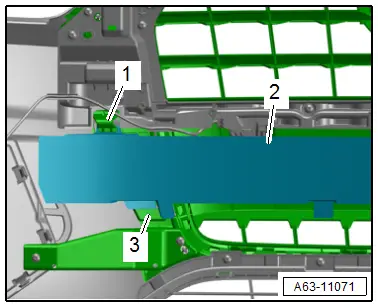
Molded Foam Part, Removing and Installing, Audi Q3 from MY 2015
Removing
- Remove the front bumper cover. Refer to → Chapter "Bumper Cover, Removing and Installing".
- Release the retainer -1-, rotate the molded foam part -2- out and remove downward from the bracket -3-.
Installing
Install in reverse order of removal.
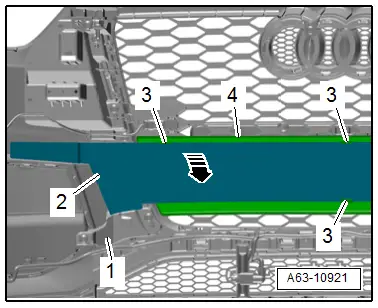
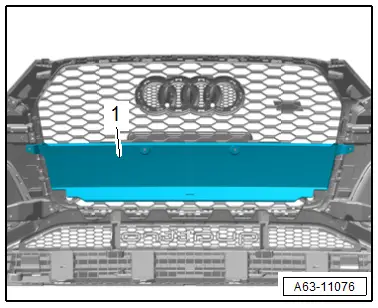
Molded Foam Part, Removing and Installing, Audi RS Q3
Removing
- Remove the front bumper cover. Refer to → Chapter "Bumper Cover, Removing and Installing".
- Release the catch -3- and disengage the molded foam part -2- from the radiator grille -1-, to do this pivot the upper molded foam part out of the mount -4- in the direction of the -arrow-.
Installing
Install in reverse order of removal. Note the following:
- Install the front bumper cover. Refer to → Chapter "Bumper Cover, Removing and Installing".
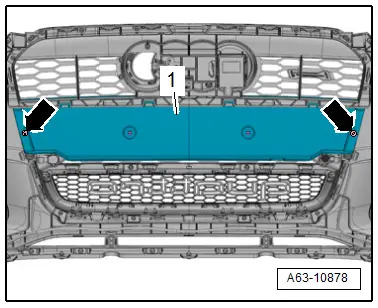
Molded Foam Part Mount, Removing and Installing, Audi RS Q3 through MY 2014
Removing
- Remove the license plate.
- Remove screws -2- and -3- on the license plate holder -1-.
- Remove the molded foam part. Refer to → Chapter "Molded Foam Part, Removing and Installing, Audi RS Q3".

- Remove the bolts -arrows-.
- Remove the mount -1-.
Installing
Install in reverse order of removal. Note the following:
- Install the molded foam part. Refer to → Chapter "Molded Foam Part, Removing and Installing, Audi RS Q3".
Molded Foam Part Mount, Removing and Installing, Audi RS Q3 from MY 2015
Removing
- Remove the radiator grille reinforcement brace. Refer to → Chapter "Reinforcement Brace, Removing and Installing, Version 2".
- Remove the molded foam part. Refer to → Chapter "Molded Foam Part, Removing and Installing, Audi RS Q3".
- Remove the mount -1-.
Installing
Install in reverse order of removal.
Headlamp Washer System Spray Nozzle Cover, Removing and Installing
Removing
- Pull the spray nozzle telescope -2- until stop out of the bumper cover -arrow A-.
- Hold telescoping section in the extended position with pliers.
- Spread the side pieces -3- of the cover -1- for the spray nozzle -arrow B- and carefully disengage from the pins and remove.
Installing
Install in reverse order of removal. Note the following:
- Press the spray nozzle cover on until it engages audibly.
READ NEXT:
 Air Intake Grille Trim, Removing and Installing
Removing
- Remove the air intake grille. Refer to
→ Chapter "Air Intake Grille, Removing and Installing, Vehicles
through MY 2014".
- Remove the front bumper cover. Refer to
â
Side Air Intake Trim, Removing and Installing, Audi RS Q3 through MY 2014
Removing
- Left: remove the front bumper cover. Refer to
→ Chapter "Bumper Cover, Removing and Installing".
- Right: remove the front wheel housing liner and wheel
spoiler. Refer
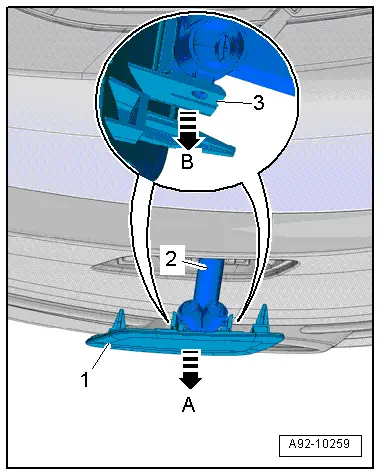
RSQ3 Spoiler-Lower Section, Removing and Installing
Removing
- Remove the lower radiator grille. Refer to
→ Chapter "Radiator Grille, Removing and Installing, Audi RS Q3
through MY 2014".
- Remove the bolt -arrow-.
- ReleaseSEE MORE:
Checking coolant
Fig. 150 Engine compartment - coolant expansion tank (diagram): 1 cover; 2
markings
Observe the safety precautions.
Checking the coolant level
Park the vehicle on a level surface.
Switch the ignition off.
Open the hood.
Check the coolant level in the coolant expansion
tank fig. 146 using th
Hood, Adjusting
Special tools and workshop equipment
required
Gauge - Gap Adjustment -3371-
Gap Dimensions for Hood
Note
All dimensions are in mm with a +- 0.5 mm tolerance.
Dimension -A- = 4.5 mm
Dimension -B- = 4.5 mm
Dimension -C- = 4.5 mm
Dimension -D- = 3.0 mm centered
Height