Audi Q3: Inner Window Shaft Strip, Removing and Installing
Removing
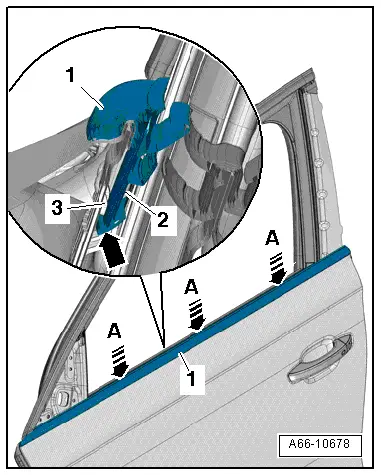
- Remove the front window frame trim panel. Refer to → Body Interior; Rep. Gr.70; Front Door Trim; Window Frame Trim Removing and Installing.
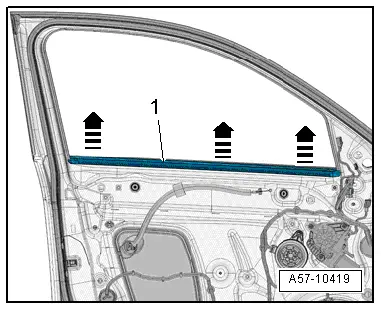
- Remove the window shaft strip -1- upward -arrows-.
Installing
Install in reverse order of removal. Note the following:
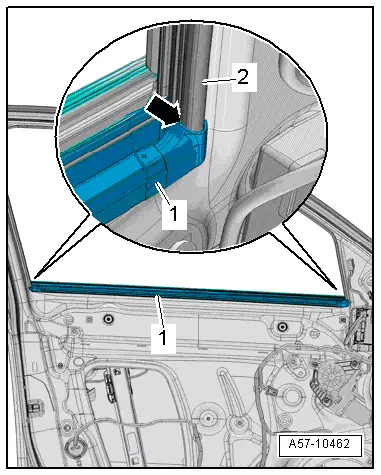
- Place the inner window shaft strip -1- on both ends on the window guide -2--arrow- and press to the center of the door fold.
- Install the front window frame trim panel. Refer to → Body Interior; Rep. Gr.70; Front Door Trim; Window Frame Trim Removing and Installing.
Outer Window Shaft Strip, Removing and Installing
Special tools and workshop equipment required
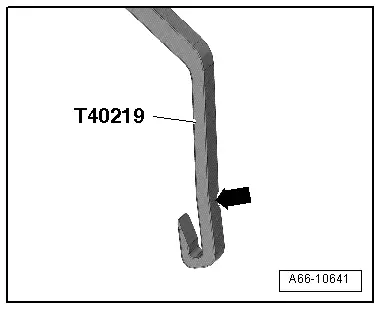
- Window Slot Seal Tool -T40219-
Window Slot Seal Tool -T40219- preparing:
- To remove the window shaft strip, pull the Window Slot Seal Tool -T40219- carefully at the marked location -arrow- so that it can be inserted behind the strip.
Removing
- Lower the door window.
- Remove the door trim panel. Refer to → Body Interior; Rep. Gr.70; Front Door Panels; Front Door Panel, Removing and Installing.
- Remove the mirror adjustment unit bracket. Refer to → Chapter "Mirror Adjusting Unit Mount, Removing and Installing".
- Remove the inner window shaft strip. Refer to → Chapter "Inner Window Shaft Strip, Removing and Installing".
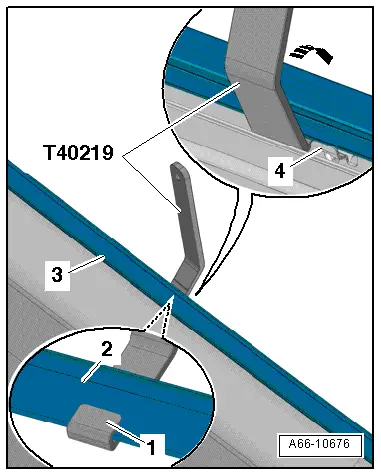
- Insert the Window Slot Seal Tool -T40219- next to the guide-4- for the window shaft strip -3- and hold it on the strip -2-.
- The front section -1- of the Window Slot Seal Tool -T40219- must be installed as illustrated.
- Push the Window Slot Seal Tool -T40219- gently in direction of -arrow- to release it.
- The retaining strip must audibly unlock.
- Remove the window shaft strip upward from the door flange using the Window Slot Seal Tool -T40219-.
- Remove the window shaft strip.
Installing
Install in reverse order of removal. Note the following:
 Note
Note
When installing, the lower edge of the window shaft strip can be coated with tire mounting paste.
- Position the window shaft strip -1- on the B-pillar trim on the door fold and press on it evenly -arrows A-. When doing this, the strip -2- must audibly engage.
- The retaining strip must fit -arrow- under the retaining plate -3-.
- Install the inner window shaft strip. Refer to → Chapter "Inner Window Shaft Strip, Removing and Installing".
- Install the mirror adjustment unit mount. Refer to → Chapter "Mirror Adjusting Unit Mount, Removing and Installing".
READ NEXT:
 Door Inner Cover, Removing and Installing
Special tools and workshop equipment
required
Wedge Set -T10383-
Removing
- Remove the door trim panel. Refer to
→ Body Interior; Rep. Gr.70; Front Door Panels; Front
Door Handle, Removing and Installing
Lock Cylinder, Removing and Installing
Removing
- Remove the sealing plugs.
- Remove the clamping screw -3-
until it stops using a screwdriver -4-.
- Press the lock cylinder ret
Door Lock, Removing and Installing
Door Lock, Removing and Installing
Caution
There is a risk of malfunctions.
The door lock must be removed and installed together
with the bracket to prevent over-bending the cable when
SEE MORE:
Component Location Overview - Relay Carriers, Fuse Panels and E-Boxes
Overview - E-box, Wire Junction, Fuse Panel, Suppressor
1 - Nut
9 Nm
2 - Wiring Harness
3 - Nut
4.5 Nm
4 - Suppressor -C24-
Removing and installing. Refer to
→ Chapter "Suppressor -C24-, Removing and Installing".
5 -
Securing child safety seats belt
Observe the safety precautions. The
front passenger's seat is a dangerous location for
a child, even with an advanced airbag system. If
exceptional circumstances require the child safety
seat to be placed on the front passenger's
seat, then the front passenger's airbag must be
deactivated.
Securing
