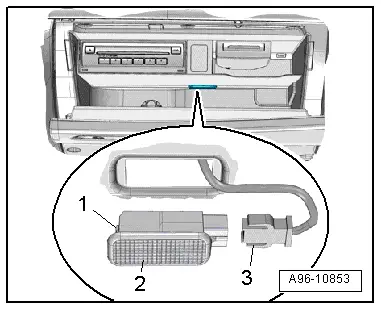
Audi Q3: Glove Compartment Lamp -W6-, Removing and Installing
Removing
- Turn the light switch to position "0".
- Press in the tab -1- using a flat-head screwdriver and pry out the glove compartment lamp -2-.
- Disconnect the connector -3-.
Installing
Install in reverse order of removal. Note the following:
- Connect the connectors.
- Insert the glove compartment lamp into opening and engage on the opposite side.
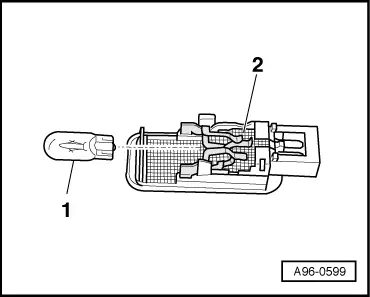
Glove Compartment Lamp -W6- Bulb, Replacing
Removing
- Remove the glove compartment lamp. Refer to → Chapter "Glove Compartment Lamp -W6-, Removing and Installing".
- Remove the bulb -1- from the bulb socket on the back of the glove compartment lamp -2-.
Installing
Install in reverse order of removal.
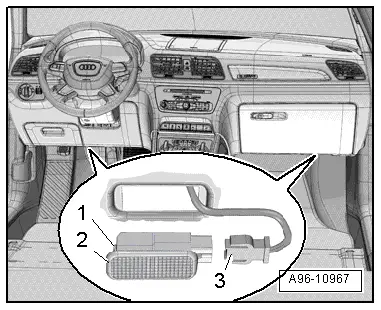
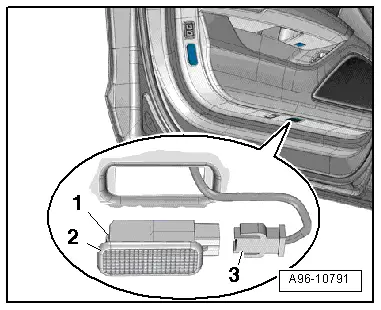
Left/Right Footwell Lamp -W9- / -W10-, Removing and Installing
Removing
- Using a flat-head screwdriver, press in the retaining tab -1- and pry out the footwell lamp -2-.
- Disconnect the connector -3-.
Installing
Install in reverse order of removal. Note the following:
 Note
Note
The entire footwell lamp must be replaced if an LED is faulty.
- Insert the footwell lamp into the opening and engage on the opposite side.
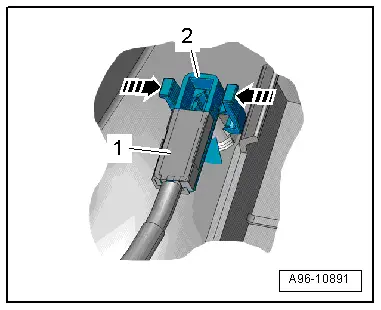
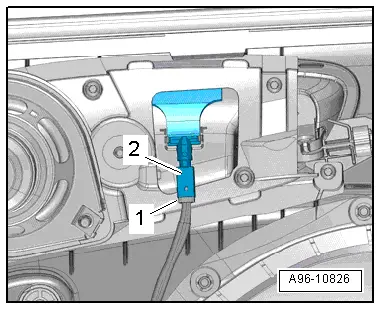
Central Locking -SAFE- Indicator Lamp -K133-, Removing and Installing
Removing
- Remove the front door trim panel. Refer to → Body Interior; Rep. Gr.70; Front Door Trim Panels; Front Door Trim Panel, Removing and Installing.
- Release the retaining clips in direction of -arrows-.
- Remove the central locking LED -1- down out of the door trim -2-.
Installing
Install in reverse order of removal. Note the following:
 Note
Note
The new Central Locking -SAFE- Indicator Lamp -K133- must be connected with the door trim wiring harness.
- Disconnect the wire and connect it with the new wire for the Central Locking -SAFE- Indicator Lamp -K133-. Refer to → Electrical Equipment General Information; Rep. Gr.97; Wiring Harness and Connector Repair.
- Install the front door trim panel. Refer to → Body Interior; Rep. Gr.70; Front Door Trim Panels; Front Door Trim Panel, Removing and Installing.
Driver and Front Passenger Door Opener Illumination Bulb -L108-/-L109-, Removing and Installing
Removing
- Remove the front door trim panel. Refer to → Body Interior; Rep. Gr.70; Front Door Trim Panels; Front Door Trim Panel, Removing and Installing.
- Disconnect the connector -1-.
- Turn the bulb socket -2- to the left and remove it at the door opener.
Installing
Install in reverse order of removal. Note the following:
- Install the front door trim panel. Refer to → Body Interior; Rep. Gr.70; Front Door Trim Panels; Front Door Trim Panel, Removing and Installing.
Left/Right Front Entry Lamp -W31-/-W32-, Removing and Installing
Removing
- Use flat screwdriver to press in the retaining tab -1- and lift out the entry lamp -2-.
- Disconnect the connector -3-.
Installing
Install in reverse order of removal. Note the following:
 Note
Note
The entire entry lamp must be replaced if an LED is faulty.
- Install the entry lamp into the opening and engage on the opposite side.
READ NEXT:
 Driver/Front Passenger Door Warning Lamp -W30-/-W36-, Removing and
Installing
Driver/Front Passenger Door Warning Lamp -W30-/-W36-, Removing and
Installing
Removing
- Press the tab -1- with a
flat-blade screwdriver and remove the door warning lamp
-2-.
- Disconnect the connector -3-.
- Carefully pry out the cover over the lamp in d
Speaker Ambient Lighting Bulb 1 and 2 -L211-/-L212-, Removing and Installing
Speaker Ambient Lighting Bulb 1 -L211-, Removing and Installing, Front
Door
Removing
- Remove the front door trim panel. Refer to
→ Body Interior; Rep. Gr.70; Front Door Tri
Left and Right Ambient Lighting Bulb for Rear Doors -L166-/-L167-, Removing
and Installing
Removing
- Remove the switch mount. Refer to
→ Body Interior; Rep. Gr.70; Rear Door Trim Panels; Rear Pull
Handle Removing and Installing.
Note
The entire lamp muSEE MORE:
Side Air Intake Trim, Removing and Installing, Audi RS Q3 through MY 2014
Removing
- Left: remove the front bumper cover. Refer to
→ Chapter "Bumper Cover, Removing and Installing".
- Right: remove the front wheel housing liner and wheel
spoiler. Refer to
→ Chapter "Front Wheel Housing Liner, Removing and Installing".
- Carefully remov
Battery Jump Start Terminal
Overview - Battery Jump Start Terminal
1 - Bolt
6 Nm
2 - Battery Jump Start Terminal -U6-
With positive terminal grip
Removing and installing. Refer to
→ Chapter "Jump Start Point, Removing and Installing".
3 - Bolts
8 Nm
4 - 