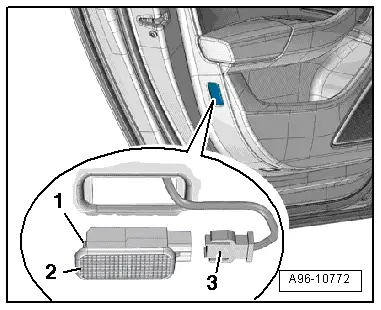
Audi Q3: Driver/Front Passenger Door Warning Lamp -W30-/-W36-, Removing and Installing
Removing
- Press the tab -1- with a flat-blade screwdriver and remove the door warning lamp -2-.
- Disconnect the connector -3-.
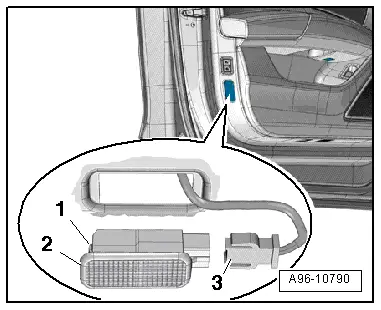
- Carefully pry out the cover over the lamp in direction of -arrow-.

- Remove the bulb -1- from the socket -2- on the back of the door warning lamp.
Installing
Install in reverse order of removal. Note the following:
- Mount the cover on the door warning lamp.
- Insert the door warning lamp into the opening and engage on the opposite side.

Left/Right Rear Door Opener Illumination Bulb -L110- / -L111-, Removing and Installing
Removing
- Remove the rear door trim panel. Refer to → Body Interior; Rep. Gr.70; Rear Door Trim Panels; Rear Door Trim Panel, Removing and Installing.
- Disconnect the connector -1-.
- Turn the bulb socket -2- to the left and remove it at the door opener.
Installing
Install in reverse order of removal. Note the following:
- Install the rear door trim panel. Refer to → Body Interior; Rep. Gr.70; Rear Door Trim Panels; Rear Door Trim Panel, Removing and Installing.
Left/Right Rear Entry Lamp -W33- / -W34-, Removing and Installing
Removing
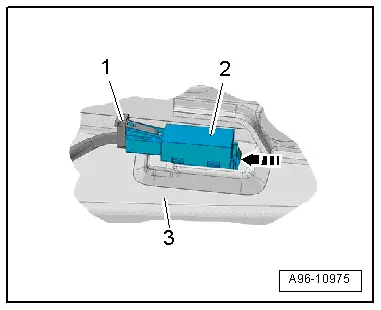
- Use flat screwdriver to press in the retaining tab -1- and lift out the entry lamp -2-.
- Disconnect the connector -3-.
Installing
Install in reverse order of removal. Note the following:
 Note
Note
The entire entry lamp must be replaced if an LED is faulty.
- Install the entry lamp into the opening and engage on the opposite side.
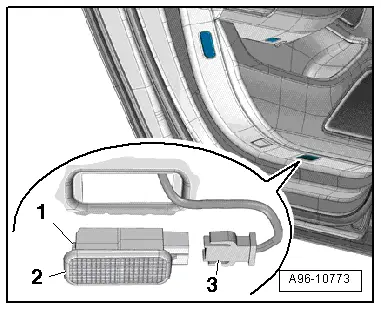
Left/Right Rear Door Warning Lamp -W37-/-W38-, Removing and Installing
Removing
- Press the tab -1- with a flat-blade screwdriver and remove the door warning lamp -2-.
- Disconnect the connector -3-.
- Carefully pry out the cover over the lamp in direction of -arrow-.
- Remove the bulb -1- from the socket -2- on the back of the door warning lamp.
Installing
Install in reverse order of removal. Note the following:
- Mount the cover on the door warning lamp.
- Insert the door warning lamp into the opening and engage on the opposite side.

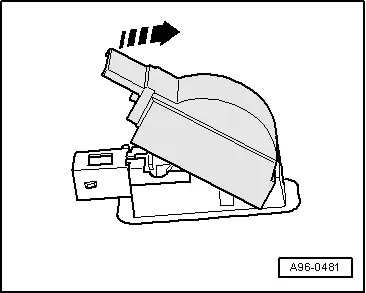
Storage Compartment Illumination Bulb -L120-, Removing and Installing
Removing
- Remove the A/C system control head. Refer to → Heating Ventilation and Air Conditioning; Rep. Gr.87; Display And Control Unit, Removing and Installing.
 Note
Note
The entire lamp must be replaced if an LED is faulty.
- Disconnect the connector -1-.
- Open the clip in direction of -arrow-.
- Remove the storage compartment illumination bulb -2- from the mount -3-.
Installing
Install in reverse order of removal. Note the following:
- Install the A/C system control head. Refer to → Heating Ventilation and Air Conditioning; Rep. Gr.87; Display And Control Unit, Removing and Installing.
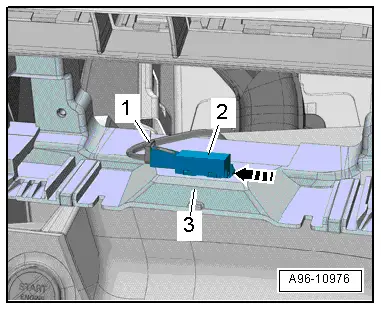
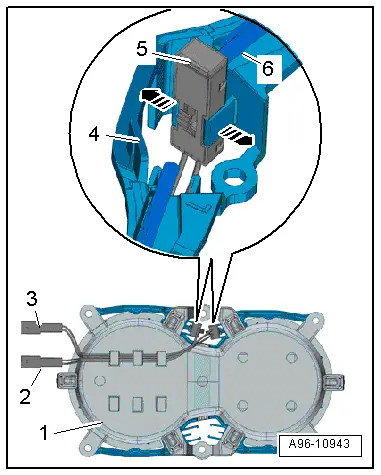
Cupholder Illumination Bulb\Cupholder Illumination Bulb 2 -L121-/-L215-, Removing and Installing
Removing
- Remove the cupholder. Refer to → Body Interior; Rep. Gr.68; Center Console; Cupholder, Removing and Installing.
 Note
Note
The entire lamp must be replaced if an LED is faulty.
- Carefully release the retainers in direction of -arrows- and remove the lamp -5- from the lighting strip -6- and the mount -4-.
- Free up the wiring harness -2 and 3- from the cupholder -1-.
Installing
Install in reverse order of removal. Note the following:
- Install the cupholder. Refer to → Body Interior; Rep. Gr.68; Center Console; Cupholder, Removing and Installing.
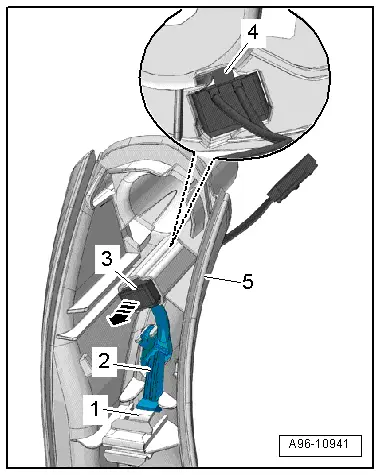
Driver and Front Passenger Door Ambient Lighting Bulb -L164-/-L165-, Removing and Installing
Removing
- Remove the switch mount. Refer to → Body Interior; Rep. Gr.70; Front Door Trim Panels; Front Pull Handle Removing and Installing.
- Open the clip -1- and remove the lighting strip -2- from the pull handle -5- and at the same time disengage from the lamp.
- Release the spring -4- and remove the lamp -3- from the pull handle in the direction of -arrow-.
 Note
Note
The entire lamp must be replaced if an LED is faulty.
Installing
Install in reverse order of removal. Note the following:
- Install the switch mount. Refer to → Body Interior; Rep. Gr.70; Front Door Trim Panels; Front Pull Handle Removing and Installing.
Driver and Front Passenger Door Storage Compartment Illumination Bulb -L160-/-L161-, Removing and Installing
Removing
- Remove the front door trim panel. Refer to → Body Interior; Rep. Gr.70; Front Door Trim Panels; Front Door Trim Panel, Removing and Installing.
- Disconnect the connector -1-.
- Open the clip in direction of -arrow-.
- Remove the door storage compartment illumination bulb -2- from the door trim panel -3-.
Installing
Install in reverse order of removal. Note the following:
 Note
Note
If one of the LEDs is faulty, then the complete door storage compartment illumination bulb must be replaced.
- Install the front door trim panel. Refer to → Body Interior; Rep. Gr.70; Front Door Trim Panels; Front Door Trim Panel, Removing and Installing.
READ NEXT:
 Speaker Ambient Lighting Bulb 1 and 2 -L211-/-L212-, Removing and Installing
Speaker Ambient Lighting Bulb 1 -L211-, Removing and Installing, Front
Door
Removing
- Remove the front door trim panel. Refer to
→ Body Interior; Rep. Gr.70; Front Door Tri
Left and Right Ambient Lighting Bulb for Rear Doors -L166-/-L167-, Removing
and Installing
Removing
- Remove the switch mount. Refer to
→ Body Interior; Rep. Gr.70; Rear Door Trim Panels; Rear Pull
Handle Removing and Installing.
Note
The entire lamp mu
Component Location Overview - Instrument Panel Controls
1 - ASR/ESP Button -E256-
Removing and installing. Refer to
→ Chapter "ASR/ESP Button -E256-, Removing and Installing".
2 - Left Lower Button Unit
Equipment lSEE MORE:
Overview - Center Console
Overview - Center Console, Basic Equipment Level
1 - Storage Compartment
Vehicles with:
With External Audio Source Connection -R199-
Removing and installing. Refer to
→ Chapter "Front Center Console Storage Compartment, Removing and
Installing".
Insert in the mas
Steering Column Electronics Control Module -J527-, Removing and Installing
Steering Column Electronics Control Module -J527-, Removing and
Installing, with Mechanical Ignition Lock
The Airbag Spiral Spring/Return Spring with Slip Ring -F138-
and the Steering Angle Sensor -G85- are integrated in the
Steering Column Electronics Control Module -J527-.
- If replac