Audi Q3: Left and Right Ambient Lighting Bulb for Rear Doors -L166-/-L167-, Removing and Installing
Removing
- Remove the switch mount. Refer to → Body Interior; Rep. Gr.70; Rear Door Trim Panels; Rear Pull Handle Removing and Installing.
 Note
Note
The entire lamp must be replaced if an LED is faulty.
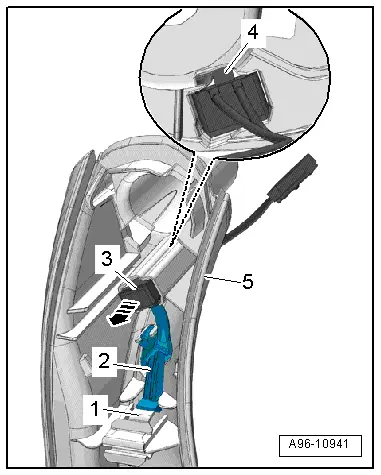
- Open the clip -1- and remove the lighting strip -2- from the pull handle -5- and at the same time disengage from the lamp.
- Release the spring -4- and remove the lamp -3- from the pull handle in the direction of -arrow-.
Installing
Install in reverse order of removal. Note the following:
- Install the switch mount. Refer to → Body Interior; Rep. Gr.70; Rear Door Trim Panels; Rear Pull Handle Removing and Installing.
Left and Right Rear Door Storage Compartment Illumination Bulb -L170-/-L171-, Removing and Installing
Removing
- Remove the rear door trim panel. Refer to → Body Interior; Rep. Gr.70; Rear Door Trim Panels; Rear Door Trim Panel, Removing and Installing.
- Disconnect the connector -1-.
- Open the clip in direction of -arrow-.
- Remove the door storage compartment illumination bulb -2- from the door trim panel -3-.
Installing
Install in reverse order of removal. Note the following:
 Note
Note
The entire lamp must be replaced if an LED is faulty.
- Install the rear door trim panel. Refer to → Body Interior; Rep. Gr.70; Rear Door Trim Panels; Rear Door Trim Panel, Removing and Installing.
Selector Lever Transmission Range Position Display Unit -Y26-, Removing and Installing
Removing
- Remove the center console unit. Refer to → Body Interior; Rep. Gr.68; Center Console; Center Console Unit, Removing and Installing.
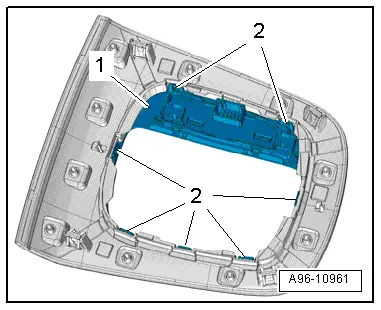
- Carefully release the decorative frame with the display unit -1- from the catches -2- and remove upward.
Installing
Install in reverse order of removal. Note the following:
- Install the center console unit. Refer to → Body Interior; Rep. Gr.68; Center Console; Center Console Unit, Removing and Installing.
Left/Right Rear Footwell Lamp -W45-/-W46-, Removing and Installing
Removing
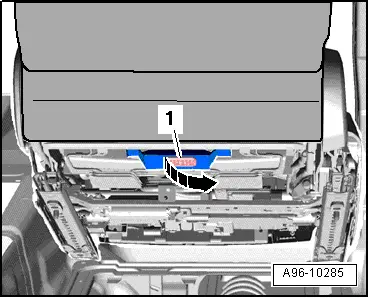
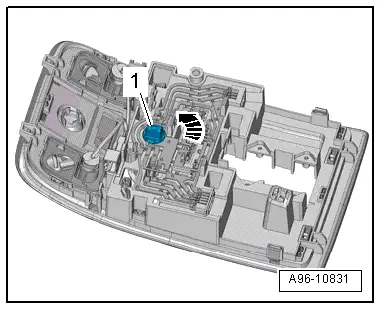
- Carefully pry out the bulb -1- using a flat-blade screwdriver in direction of -arrow-.
- Disconnect the connector.
Installing
Install in reverse order of removal. Note the following:
 Note
Note
The entire footwell lamp must be replaced if an LED is faulty.
- Insert light into opening and engage on opposite side.
Left/Right Luggage Compartment Lamp -W18- / -W35-, Removing and Installing
Removing
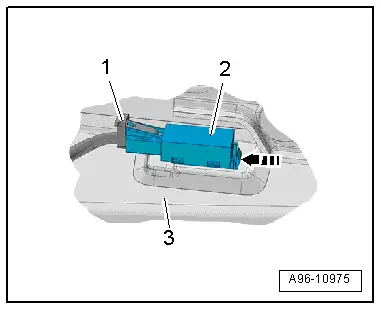
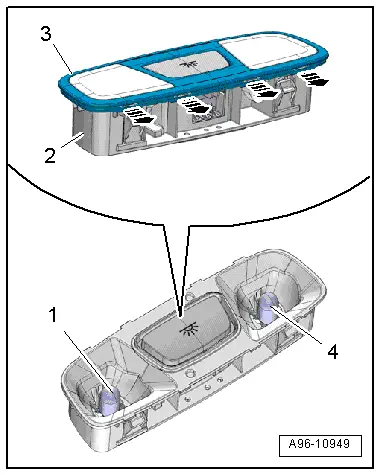
- Press in the tab -1- using a flat screwdriver and pry out the luggage compartment lamp -2-.
- Disconnect the connector -3-.

- Carefully pry out the cover over the lamp in direction of -arrow-.
- Remove the bulb -1- from the bulb socket -2- on the back of the luggage compartment lamp.
Installing
Install in reverse order of removal. Note the following:
 Note
Note
The entire luggage compartment lamp must be replaced if an LED is faulty.
- Insert light into opening and engage on opposite side.
Driver/Front Passenger Vanity Mirror Lamp -W20-/-W14-, Removing and Installing
Removing
- Swivel the sun visor forward.
- Pry out the vanity mirror illumination -1- at the cut-out -arrow B- using a flat-blade screwdriver.
- Disconnect the connector.
Installing
Install in reverse order of removal. Note the following:
 Note
Note
If one of the LEDs is faulty, then it is necessary to replace the entire vanity mirror illumination.

Front Interior Lamp -W1-/Front Passenger Reading Lamp -W13-/ Driver Reading Lamp -W19-, Replacing
Removing
- Remove the front interior/reading lamp. Refer to → Chapter "Front Interior Lamp/Reading Lamp, Removing and Installing".
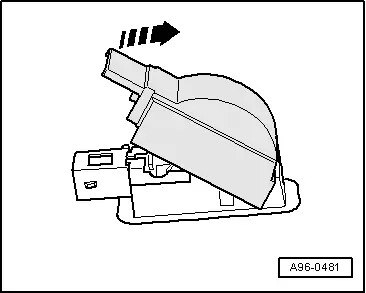
- Turn the bulb socket -1- counterclockwise in direction of -arrow- and remove it from the interior/reading lamp.
- Remove the bulb from the socket.
Installing
Install in reverse order of removal. Note the following:
- Insert the new bulb in the socket. Do not touch the glass bulbs with bare hands.
- Install the front interior lamp/reading lamp. Refer to → Chapter "Front Interior Lamp/Reading Lamp, Removing and Installing".
Left/Right Rear Reading Lamp -W11-/-W12-, Replacing
Removing
- Remove the rear interior/reading lamp. Refer to → Chapter "Rear Interior/Reading Lamp, Removing and Installing".
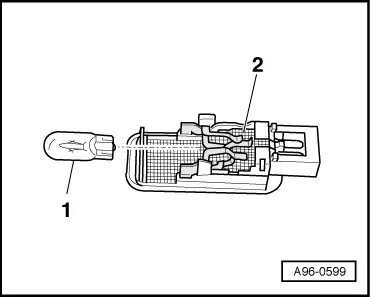
- Carefully release the retaining tabs in direction of -arrow- and remove the interior lamp lens -3-.
- Remove the bulbs -1 and 4- from the bulb socket -2-.
Installing
Install in reverse order of removal. Note the following:
- Install the rear interior/reading lamp. Refer to → Chapter "Rear Interior/Reading Lamp, Removing and Installing".
Ambient Lighting LED, Removing and Installing
The ambient lighting LED is located in the front interior/reading lamp and cannot be replaced separately if faulty.
- Replace the front interior lamp/reading lamp. Refer to → Chapter "Front Interior Lamp/Reading Lamp, Removing and Installing".
READ NEXT:
 Component Location Overview - Instrument Panel Controls
1 - ASR/ESP Button -E256-
Removing and installing. Refer to
→ Chapter "ASR/ESP Button -E256-, Removing and Installing".
2 - Left Lower Button Unit
Equipment l
Component Location Overview - Center Console Controls
1 - Access/Start Authorization Button -E408-
Removing and installing. Refer to
→ Chapter "Access/Start Authorization Button -E408-, Removing and
Installing".
2 -&nbs
Light Switch -E1-, Removing and Installing
Removing
- Turn the light switch to position "0".
- Push the light switch in direction of
-arrow A- and turn right at the same time in direction of
-arrow B-.
- Hold the switch inSEE MORE:
General information
Selecting the radio
Fig. 136 Center display: FM station list
Fig. 137 Center display: SiriusXM station list
Depending on the vehicle equipment, the radio
may support the FM, AM, and SiriusXM (satellite
radio) frequency bands. Using the HD Radio receiver
also allows you to receive radio stations
on
New tires or wheels
Audi recommends having all work
on tires or wheels performed by
an authorized Audi dealer or authorized
Audi Service Facility.
These facilities have the proper
knowledge and are equipped with
the required tools and replacement
parts.
New tires do not yet have the
optimal gripping properties.
Dr