Audi Q3: Condensation Water Drain, Checking
Procedure
- Remove the glove compartment. Refer to → Body Interior; Rep. Gr.68; Storage Compartments and Covers; Glove Compartment, Removing and Installing.
- Remove the right front footwell center console trim panel. Refer to → Body Interior; Rep. Gr.68; Center Console; Front Footwell Center Console Trim Panel, Removing and Installing.
- Carefully fold back the carpet near the condensation water drain hose far enough so that the condensation water drain hose is visible.
- The bracket -5- must be completely clipped into the opening in the body -4-.
- If the bracket with the condensation water drain hose is positioned correctly in the body opening, then the condensation water drain hose must be checked for debris.
- Remove the condensation water drain hose. Refer to → Chapter "Condensation Water Drain, Removing and Installing".

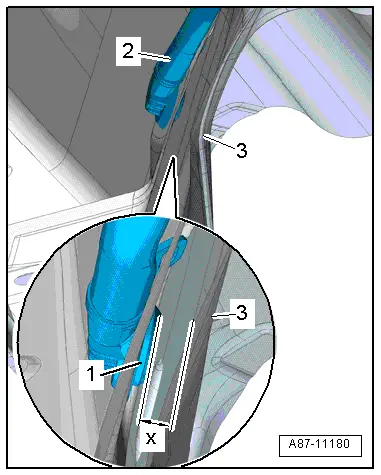
- Check the distance between the condensation water drain opening -1- and the heat shield -3-.
- There must be a sufficient distance (dimension -x-) present, so that the condensation water can drain out of the condensation water drain hose -2-.
- Check the Air Conditioning (A/C) condenser water drain for dirt and if necessary, clean using a piece of wire.
- The cross section of the condensation water drain hose must not be constricted (pressed together).
For complaints of moisture in the passenger compartment, check the following components in addition to the condensation water drain:
- Water drain for the plenum chamber. Refer to → Chapter "Plenum Chamber Water Drain, Checking".
- Rain water drain channel for damage and correct installation. Refer to → Chapter "Fresh Air Intake Cover, Removing and Installing".
- Plenum chamber cover for damage and correct installation. Refer to → Body Exterior; Rep. Gr.50; Bulkhead; Plenum Chamber Cover, Removing and Installing.
- Dust and pollen filter for soiling and correct installation. Refer to → Chapter "Dust and Pollen Filter, Removing and Installing".
- Forced air extraction in the luggage compartment. Refer to → Chapter "Passenger Compartment Forced Air Extraction, Checking".
- Activation and function of the air recirculation door (for example, in the "output diagnostic test mode") using the Vehicle Diagnostic Tester in the "Guided Fault Finding" function.
- If there are complaints of moisture in the passenger compartment, check the vent temperature of the air from the evaporator, which only emerges when the A/C compressor is switched on under certain climatic conditions. Refer to Vehicle Diagnostic Tester in the "Guided Fault Finding" function.
- Read the measured value for the Evaporator Vent Temperature Sensor -G263-.
- Check the vent temperature at the evaporator under conditions of use described by the customer or at the following setting on the control head:
Vehicles with Manually Controlled A/C System:
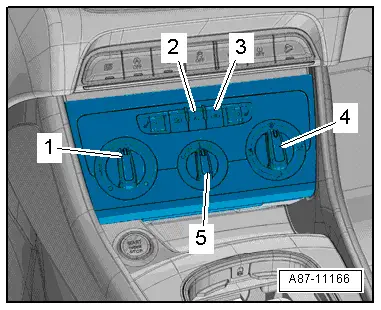
- Adjust the setting on the A/C Control Module -J301- control head.
- A/C compressor switched on - the indicator lamp in the AC or A/C button -2- illuminates (not with a heater without an A/C system).
- The knob -1- for the temperature setting to the "cold" stop.
- The lowest possible fresh air blower speed is set - knob -5- for the fresh air blower speed at level "1".
- Fresh air mode - the indicator lamp in the recirculation button -3- does not illuminate.
Vehicles with automatic climate control system:
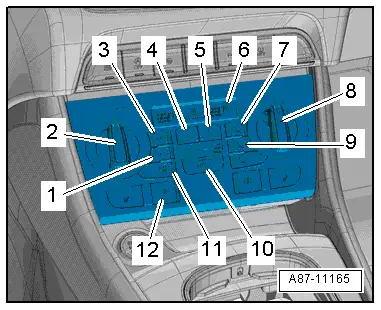
- Adjust the setting on the Climatronic Control Module -J255- control head.
- "Auto" mode, A/C compressor switched on - the indicator lamps in the buttons -1 and 10-.
- Temperature preset via the knobs -2 and 8- - "LO" for the driver and front passenger side in the display -6- on the Climatronic Control Module -J255-.
- Intermediate fresh air blower speed at a voltage of approximately 7 V on the Fresh Air Blower -V2-.
- Fresh air mode - the indicator lamp in the recirculation button -3- does not illuminate.
For All Vehicles:
- Instrument panel vents are opened.
- If the Evaporator Vent Temperature Sensor -G263- measured value is too low (colder than 0 ºC for a long period of time when the ambient temperature is above 0 ºC (32 ºF) ) or too high (even though the A/C system is working correctly, for example: higher than 10 ºC (50 ºF) ), follow the procedure for checking the cooling output. Refer to → Chapter "Cooling Output, Checking".
- Install the right front footwell center console trim panel. Refer to → Body Interior; Rep. Gr.68; Center Console; Front Footwell Center Console Trim Panel, Removing and Installing.
- Install the glove compartment. Refer to → Body Interior; Rep. Gr.68; Storage Compartments and Covers; Glove Compartment, Removing and Installing.
Condensation Water Drain, Removing and Installing
Removing
- Remove the glove compartment. Refer to → Body Interior; Rep. Gr.68; Storage Compartments and Covers; Glove Compartment, Removing and Installing.
- Remove the right front footwell center console trim panel. Refer to → Body Interior; Rep. Gr.68; Center Console; Front Footwell Center Console Trim Panel, Removing and Installing.
- Carefully move the carpet aside and cover it in the area under the condensation water hose with waterproof foil and water absorbing paper.
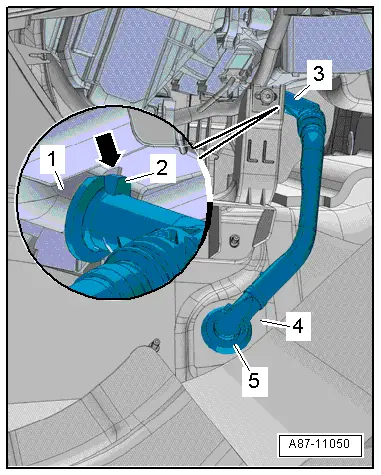
- Remove the condensation water drain hose -3- from the A/C unit (heater) -1- and the body -4-.
Installing
Installation is done is reverse order, observe the following:
- The condensation water drain hose can only be slid onto the A/C unit (the heater) in one position until stop.
- The tab -arrow- on the connection must engage into the guide -2-.
- Insert the condensation water drain hose into the body opening -4- until it audibly engages.
- The condensation water drain -5- must rest properly on the body.
 Note
Note
- Install the condensation water drain hose so that it is not twisted or crushed.
- Make sure the carpet does not push up against the condensation water drain hose when installing.
- If a condensation water drain hose fits too loose on the A/C unit connection, secure it with a clamp, for example, so that it cannot slide off. Hose clamps. Refer to the Parts Catalog.
- Install the right front footwell center console trim panel. Refer to → Body Interior; Rep. Gr.68; Center Console; Front Footwell Center Console Trim Panel, Removing and Installing.
- Install the glove compartment. Refer to → Body Interior; Rep. Gr.68; Storage Compartments and Covers; Glove Compartment, Removing and Installing.
READ NEXT:
 Overview - Air Routing and Air Distribution in Passenger Compartment
Overview - Air Routing and Air Distribution in Passenger Compartment,
Front Air Guides
1 - Screw
1.5 Nm
2 - Left Footwell Vent Air Guide - Driver Side
Removing
Air Intake and Outlet Openings
Air Intake and Outlet Openings, Air Intake Housing
1 - Air Guide Housing
2 - Fresh Air Door
There are different versions. Refer to the Parts Catalog.
Only automatic clima
SEE MORE:
Release Cable, Removing and Installing
Release Cable Coupling
- Remove clips -1- and lift the release
cables -8- and -9-
on both sides toward the hood latches.
- To remove the coupling -2-, release the
retainers -arrows- on the front of the lock
carrier -3- and push them to the rear out
of the bracket.
- Eng
Front Pull Handle, Removing and Installing
Front Pull Handle, Removing and Installing
Removing
- Remove the armrest. Refer to
→ Chapter "Front Armrest, Removing and Installing".
- Disconnect the connector for the window regulator control
head.
- Driver side: disconnect the connector for the Mirror
Adjusting Sw
