Audi Q3: Airbag Fasteners, Checking After a Collision
All damaged securing pieces must be replaced, you cannot reshape components or "make them fit".
The following components must be checked after every airbag deployment.
With a passenger airbag deployment:
- Instrument panel central tube, passenger airbag supports and passenger airbag must be installed free of tension. Replace central tube.
- Check the glove compartment for damage. Replace the glove compartment if damaged.
With a driver airbag deployment:
- Steering wheel: Remove the steering wheel and place it with the rim on a flat surface. The entire steering wheel rim must rest on the surface. Otherwise, steering wheel should be replaced.
- Check steering wheel for smoke residue. If smoke residue is present, replace steering wheel.
Collision without Airbag Deployment
- If the Airbag Indicator Lamp -K75- does not indicate a malfunction, then it is not necessary to replace the pyrotechnic components. Seat belts must be inspected separately.
Seat Belts, Checking
 WARNING
After every accident the seat belt system must be inspected systematically! If damage is determined when inspecting the check points, customer must be informed regarding necessity of changing belts.
Inspection Points
- Check the belt webbing. Refer to → Chapter "Seat Belt Webbing, Checking".
- Check the automatic belt retractor (locking function). Refer to → Chapter "Automatic Belt Retractor, Checking".
- Visual inspection of belt buckle. Refer to → Chapter "Seat Belt Latch, Inspecting Visually".
- Belt latch function test. Refer to → Chapter "Seat Belt Latch Function Test".
- Check the seat belt relays and latch tongue. Refer to → Chapter "Seat Belt Relays and Belt Tongue, Checking".
- Check securing components and anchorage points. Refer to → Chapter "Attachments and Attaching Points, Checking After a Collision".
- Check the function of the child seat anchorage for additional child seats (not for the driver safety belt). Refer to → Chapter "Seat Belt for Child Seat, Checking Child Seat Restraint Function, Market-Specific".
 Caution
If customer refuses to have a damaged seat belt replaced, appropriate note should be made in the customer Maintenance booklet.
Seat Belt Webbing, Checking
Procedure
- Pull the belt completely out of the automatic belt retractor or lap belt adjustment tongue.
- Check belt webbing for soiling, wash with mild soap solution if necessary. Refer to the Operating Instructions.
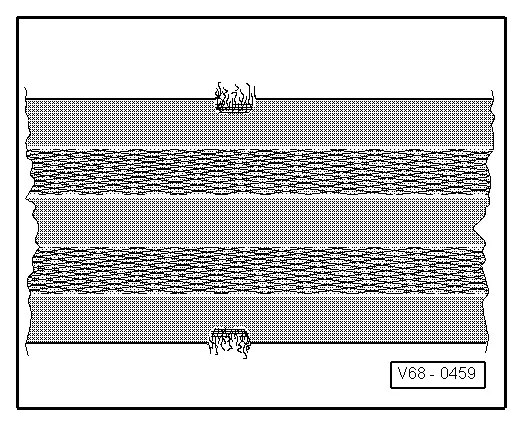
- If one of the types of damage (1 and 2) shown in the following is detected on a vehicle which has been in an accident - seat belt must be replaced completely with belt buckle.
- If damage as illustrated under points 1 or 2 is determined on vehicle which has not been involved in an accident, it is sufficient to replace damaged belt only.
- 1 - Belt webbing cut, torn or chafed.
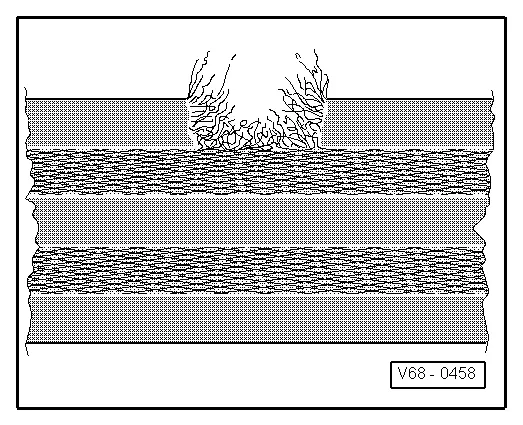
- 2 - Webbing loops on belt edge torn.
Automatic Belt Retractor, Checking
The automatic belt retractor has two locking functions.
- The first locking function is initiated by the belt being jerked out of the belt retractor (belt extraction acceleration).
Test 1
- Pull the belt webbing out of the belt retractor with a firm jerk.
- No locking effect - replace seat belt complete with belt buckle.
- If difficulties are experienced when pulling out or retracting belt, first check whether position of the belt retractor has been altered.
- The second locking function is initiated by change in vehicle velocity (vehicle-dependent locking function).
Test 2
 WARNING
For safety reasons, road test should be carried out on traffic-free stretch to ensure that other motorists/pedestrians etc. are not endangered.
- Fasten seat belt.
- Accelerate vehicle to 20 km/h (12 mph) and then perform a full braking maneuver with foot brake.
- Replace seat belt complete with seat belt latch if seat belt is not locked by locking mechanism during braking procedure.
Seat Belt Latch, Inspecting Visually
- Inspect belt buckle for cracks and fracturing.
- If damaged, replace seat belt complete with belt buckle.
Seat Belt Latch Function Test
Checking Belt Buckle
- Insert belt tongue into belt buckle until it clicks into place. Check whether the locking mechanism is properly engaged by giving the belt webbing a firm jerk.
- Replace seat belt complete with seat belt latch if belt tongue fails even only once to engage properly in seat belt latch during at least five tests.
Check Release Mechanism
- Press the seat belt latch to release the seat belt. With the seat belt relaxed, the lock tongue must spring out of seat belt latch without assistance.
- Perform the test at least five times. Replace the seat belt completely together with the seat belt latch if the lock tongue fails to spring out even once.
 WARNING
Under no circumstances may grease be used to eliminate noise or stiffness at belt buckle buttons.
Seat Belt Relays and Belt Tongue, Checking
The plastic-covered guides show fine parallel scoring after straining of the belt system (belt was fastened during accident). (Wear which has been brought about by frequent belt use can be recognized by smooth signs of wear which are free of scoring).
- Check plastic for deformation, rupture and tearing.
- For groove build-up and/or damage, replace seat belt completely with lock.
Attachments and Attaching Points, Checking After a Collision
- Buckle latch deformed (stretched).
- Height adjustment not functional.
- Anchorage points (seat, pillar, vehicle floor) distorted or threads damaged.
- If damage is found at components, replace the seat belt completely with lock.
- If parts of the seat belt system are removed due to an accident, replace the belt system mounting bolts.
- Replace anchorage points.
 Note
Note
In damage is discovered that is not accident-related, for example, wear, replace the particular part which is damaged.
Seat Belt for Child Seat, Checking Child Seat Restraint Function, Market-Specific
To check function, you must install entire belt system, including side trim.
Switching Hold Function On
- Pull out seat belt as far as the stop.
Correct Function
- Belt must retract with a chattering sound.
- If retracting process is stopped, belt cannot be pulled out anymore.
Deactivating
- Belt retraction to about 100 mm remaining.
- Hold function must switch off with a remainder of 100 mm, at the latest. Belt functions normally again.
If the seat belt child seat anchorage does not work, replace the seat belt
Child Seat Anchors, Checking After a Collision
Inspection Points
- Child seat anchors must be checked for damage or deformation after a collision.
- Child seat anchors welded or bolted into the body or the seat or backrest must not be repaired or straightened.
- Child seat anchors bolted into the body or the seat or backrest must be replaced if damaged or deformed.
- Child seat anchors securing bolts should be replaced if bracket is damaged.
Automatic Dimming Interior Rearview Mirror Safety Precautions
 WARNING
- To produce its unique properties, the interior rearview mirror glass is composed of several layers and contains an electrolyte. Be careful of electrolyte leaking from a broken mirror.
- The liquid electrolyte can cause irritation to the skin, eyes and respiratory system.
- If liquid electrolyte comes into contact with the eyes or skin, flush thoroughly with plenty of water. If irritation persists, seek medical attention immediately.
 Caution
Electrolyte leaking from a broken mirror will damage all plastic surfaces it comes in contact with. Remove spilled electrolyte immediately using clean water and a sponge.
Repair Information
Contact Corrosion
Contact corrosion can occur if incorrect fasteners (bolts, nuts, washers, etc.) are used.
For this reason, only fasteners with a special surface coating are installed.
In addition, rubber or plastic parts and adhesives consist of non-conductive materials.
If there are doubts as to whether parts can be reused or not, use new parts. Refer to the Parts Catalog.
 Note
Note
- The use of original replacement parts is recommended, they are tested and are compatible with aluminum.
- The use of Audi accessories is recommended.
- Damage due to contract corrosion is not covered under warranty!
Wire Routing and Securing
When loosening or removing and installing hydraulic, pneumatic or electrical lines, draw sketches or take pictures. This ensures installation is the same as the original.
Special Tools
Special tools and workshop equipment required
- Vehicle Diagnostic Tester
READ NEXT:
 Component Location Overview - Storage Compartment/Covers
1 - Center Console
Overview. Refer to
→ Chapter "Overview - Center Console".
2 - Driver Side Instrument Panel Cover
Overview. Refer to
→ Chapter "Ove
Driver Side Instrument Panel Cover, Removing and Installing
Note
As a replacement part, the new cover is delivered with an
additional attaching point.
Special tools and workshop equipment
required
Wedge Set -T10383-
Removing
- Remov
SEE MORE:
Component Location Overview - Center Console Controls
1 - Access/Start Authorization Button -E408-
Removing and installing. Refer to
→ Chapter "Access/Start Authorization Button -E408-, Removing and
Installing".
2 - Heated Driver Seat Adjuster -E94-
Integrated in the A/C Control Module -J301-/ Climatronic Con
Noise Insulation
Overview - Noise Insulation
1 - Bolt
2.5 Nm
Quantity: 3
2 - Front Noise Insulation
For the engine
Removing and installing. Refer to
→ Chapter "Noise Insulation, Removing and Installing".
3 - Rubber Washer
Quantity: 2
4 - Qu
