Audi Q3: Driver Side Instrument Panel Cover, Removing and Installing
 Note
Note
As a replacement part, the new cover is delivered with an additional attaching point.
Special tools and workshop equipment required
- Wedge Set -T10383-
Removing
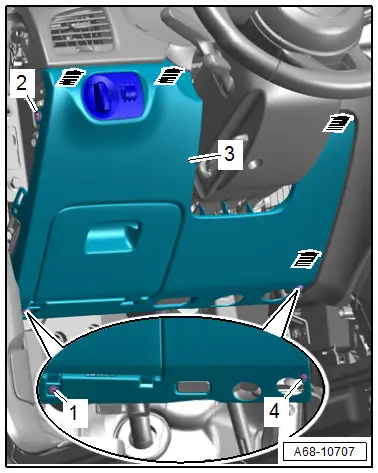
- Remove the side cover from the instrument panel on the driver side. Refer to → Chapter "Instrument Panel Side Cover, Removing and Installing".
- Remove the side screw -2-.
- Remove the lower bolts -1 and 4-.
- Unclip the driver side instrument panel cover -3- from the instrument cluster using the Wedge -T10383/1--arrows-.
 Note
Note
The instrument panel cover can only be unclipped from the instrument panel by exerting a relatively high amount of force.
- Disconnect the connector from the light switch.
- If the vehicle has footwell lamps: disconnect the connector.
Installing
Install in reverse order of removal. Note the following:
 Note
Note
- As a replacement part, the new cover is delivered with an additional attaching point.
- On a used instrument panel and a new cover, the attaching points -arrow A- and -arrow B- can be offset approximately 1 mm.
- When offsetting the attaching points, the hole on the instrument panel must be reworked as described in the following:
- Remove approximately 3 mm overhang at the hole -arrow B- on the instrument panel with a small file.
Installation notes, for example tightening specifications, replacing components. Refer to → Chapter "Overview - Driver Side Instrument Panel Cover".

Instrument Cluster Gap Cover, Removing and Installing
Special tools and workshop equipment required
- Trim Removal Wedge -3409-
Removing
- Move the steering wheel as far down as possible.
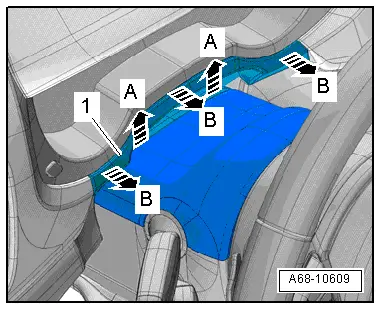
- Using a small flat-head screwdriver, carefully unclip the gap cover -1- from the upper trim panel for the steering column switch module -A arrows-.
- Unclip the instrument cluster gap cover from the instrument panel using the Trim Removal Wedge -3409--B arrows-.
- Remove the cover.
Installing
Install in reverse order of removal.
Installation notes, for example tightening specifications, replacing components. Refer to → Chapter "Overview - Steering Column Trim Panel".
Upper Steering Column Trim Panel, Removing and Installing
Removing
- Move the steering wheel as far down as possible.
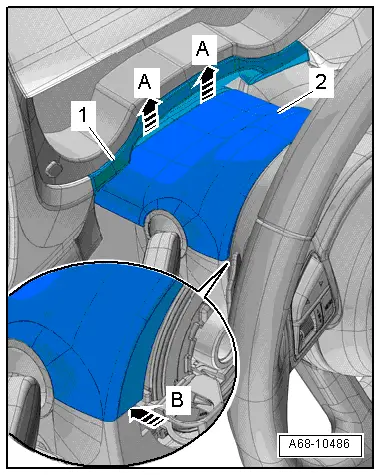
- Using a small flat-head screwdriver, carefully unclip the gap cover -1- from the upper trim panel -2- for the steering column switch module -arrow A-.
- Turn the steering wheel counterclockwise 90º from the straight position.
- Carefully pry the upper trim off the lower trim using a small flat blade screwdriver -arrow B-.
- Turn the steering wheel back 180º and repeat the procedure on the opposite side.
- Disengage the upper steering column switch module trim from the lower trim and remove it.
Installing
Install in reverse order of removal. Note the following:
- Engage the upper trim panel -1- in the lower trim panel -A arrows-.
- Make sure that the lower trim panel pins engage in the opening at the upper trim panel retaining tab -B arrows-.
Installation notes, for example tightening specifications, replacing components. Refer to → Chapter "Overview - Steering Column Trim Panel".

Lower Steering Column Trim Panel, Removing and Installing
Removing
- Remove the upper steering column switch module trim. Refer to → Chapter "Upper Steering Column Trim Panel, Removing and Installing".
- Turn the steering wheel counterclockwise 90º from the straight position.
- Remove the bolt -1-.
- Turn steering wheel back 180º and remove screw on the opposite side.
 Note
Note
When bolt -1- is not accessible, the steering wheel must be removed for further work. Refer to → Suspension, Wheels, Steering; Rep. Gr.48; Steering Wheel; Steering Wheel, Removing and Installing.
- Remove the screw -3- and the lower trim panel -2- for the steering column switch module.
- Disconnect the connector.
Installing
Install in reverse order of removal.
Installation notes, for example tightening specifications, replacing components. Refer to → Chapter "Overview - Steering Column Trim Panel".

READ NEXT:
 Glove Compartment Handle, Removing and Installing
Special tools and workshop equipment
required
Locking Pin (3 pc.) -T40011-
Removing
Note
If glove compartment cover does not open, it can be opened
via the emergency release. Ref
Equipment
Overview - Sun Visors
1 - Sun Visor
Allocation. Refer to the Parts Catalog.
Removing and installing. Refer to
→ Chapter "Sun Visor, Removing and Installing".
Insert visor
Overview - Center Console
Overview - Center Console, Basic Equipment Level
1 - Storage Compartment
Vehicles with:
With External Audio Source Connection -R199-
Removing and installing. Refer to
→&nbsSEE MORE:
Brake fluid
Fig. 151 Engine compartment: cap on brake fluid reservoir
Observe the safety precautions.
Checking the brake fluid level
Park the vehicle on a level surface.
Read the brake fluid level on the brake fluid
reservoir fig. 146. The brake
fluid
level must be between the MIN and MAX markings.
Th
Drive Axle, Removing and Installing
Removing
- Measure dimension from center of wheel to lower edge of
wheel housing. Refer to
→ Chapter "Wheel Bearing in Curb Weight, Lifting Vehicles with
Coil Spring".
- Loosen the drive axle threaded connection. Refer to
→ Chapter "Drive Axle Threaded Connection, Lo