Audi Q3: Underbody Panel
Overview - Underbody Panels

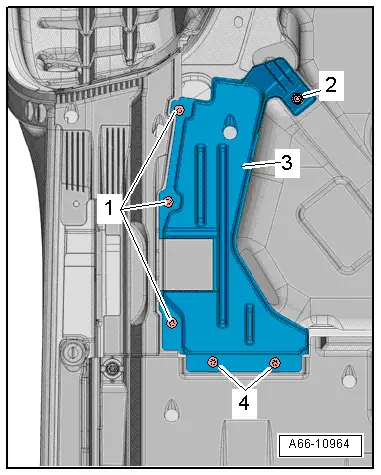
1 - Nut
- 2 Nm
- Quantity: 11
2 - Spring Nut
- For the quick release
3 - Underbody Panel
- Removing and installing. Refer to → Chapter "Underbody Panels, Removing and Installing".
4 - Nut
- 2.5 Nm
5 - Nut
- 2.5 Nm
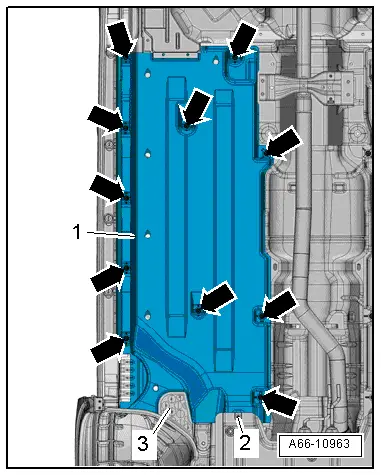
6 - Center Rear Underbody Panel
- Only for Front Wheel Drive (FWD)
- Removing and installing. Refer to → Chapter "Rear Center Underbody Panel, Removing and Installing".
7 - Nut
- 2.5 Nm
8 - Bracket
9 - Expanding Rivet
- Quantity: 2
10 - Nut
- 2.5 Nm
11 - Nut
- 2.5 Nm
12 - Bolt
- 2.5 Nm
- Quantity: 3
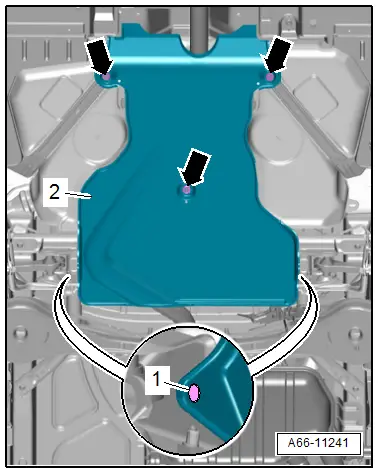
13 - Rear Underbody Trim
- Removing and installing. Refer to → Chapter "Underbody Panels, Removing and Installing".
14 - Metal Nut
- Quantity: 2
15 - Bolt
- 2.5 Nm
- Quantity: 2
Underbody Panels, Removing and Installing
Underbody Panels, Removing and Installing
Removing
- Remove the nut -2- and bolts -1 and 4-.
- Remove the rear underbody panel -3-.
- Loosen the quick-release fastener -2-.
- Remove the nuts -arrows-.
- Remove the underbody panel -1-.
Installing
Install in reverse order of removal. Note the following:
- The underbody panel must be pushed behind the rear underbody panel -3-.
Rear Center Underbody Panel, Removing and Installing
Removing
- Remove the expanding rivet -1-.
- Remove the nuts -arrows- and the underbody panel -2-.
Installing
Install in reverse order of removal. Note the following:
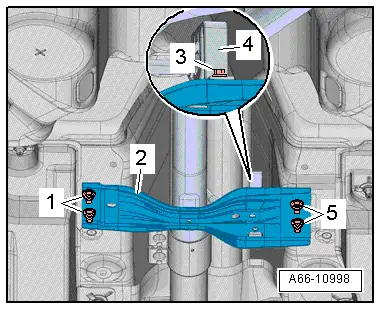
Tunnel Bridge, Removing and Installing
Removing
- Remove the nuts -1 and 5-
- Remove the bolts -3- from the suspended mount -4- for the center muffler.
- Remove the crossbrace -2-.
Installing
Install in reverse order of removal. Note the following:
- Install the center muffler suspended mount. Refer to → Rep. Gr.26; Exhaust Pipes/Mufflers; Overview - Muffler.
READ NEXT:
 Roof Bars/Roof Rails
Overview - Roof Railing
1 - Nut
Quantity: 4
Install with locking compound. For the correct locking compound,
refer to the Parts Catalog.
Tightening sequence. Refer to
→
Roof Railing, Removing and Installing
Roof Railing, Removing and Installing
WARNING
Follow all Safety Precautions when working with
pyrotechnic components. Refer to
→ Body Interior; Rep. Gr.00; Safety Prec
Exterior Rearview Mirror
Overview - Exterior Rearview Mirror
1 - Bolt
1 Nm
2 - Mirror Adjusting Unit
Removing and installing. Refer to
→ Chapter "Mirror Adjusting Unit, Removing and SEE MORE:
Repair Information
Shock Absorber Leaks
Shock absorbers are frequently rejected and exchanged
because of leaks. Examinations on the test stand and on the
vehicle have shown that the replacement of a large number of
rejected shock absorbers was not justified.
Slight leaking of oil ("sweating") at piston rod sea
Wheel Bearing Housing, Removing and Installing
Special tools and workshop equipment
required
Puller - Ball Joint -3287A-
Torque Wrench 1332 40-200Nm -VAG1332-
Engine and Gearbox Jack -VAS6931-
Digital Torque Wrench -VAG1756A-
Spreader Tool -3424-
Removing
- Loosen the drive axle threaded connection on the wheel side.
Ref