Audi Q3: Roof Railing, Removing and Installing
Roof Railing, Removing and Installing
 WARNING
Follow all Safety Precautions when working with pyrotechnic components. Refer to → Body Interior; Rep. Gr.00; Safety Precautions; when working with Pyrotechnic Components.
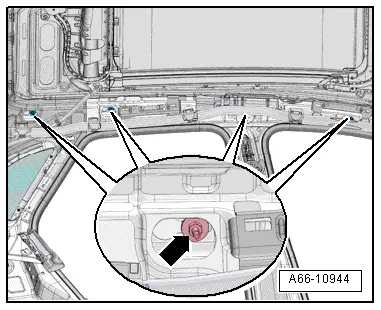
Removing
- Lower the headliner. Refer to → Body Interior; Rep. Gr.70; Roof trim; Headliner, removing and installing.
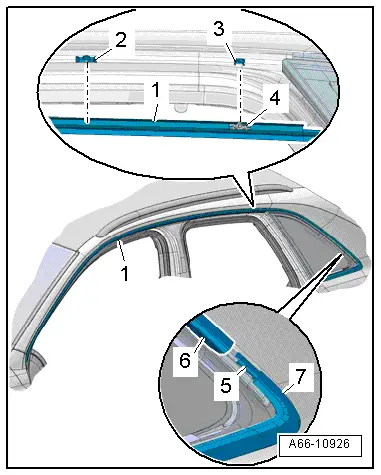
- Remove the nuts -arrow-.
- Remove the roof rail upward.
Installing
Install in reverse order of removal. Note the following:
 Note
Note
- Clean the threaded pin threads on the roof rail with a wire brush.
- Carefully clean the threads of the nuts that are coating with locking fluid free of locking fluid residue using a thread cutter. Otherwise, the threaded pins could lock up when installed and shear off when removed again.
- Install the roof rail with the guide pins in the mount on the vehicle roof.
- Install the nuts with locking fluid and tighten. Refer to → Fig. "Roof Rail - Tightening Specification and Sequence".
- Install the headliner. Refer to → Body Interior; Rep. Gr.70; Roof trim; Headliner, removing and installing.
Balancing Element, Removing and Installing
Removing
- Remove the roof rail. Refer to → Chapter "Roof Railing, Removing and Installing".
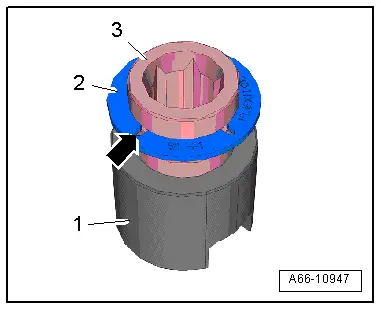
- Press the adjusting screw -1- in the balancing element -3-.
- Slide the balancing element and remove inward from roof cutout -2-.
Installing
Install in reverse order of removal. Note the following:
 Note
Note
- Use a wire brush to clean the threads of bolts that were screwed in with locking compound.
- All threaded bores in which bolts with locking fluid were installed must be carefully cleaned of remaining locking fluid using a thread cutter. If the holes are not cleaned, then the bolts could break off the next time they are removed.
- Replace a damaged gasket.
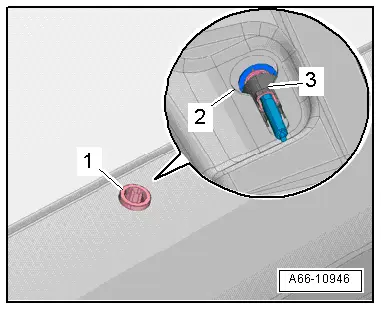
- Check the seal -2- for damage.
- The seal most sit in the groove -arrow-.
- Install the adjustment screw -3- with locking fluid in the balancing element -1-, place in the roof cut out and secure.
- Install the roof rail. Refer to → Chapter "Roof Railing, Removing and Installing".
Roof Trim Molding, Removing and Installing
Special tools and workshop equipment required
- Wedge Set -T10383-
Removing
 Note
Note
- Do not bend the roof trim molding.
- Tape around the roof trim molding on the A-pillar to prevent damaging the paint.
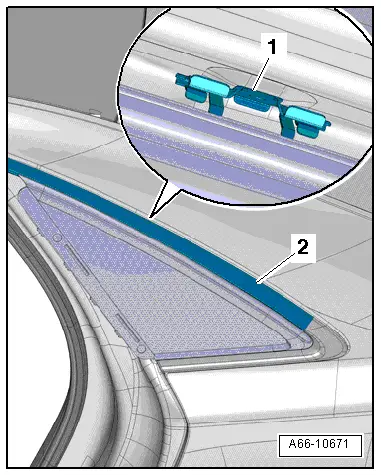
- Open the front and rear doors.
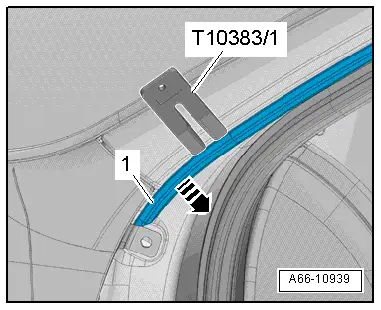
- Using the Wedge -T10383/1- pry up the roof trim molding -1- beginning at the A-pillar from the clips -arrows-.
- Remove the roof trim molding from the clips -1- in the area around the rear side window -2-.
- Have a second technician hold the roof trim molding to keep it from damaging the paint.
- Tape off the area around the side window trim molding -1- with adhesive tape, as illustrated, -3- to protect the paint.
- Pull the roof trim molding -2- out of the clips -1- in the side window in direction of -arrow-.
- Remove the roof trim molding.
Installing
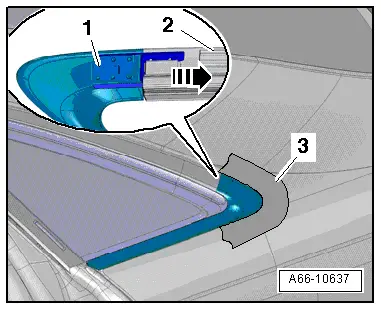
- Install the roof trim molding -1- into the side window trim molding -7-.
- The clamp -5- must fit correctly into the guide -6-.
- The roof trim molding be touching the end of the side window trim molding.
- Place the roof trim molding with the alignment pins -4- in the clip mount -3- in the vehicle roof.
- Push the roof trim molding in the area of the side window in the clamps and clips -2- until it engages audibly.
READ NEXT:
 Exterior Rearview Mirror
Overview - Exterior Rearview Mirror
1 - Bolt
1 Nm
2 - Mirror Adjusting Unit
Removing and installing. Refer to
→ Chapter "Mirror Adjusting Unit, Removing and
Wheel Housing Liner
Overview - Front Wheel Housing Liner
1 - Front Wheel Spoiler
Removing and installing. Refer to
→ Chapter "Front Wheel Spoiler, Removing and Installing".
2 - Bolt
Name Badges and Emblems
Overview - Name Badges and Emblems
Overview - Name Badges and Emblems, Vehicles through MY 2014
1 - Audi Rings
Removing and installing. Refer to
→ Chapter "Front Emblem, RemSEE MORE:
Brake Caliper Piston, Removing and Installing
Brake Caliper Piston, Removing and Installing, Single-Piston Brake
Special tools and workshop equipment
required
Trim Removal Wedge -3409-
Piston Resetting Tool -T10145-
Piston Resetting Tool - Cap /6 -T10146/6- from Piston
Resetting Tool - Caps /1,/2,/3,/4,/5 -T10146-
Removing
T
Left/Right HID Headlamp Bulb -L13-/-L14-, Removing and Installing
Left/Right HID Headlamp Bulb -L13-/-L14-, Removing and Installing,
through MY 2014
WARNING
High voltage poses a life-endangering risk, injury
risk and environmental hazard.
HID headlamp usage and safety precautions. Refer to
→ Chapter "HID Headlamp Usage and Safety Precautio