Audi Q3: Exterior Rearview Mirror
Overview - Exterior Rearview Mirror
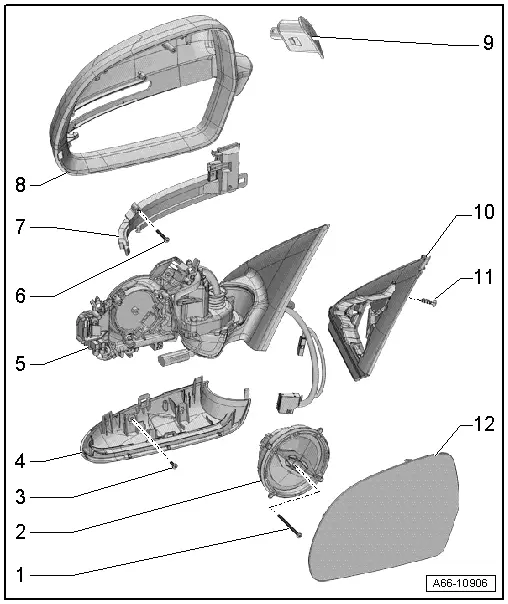
1 - Bolt
- 1 Nm
2 - Mirror Adjusting Unit
- Removing and installing. Refer to → Chapter "Mirror Adjusting Unit, Removing and Installing".
3 - Bolt
- 1 Nm
- Quantity: 2
4 - Cover
- For the mirror adjusting unit mount
- Removing and installing. Refer to → Chapter "Mirror Trim, Removing and Installing".
5 - Mirror Adjusting Unit Mount
- Common part with cover
- Removing and installing. Refer to → Chapter "Mirror Adjusting Unit Mount, Removing and Installing".
6 - Bolt
- Quantity: 2
- Tightening specification. Refer to → Electrical Equipment; Rep. Gr.94; Overview - Exterior Rearview Mirror Lamps.
7 - Exterior Mirror Turn Signal Lamp
- Removing and installing. Refer to → Electrical Equipment; Rep. Gr.94; Lamps in the Exterior Rearview Mirror; Driver and Front Passenger Exterior Rearview Mirror Turn Signal Bulb L131/L132 Removing and Installing.
8 - Exterior Mirror Housing
- Removing and installing. Refer to → Chapter "Exterior Mirror Housing, Removing and Installing".
9 - Lane Change Assistance Warning Lamp inside the Exterior Mirror
- Removing and installing. Refer to → Electrical Equipment; Rep. Gr.96; Lane Change Assistance; Lane Change Assistance Warning Lamp in Driver and Front Passenger Exterior Rearview Mirrors K233/K234 Removing and Installing.
10 - Seal
- for the mirror base
11 - Bolt
- 10 Nm
12 - Mirror Glass
- Removing and installing. Refer to → Chapter "Mirror Glass, Removing and Installing".
Mirror Glass, Removing and Installing
Special tools and workshop equipment required
- Double Suction Lifter -VAG1344-
- Safety Gloves
Removing
 WARNING
Risk of injury.
Wear safety gloves.
- Position the Double Suction Lifter -VAG1344- on the center of the mirror glass -1-, as illustrated.
- Remove the mirror glass from the mirror adjuster using the Double Suction Lifter - VAG1344-.
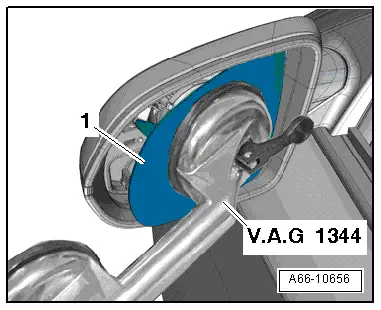
- Disconnect the connectors -1 and 2- for the mirror heating on the back of the mirror glass -3-.
- Unclip the connector -4- (if equipped) from the bracket -arrow-.
Installing
Install in reverse order of removal. Note the following:
- Position the mirror glass on the mirror adjusting unit and press it on.
 Note
Note
Only press the center of the mirror glass when pressing it on.
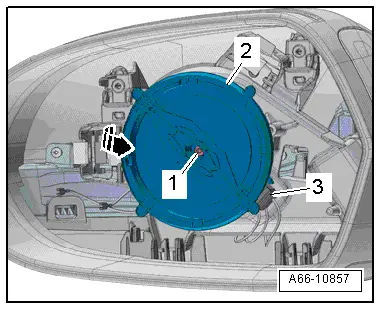
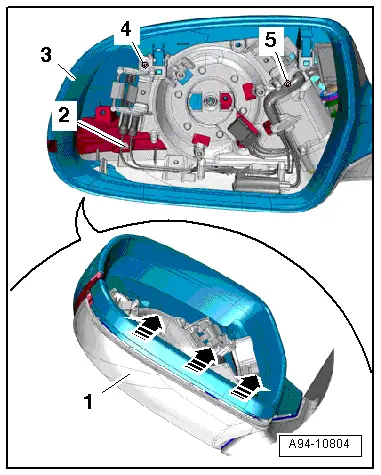
Mirror Adjusting Unit, Removing and Installing
Mirror Adjusting Unit, Removing and Installing
Removing
- Remove the mirror glass. Refer to → Chapter "Mirror Glass, Removing and Installing".
- Remove the bolt -1-.
- Disengage the mirror adjuster -2- from the mount -arrow-.
- Disconnect the connector -3- from the mirror adjuster.
- Remove the mirror adjuster.
Installing
Install in reverse order of removal. Note the following:
- Press the mirror adjusting unit onto the mirror mount until it engages audibly.
- Install the mirror glass. Refer to → Chapter "Mirror Glass, Removing and Installing".
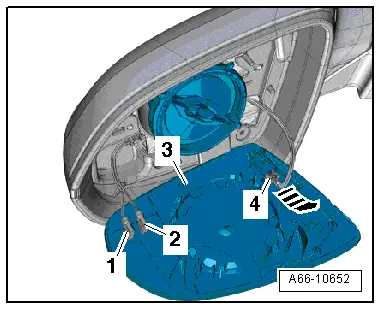
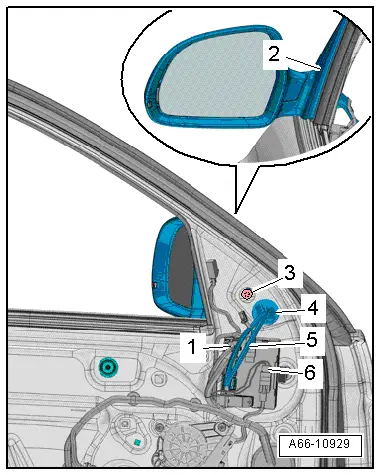
Mirror Adjusting Unit Mount, Removing and Installing
Removing
- Remove the window frame trim panel. Refer to → Body Interior; Rep. Gr.70; Front Door Trim; Window Frame Trim Removing and Installing.
- Remove the clip and disconnect the connector -1-.
- Disconnect the connector -6-.
- Remove the bolt -3-.
- Remove the mirror adjusting unit mount -2- while guiding the grommet -4- and the wiring harness -5- out through the body opening.
Installing
Install in reverse order of removal. Note the following:
- Install the window frame trim panel. Refer to → Body Interior; Rep. Gr.70; Front Door Trim; Window Frame Trim Removing and Installing.
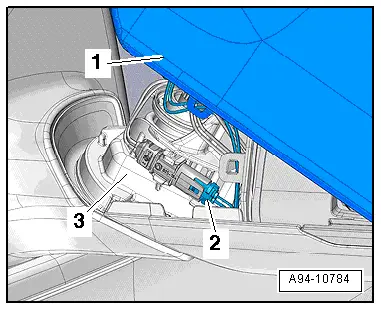
Exterior Mirror Housing, Removing and Installing
Removing
- Remove the mirror glass. Refer to → Chapter "Mirror Glass, Removing and Installing".
- Remove the screws -4- and -5-.
- Open the clip -2- and remove the exterior mirror housing -3- from the cover -1--arrows-.
- On vehicles with lane change assist, remove the exterior mirror housing -1- just enough until the connector is visible.
- Disconnect the lane change assistance warning lamp connector -2- on the front side of the mirror adjustment unit bracket -3-.
- Pull the exterior mirror housing -1- upward and remove.
- If the housing is replaced, remove the turn signal bulb. Refer to → Electrical Equipment; Rep. Gr.94; Exterior Rearview Mirror Lamps; Driver and Front Passenger Exterior Rearview Mirror Turn Signal Bulb L131/L132 Removing and Installing.
Installing
Install in reverse order of removal. Note the following:
- Install the mirror glass. Refer to → Chapter "Mirror Glass, Removing and Installing".
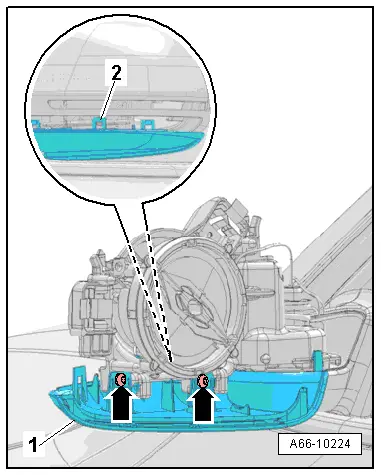
Mirror Trim, Removing and Installing
Removing
- Remove the exterior mirror housing. Refer to → Chapter "Exterior Mirror Housing, Removing and Installing".
- Remove the bolts -arrows-.
- Disengage the retaining tab -2- and remove the mirror trim -1- on the mirror adjusting unit mount.
Installing
Install in reverse order of removal. Note the following:
- Install the exterior mirror housing. Refer to → Chapter "Exterior Mirror Housing, Removing and Installing".
READ NEXT:
 Wheel Housing Liner
Overview - Front Wheel Housing Liner
1 - Front Wheel Spoiler
Removing and installing. Refer to
→ Chapter "Front Wheel Spoiler, Removing and Installing".
2 - Bolt
Name Badges and Emblems
Overview - Name Badges and Emblems
Overview - Name Badges and Emblems, Vehicles through MY 2014
1 - Audi Rings
Removing and installing. Refer to
→ Chapter "Front Emblem, Rem
Trailer Hitch
Overview - Trailer Hitch
1 - Grommet
For the cable
2 - Bolt
Quantity: 4
Tightening specification. Refer to
→ Chapter "Overview - Impact Member".
3 SEE MORE:
Sunroof Frame, Removing and Installing
1 - Bolt
3 Nm
2 - Power Sunroof Control Module -J245-.
Performing the adaptation procedure. Refer to
→ Chapter "Motor Adaptation".
3 - Bolt
8 Nm.
4 - Roof
5 - Panorama Roof Frame
Removing
Headliner remo
Driver Side Airbag
Overview - Driver Side Airbag
1 - Locking Bracket
Use a T25 TORX screwdriver, approximately 100 mm long
2 - Steering Column Electronics Control Module -J527-
With Airbag Spiral Spring/Return Spring with Slip Ring -F138- and
Steering Angle Sensor -G85-
Removing a