Audi Q3: Side Airbags
Overview - Front Side Airbag
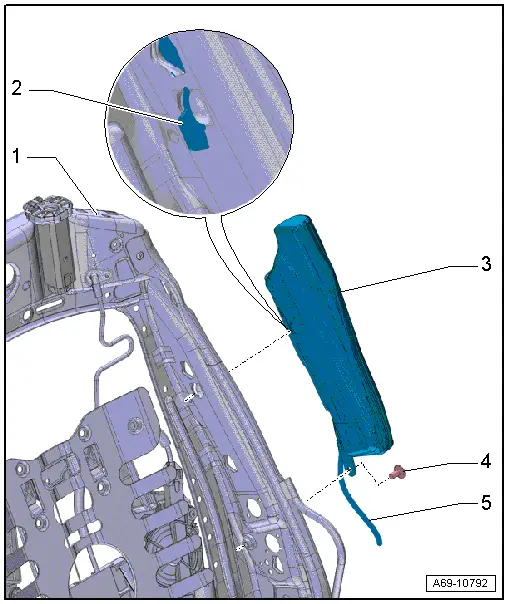
1 - Backrest Frame
2 - Hook
- For securing the side airbag to the backrest frame
3 - Front Side Airbag
- Driver side: with the Driver Thorax Airbag Igniter -N199-
- Front passenger side: with Front Passenger Thorax Airbag Igniter -N200-
 WARNING
Follow all safety precautions when working with pyrotechnic components. Refer to → Chapter "Pyrotechnic Components Safety Precautions".
- Removing and installing. Refer to → Chapter "Front Side Airbag with Igniter, Removing and Installing".
4 - Bolt
- 8 Nm
- Replace
- Clean the threaded hole with a thread tap.
- Install with locking compound. Refer to the Parts Catalog for the locking compound.
5 - Wire
- From Driver Thorax Airbag Igniter -N199-/Front Passenger Thorax Airbag Igniter -N200- directly to the connector station
Overview - Rear Side Airbag
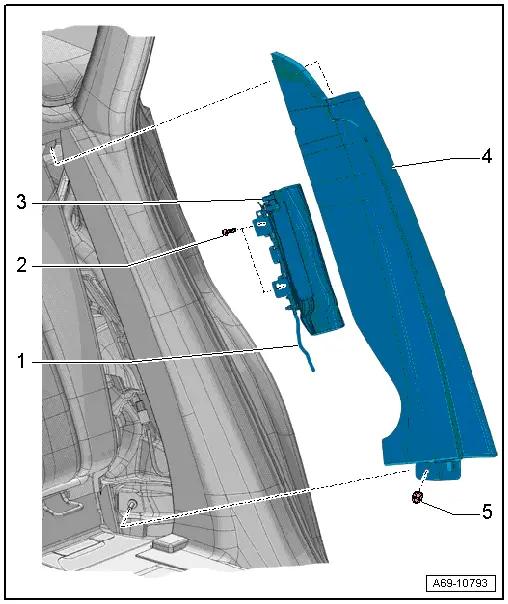
1 - Wire
2 - Bolt
- 9 Nm
- Quantity: 2
- Replace
3 - Rear Side Airbag
- Driver side: with Driver Side Rear Thorax Airbag Igniter -N201-
- Passenger side: with Passenger Side Rear Thorax Airbag Igniter -N202-
 WARNING
Follow all safety precautions when working with pyrotechnic components. Refer to → Chapter "Pyrotechnic Components Safety Precautions".
- Removing and installing. Refer to → Chapter "Rear Side Airbag with Igniter, Removing and Installing".
4 - Side Cushion
- Removing and installing. Refer to → Chapter "Rear Side Padding With Side Airbag, Removing and Installing".
5 - Nut
- 9 Nm
Front Side Airbag with Igniter, Removing and Installing
Removing
 WARNING
- Follow all safety precautions when working with pyrotechnic components. Refer to → Chapter "Pyrotechnic Components Safety Precautions".
- Follow the additional safety precautions when working with the side airbag. Refer to → Chapter "Side Airbag Additional Safety Precautions".
- Follow all regulations when disposing of pyrotechnic components. Refer to → Chapter "Airbag, Belt Tensioner and Battery Cut-Out Units, Storing, Transporting and Disposing".
- Remove the front seat. Refer to → Chapter "Front Seat, Removing and Installing".
- Fasten the front seat on the Engine/Transmission Holder - Seat Repair Fixture -VAS6136-. Refer to → Chapter "Front Seat, Mounting on Fixture for Seat Repair".
- Remove the backrest cover. Refer to → Chapter "Backrest Cover, Removing and Installing".
- Remove the backrest. Refer to → Chapter "Front Backrest, Removing and Installing".
- Remove the padding on the backrest until the bolt -7- for the side airbag is accessible. Refer to → Chapter "Backrest Cover and Cushion, Removing and Installing".
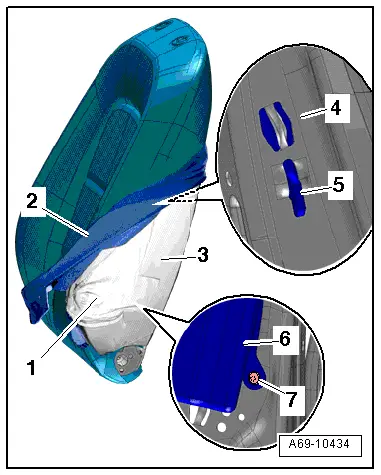
- Carefully pull the backrest cover -2- as far forward as possible with the backrest cushion -3- in the area of the side airbag.
- Remove the bolt -7-.
- Release the side airbag -6- and the hook -5- from the backrest frame -4- and leave it in the pocket sewn into the cover -1-.
- Remove the backrest cover and backrest cushion form the seat backrest (refer to → Chapter "Backrest Cover and Cushion, Removing and Installing") and remove the side airbag.
- To do this carefully remove the side airbag wiring harness and depending on the version all other wiring harnesses from the backrest.
Installing
 WARNING
- Follow all safety precautions when working with pyrotechnic components. Refer to → Chapter "Pyrotechnic Components Safety Precautions".
- Before handling pyrotechnic components (for example, connecting the connector), the person handling it must "discharge static electricity". This can be done by touching the door striker, for example.
- Observe all measures when installing the front seat. Refer to → Chapter "Front Seat, Removing and Installing".
Install in reverse order of removal.
Installation notes, for example tightening specifications, replacing components. Refer to → Chapter "Overview - Front Side Airbag".
Rear Side Airbag with Igniter, Removing and Installing
Removing
 WARNING
- Follow all safety precautions when working with pyrotechnic components. Refer to → Chapter "Pyrotechnic Components Safety Precautions".
- Follow the additional safety precautions when working with the side airbag. Refer to → Chapter "Side Airbag Additional Safety Precautions".
- Follow all regulations when disposing of pyrotechnic components. Refer to → Chapter "Airbag, Belt Tensioner and Battery Cut-Out Units, Storing, Transporting and Disposing".
- Disconnect the battery ground cable with the ignition turned on. Refer to → Electrical Equipment; Rep. Gr.27; Battery; Battery, Disconnecting and Connecting.
- Remove the side cushion. Refer to → Chapter "Rear Side Padding With Side Airbag, Removing and Installing".
 WARNING
Before handling pyrotechnic components (for example, disconnecting the connector), the person handling it must "discharge static electricity". This can be done by touching the door striker, for example.
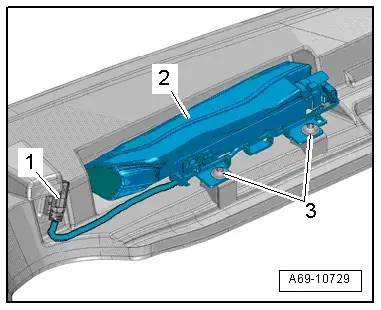
- Free up the connector -1- from the rear side airbag.
- Remove the bolts -3-.
- Remove the rear side airbag -2- from the side cushion.
 WARNING
Set the airbag down so the impact cushion faces upward.
Installing
 WARNING
- Follow all safety precautions when working with pyrotechnic components. Refer to → Chapter "Pyrotechnic Components Safety Precautions".
- Before handling pyrotechnic components (for example, connecting the connector), the person handling it must "discharge static electricity". This can be done by touching the door striker, for example.
Install in reverse order of removal. Note the following:
 Note
Note
Make sure the connectors are installed correctly and are secure.
 WARNING
Ignition must be on when connecting battery. If pyrotechnic components (for example, airbag, belt tensioner) are not repaired correctly, they may deploy unintentionally after connecting battery. There must not be anyone inside the vehicle when connecting the battery.
- Connect the battery ground cable with the ignition turned on. Refer to → Electrical Equipment; Rep. Gr.27; Battery; Battery, Disconnecting and Connecting.
 Note
Note
If the Airbag Indicator Lamp -K75- indicates a fault, check the DTC memory, erase it and check it again using the Vehicle Diagnostic Tester.
Installation notes, for example tightening specifications, replacing components. Refer to → Chapter "Overview - Rear Side Airbag".
READ NEXT:
 Head Curtain Airbags
Overview - Head Curtain Airbag
1 - Black Line
Serves as anti-rotation protector
must be visible after installation.
2 - Clip
Quantity: 5
Removing and installing.
Component Location Overview - Airbag Crash Sensors
Component Location Overview - Airbag Crash Sensors, USA and Canada
Market-Specific
1 - Passenger Side Front Airbag Crash Sensor -G284-
Component location: on the right of the lock c
Driver Front Airbag Crash Sensor -G283-, Removing and Installing
Drive/Front Passenger Front Airbag Crash Sensor -G283-/-G284-, Removing
and Installing, USA and Canada Market-Specific
Removing
WARNING
Follow all safety precautions when working with
SEE MORE:
Repair Information
Minimum Curing Time for Bonded Windows
WARNING
For safety reasons, use only electrically
non-conductive 2C-adhesive when installing windshield
and rear window using the materials listed below.
The vehicle can only be used after the minimum
curing time has elapsed.
Window
All wheel drive (quattro)
Description
Applies to: vehicles with all wheel drive
The all-wheel drive system distributes the driving
power variably to the front and rear axle to improve
the driving characteristics. It works together
with selective wheel torque control, which can
activate when driving through curves.
The all-
