Audi Q3: Head Curtain Airbags
Overview - Head Curtain Airbag
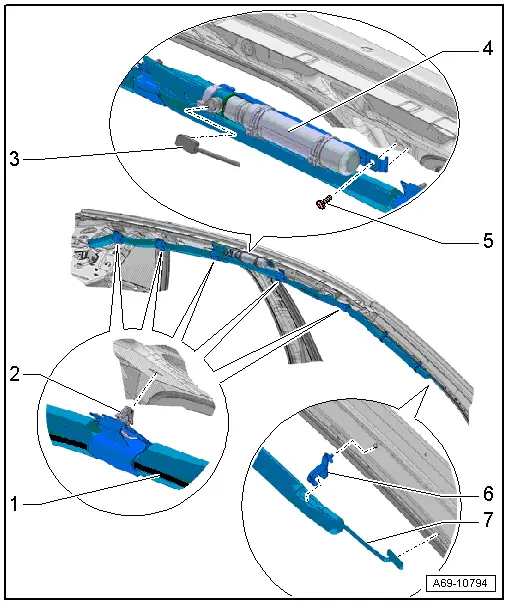
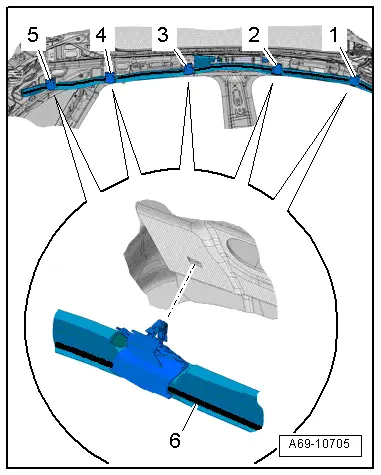
1 - Black Line
- Serves as anti-rotation protector
- must be visible after installation.
2 - Clip
- Quantity: 5
- Removing and installing.
3 - Connector
- Driver side: for Driver Head Curtain Airbag Igniter -N251-
- Front passenger side: for the Front Passenger Head Curtain Airbag Igniter -N252-
- Disconnecting and connecting.
4 - Head Curtain Airbag
- Driver side: with Driver Head Curtain Airbag Igniter -N251-
- Passenger side: with Front Passenger Head Curtain Airbag Igniter -N252-
 WARNING
Follow all safety precautions when working with pyrotechnic components. Refer to → Chapter "Pyrotechnic Components Safety Precautions".
- Removing and installing. Refer to → Chapter "Head Curtain Airbag with Igniter, Removing and Installing".
5 - Bolt
- 5 Nm
- Replace
6 - Clip
- Quantity: 2
- If it was removed because of an accident, replace the clip
7 - Strap
- Removing and installing.
Head Curtain Airbag with Igniter, Removing and Installing
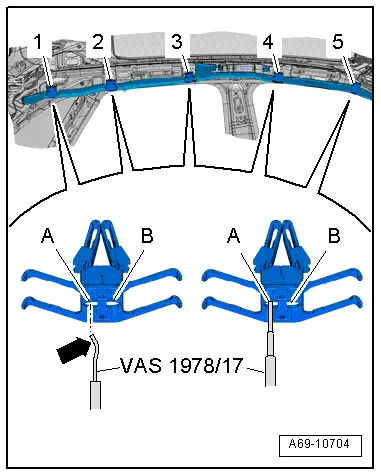
Special tools and workshop equipment required
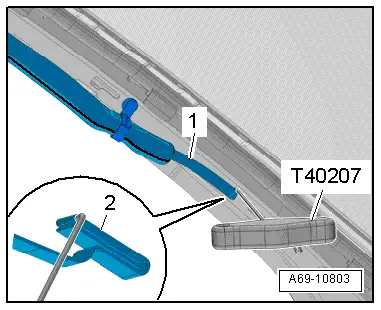
- Hook Tool -T40207-
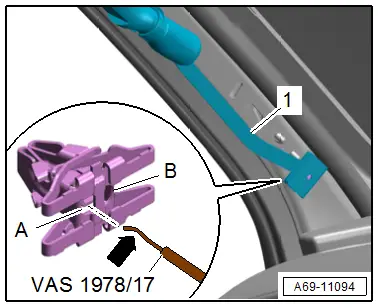
- Release Tool Set - Extraction Tool 17 -VAS1978/17- from the Release Tool Set -VAS1978/35-
Removing
 WARNING
- Follow all safety precautions when working with pyrotechnic components. Refer to → Chapter "Pyrotechnic Components Safety Precautions".
- Follow all regulations when disposing of pyrotechnic components. Refer to → Chapter "Airbag, Belt Tensioner and Battery Cut-Out Units, Storing, Transporting and Disposing".
- Disconnect the battery ground cable with the ignition turned on. Refer to → Electrical Equipment; Rep. Gr.27; Battery; Battery, Disconnecting and Connecting.
- Remove the headliner. Refer to → Chapter "Headliner, Removing and Installing".
- Remove the head curtain airbag limiting strap -1- from the A-pillar.
- Carefully position the Hook Tool -T40207- and then guide it into the opening in the body.
- Attach the Hook Tool -T40207- to the loop -2- on the head curtain airbag limiting strap and carefully pull it out.
USA and Canada market versions:
- Remove the head curtain airbag strap -1- from the A-pillar.
- To do so, forcefully push the Release Tool Set - Extraction Tool 17 -VAS1978/17- with the "spoon"-arrow- all the way into the opening -A-, as shown in the illustration.
- At the same time pull the left side of the clip out from the body.
- Pull the Release Tool Set - Extraction Tool 17 -VAS1978/17- back out and pay attention that the clips on the loosed side do not re-engage.
- Turn the Release Tool Set - Extraction Tool 17 -VAS1978/17- 180º and repeat the procedure for the opening -B-.
Continuation for all vehicles:
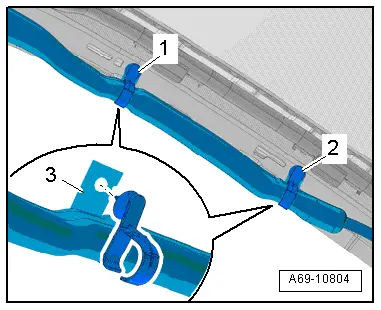
- Remove the clips -1- and -2- from the A-pillar.
- Disengage the clips -1 to 5- head curtain airbag retaining tab clips from the body.
- To do so, forcefully push the Release Tool Set - Extraction Tool 17 -VAS1978/17- with the "spoon"-arrow- all the way into the opening -A-, as shown in the illustration.
- At the same time pull the left side of the clip out from the body.
- Pull the Release Tool Set - Extraction Tool 17 -VAS1978/17- back out and pay attention that the clips on the loosed side do not re-engage.
- Turn the Release Tool Set - Extraction Tool 17 -VAS1978/17- 180º and repeat the procedure for the opening -B-.
Disconnecting and Connecting
 WARNING
Before handling pyrotechnic components (for example, disconnecting the connector), the person handling it must "discharge static electricity". This can be done by touching the door striker, for example.
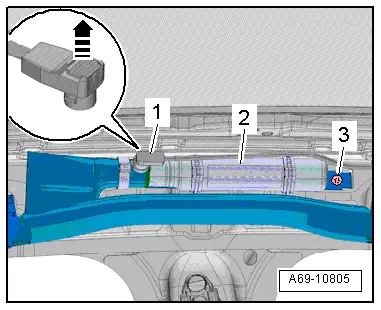
- Release the connector lock with a small screwdriver -arrow- and disconnect the connector -1-.
- Remove the bolt -3- from the head curtain airbag.
- Disengage the front head curtain airbag -2-, to do this push the gas generator slightly upward and pull inward.
- Push the head curtain airbag rearward from the mount and remove.
Installing
 WARNING
- Follow all safety precautions when working with pyrotechnic components. Refer to → Chapter "Pyrotechnic Components Safety Precautions".
- Always follow head curtain airbag installation procedure.
 WARNING
Before handling pyrotechnic components (for example, connecting the connector), the person handling it must "discharge static electricity". This can be done by touching the door striker, for example.
- Engage the head curtain airbag -1- at the rear on the body -arrow A- and push forward.
- Engage the front head curtain airbag on the body -arrow B-.
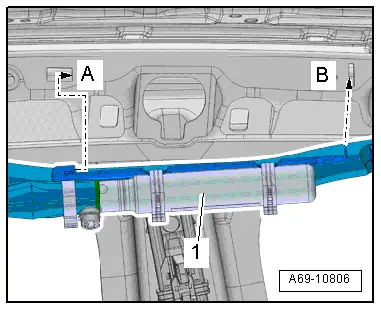
- Tighten the bolt -3-.
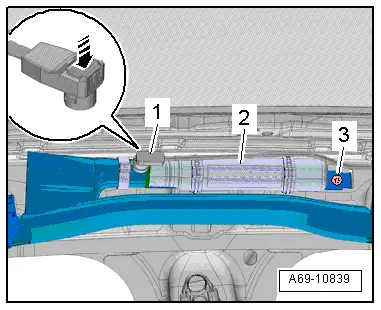
- Connect the connector -1- on the head curtain airbag igniter -2-.
- Install the connector locking mechanism -arrow B-. While doing this, the connector is pushed into the head curtain airbag igniter and locks into place.
- Attach the head curtain airbag limiting strap to the A-pillar.
 Note
Note
Replace the clips -1- and -2- if the removal is due to a crash.
- Clip the clips -1 and 2- with the tab -3- for the head curtain airbag in the body.
- Engage the head curtain airbag in the clips.

- Install the clips for the head curtain airbag in the following sequence: -1 and 5-. They must audibly clip into the body.
- Make sure the "black line"-6- is visible over the entire length. By making sure it is will ensure that the head curtain airbag is NOT twisted.
Installation is performed in reverse order of removal, while noting the following:
 Note
Note
- Make sure the connectors are installed correctly and are secure.
- Make sure the wires do not get caught.
 WARNING
Ignition must be on when connecting battery. If pyrotechnic components (for example, airbag, belt tensioner) are not repaired correctly, they may deploy unintentionally after connecting battery. There must not be anyone inside the vehicle when connecting the battery.
- Connect the battery ground cable with the ignition turned on. Refer to → Electrical Equipment; Rep. Gr.27; Battery; Battery, Disconnecting and Connecting.
 Note
Note
If the Airbag Indicator Lamp -K75- indicates a fault, check the DTC memory, erase it and check it again using the Vehicle Diagnostic Tester .
Installation notes, for example tightening specifications, replacing components. Refer to → Chapter "Overview - Head Curtain Airbag".
READ NEXT:
 Component Location Overview - Airbag Crash Sensors
Component Location Overview - Airbag Crash Sensors, USA and Canada
Market-Specific
1 - Passenger Side Front Airbag Crash Sensor -G284-
Component location: on the right of the lock c
Driver Front Airbag Crash Sensor -G283-, Removing and Installing
Drive/Front Passenger Front Airbag Crash Sensor -G283-/-G284-, Removing
and Installing, USA and Canada Market-Specific
Removing
WARNING
Follow all safety precautions when working with
Driver Side Airbag Crash Sensor -G179-/ Front Passenger Side Airbag Crash
Sensor -G180-, Removing and Installing
Driver/Front Passenger Side Airbag Crash Sensor -G179-/-G180-, Removing
and Installing, USA and Canada Market-Specific
Removing
WARNING
Follow all safety precautions when working wit
SEE MORE:
Spare tire
Removing the subwoofer
Applies to: vehicles with subwoofer
The subwoofer must be removed before the
spare tire/temporary spare tire can be removed.
Fig. 166 Spare tire well: subwoofer
Removing the subwoofer
Pull out the red connector lock 1.
Remove the connector 2 and set the disconnected
cable
Climate control system
Description
One of the following options may be available,
depending on vehicle equipment:
A deluxe automatic climate control system with
two zones to individually adjust temperature and air distribution for the
left and right
front sides 1)
A deluxe automatic climate control system with
thr
