Audi Q3: Lower Transverse Link, Removing and Installing
Lower Transverse Link, Removing and Installing, FWD Vehicles
Special tools and workshop equipment required
- Torque Wrench 1332 40-200Nm -VAG1332-
Removing
- Measure dimension from center of wheel to lower edge of wheel housing. Refer to → Chapter "Wheel Bearing in Curb Weight, Lifting Vehicles with Coil Spring".
- Remove the coil spring. Refer to → Chapter "Spring, Removing and Installing".
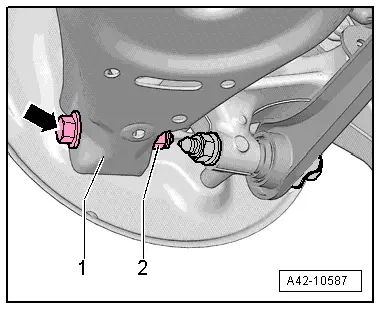
- Remove the nut -2- and remove the bolt -arrow- for the lower control arm -1-.

Vehicles with Left Rear Level Control System Sensor -G76-/Right Rear Level Control System Sensor -G77-
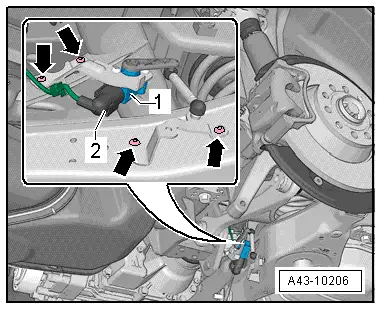
- Remove the bolts -lower arrows-.

Continuation for all vehicles
- For removing the left control arm, disengage and lower the exhaust system rear section. Refer to → Rep. Gr.26; Exhaust Pipes/Mufflers; Overview - Muffler.
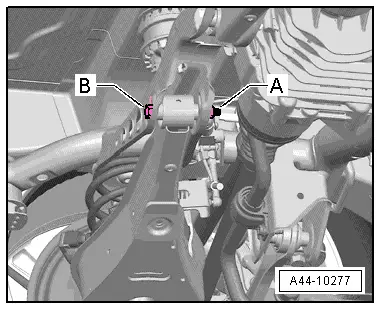
- Mark the position of eccentric screw -B- to the subframe using, for example, a felt-tip marker.
- Remove the nut -A- and the eccentric screw -B-.
- Remove the lower control arm.

Installing
Installation is reverse of removal, noting the following:
- The control arm may only be fastened if the dimension between the wheel hub center and lower edge of wheel housing, measured before assembly, is achieved. Refer to → Chapter "Wheel Bearing in Curb Weight, Lifting Vehicles with Coil Spring".
- Note the applied marking of the eccentric screw -B- to the subframe.
- Install the coil spring. Refer to → Chapter "Spring, Removing and Installing".
- An axle alignment may be required. Refer to → Chapter "Evaluating Need for Axle Alignment".
- On vehicles with electronically controlled damping, perform the function "Adapt the control position" with the Vehicle Diagnosis Tester.
- If the control position was reprogrammed and if the vehicle has lane assist, then it will then be necessary to calibrate the driver assistance systems front camera. Refer to → Chapter "Driver Assistance Systems Front Camera, Calibrating".
- On vehicles with level control system sensor, perform headlamp basic setting. Refer to → Electrical Equipment; Rep. Gr.94; Headlamp, Adjusting.
Lower Transverse Link, Removing and Installing, AWD Vehicles
Special tools and workshop equipment required
- Torque Wrench 1332 40-200Nm -VAG1332-
Removing
- Measure dimension from center of wheel to lower edge of wheel housing. Refer to → Chapter "Wheel Bearing in Curb Weight, Lifting Vehicles with Coil Spring".
- Remove the coil spring. Refer to → Chapter "Spring, Removing and Installing".
- Remove the nut -2- and remove the bolt -arrow- for the lower control arm -1-.
Vehicles with Left Rear Level Control System Sensor -G76-/Right Rear Level Control System Sensor -G77-
- Remove the bolts -lower arrows-.
Continuation for all vehicles
- For removing the left control arm, disengage and lower the exhaust system rear section. Refer to → Rep. Gr.26; Exhaust Pipes/Mufflers; Overview - Muffler.
- Mark the position of eccentric screw -B- to the subframe using, for example, a felt-tip marker.
- Remove the nut -A- and the bolt -B-.
- Remove the lower control arm.

Installing
Installation is reverse of removal, noting the following:
- The control arm may only be fastened if the dimension between the wheel hub center and lower edge of wheel housing, measured before assembly, is achieved. Refer to → Chapter "Wheel Bearing in Curb Weight, Lifting Vehicles with Coil Spring".
- Observe the applied marking for the eccentric screw -arrow B- to the subframe.
- Install the coil spring. Refer to → Chapter "Spring, Removing and Installing".
- An axle alignment may be required. Refer to → Chapter "Evaluating Need for Axle Alignment".
- On vehicles with electronically controlled damping, perform the function "Adapt the control position" with the Vehicle Diagnosis Tester.
- If the control position was reprogrammed and if the vehicle has lane assist, then it will then be necessary to calibrate the driver assistance systems front camera. Refer to → Chapter "Driver Assistance Systems Front Camera, Calibrating".
- On vehicles with level control system sensor, perform headlamp basic setting. Refer to → Electrical Equipment; Rep. Gr.94; Headlamp, Adjusting.

READ NEXT:
 Tie Rod, Removing and Installing
Tie Rod, Removing and Installing, FWD Vehicles
Special tools and workshop equipment
required
Torque Wrench 1331 5-50Nm -VAG1331-
Torque Wrench 1332 40-200Nm -VAG1332-
Removing
- Meas
Suspension Strut/Shock Absorber, Spring
Overview - Suspension Strut, Shock Absorber and Spring
1 - Lower Spring Support
Spring end rotated up to stop
2 - Coil Spring
Removing and installing. Refer to
→&
Overview - Wheel Bearing
Overview - Wheel Bearing, Vehicles with FWD
1 - Cover
2 - Bracket
3 - Bolt
50 Nm + 45º
Always replace if removed
4 - Coupling Rod
5 - SEE MORE:
Cooling system
Coolant
The engine cooling system is filled with a mixture
of purified water and coolant additive at the factory.
This coolant must not be not changed.
The coolant level is monitored using the
indicator
light. However, you should occasionally
check the coolant level.
Messages
The following messag
Rear Brake Caliper, Removing and Installing
Brake Caliper, Removing and Installing, Brake 1KU
Note
In the following description the brake caliper is removed
with the brake carrier and pads. The brake hose remains
connected.
Special tools and workshop equipment
required
Torque Wrench 1332 40-200Nm -VAG1332-
Removing
