Audi Q3: Rear Three-Point Seat Belt, Removing and Installing
Outer Rear Three-Point Seat Belt, Removing and Installing
Removing
- Remove the rear outer belt end fitting. Refer to → Chapter "Rear Outer Belt End Fitting, Removing and Installing".
- Remove the luggage compartment side trim. Refer to → Chapter "Luggage Compartment Side Trim Panel, Removing and Installing".
- Remove the cover from the seat belt guide Refer to → Chapter "Seat Belt Guide Cover, Removing and Installing".
USA and Canada market versions:
 WARNING
- Follow all safety precautions when working with pyrotechnic components. Refer to → Chapter "Pyrotechnic Components Safety Precautions".
- Follow all regulations when disposing of pyrotechnic components. Refer to → Chapter "Airbag, Belt Tensioner and Battery Cut-Out Units, Storing, Transporting and Disposing".
- Disconnect the battery ground cable with the ignition turned on. Refer to → Electrical Equipment; Rep. Gr.27; Battery; Battery, Disconnecting and Connecting.
 WARNING
Before handling pyrotechnic components (for example, disconnecting the connector), the person handling it must "discharge static electricity". This can be done by touching the door striker, for example.
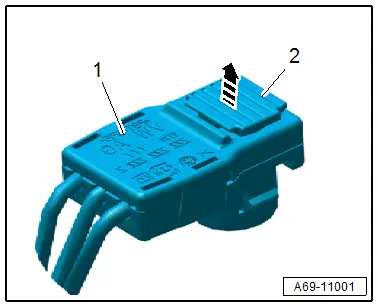
- Open the connector lock -2- with a small screwdriver -arrow- and disconnect the connector -1-.
Continuation for all vehicles:
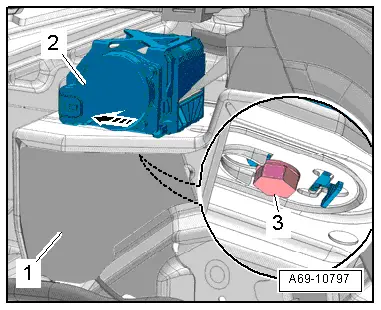
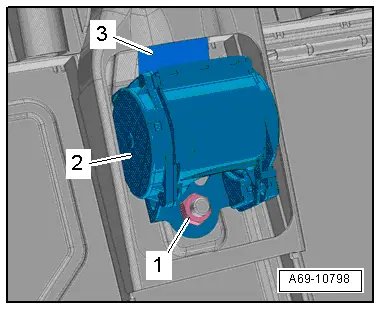
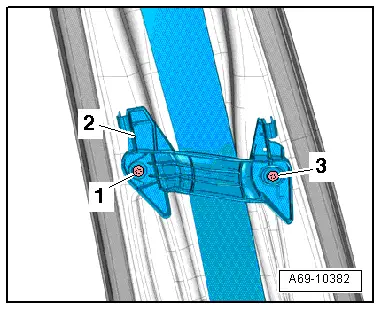
- Remove the noise insulation -1- for the rear suspension strut.
- Remove the bolt -3-.
- Push the three-point seat belt -2- toward the rear -arrow- and remove it from the mount.
Installing
- If parts of the seat belt system are removed due to an accident, replace the belt system bolts.
USA and Canada market versions:
 WARNING
- Follow all safety precautions when working with pyrotechnic components. Refer to → Chapter "Pyrotechnic Components Safety Precautions".
- Before handling pyrotechnic components (for example, connecting the connector), the person handling it must "discharge static electricity". This can be done by touching the door striker, for example.
 Note
Note
Make sure the connectors are installed correctly and are secure.
Continuation for all vehicles:
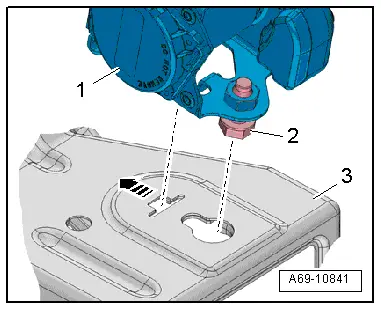
- Insert the three-point seat belt with the anti-twist mechanism and bolt -2- into the mount -3-.
- Push the three-point seat belt -1- all the way forward -arrow- and tighten the bolt at the same time.
Install in reverse order of removal.
USA and Canada market versions:
 WARNING
Ignition must be on when connecting battery. If pyrotechnic components (for example, airbag, belt tensioner) are not repaired correctly, they may deploy unintentionally after connecting battery. There must not be anyone inside the vehicle when connecting the battery.
- Connect the battery ground cable with the ignition turned on. Refer to → Electrical Equipment; Rep. Gr.27; Battery; Battery, Disconnecting and Connecting.
Installation notes, for example tightening specifications, replacing components. Refer to → Chapter "Overview - Rear Outer Three-Point Seat Belt".
Rear Three Point Seat Belt in Center Seating Position, Removing and Installing
Removing
- Remove the rear bench seat. Refer to → Chapter "Bench Seat/Single Seat, Removing and Installing".
- Remove the right 2/3 rear seat backrest. Refer to → Chapter "Rear Seat Backrest, Removing and Installing".
- Remove the backrest cover and backrest cushion from the rear seat backrest. Refer to → Chapter "Cover and Cushion, Removing and Installing, Backrest".
- Remove the nut -1-.
- Disengage the three-point seat belt -2- and remove it.
- Guide out the seat belt -3-.
Installing
- If parts of the seat belt system are removed due to an accident, replace the belt system mounting bolts.
- Insert the three-point seat belt with the anti-twist mechanism in the mount and tighten the nut.
Install in reverse order of removal.
Installation notes, for example tightening specifications, replacing components. Refer to → Chapter "Overview - Rear Center Three-Point Seat Belt".
Front Seat Belt Guide, Removing and Installing
Removing
- Remove the upper B-pillar trim panel. Refer to → Chapter "Upper B-Pillar Trim, Removing and Installing".
- Set aside the upper B-pillar trim with the seat belt still threaded through it.
- Remove the lower B-pillar trim panel. Refer to → Chapter "Lower B-Pillar Trim Panel, Removing and Installing".
- Remove the bolts -1- and -3- and remove the front belt guide -2-.
Installing
Install in reverse order of removal.
Installation notes, for example tightening specifications, replacing components. Refer to → Chapter "Overview - Front Three-Point Seat Belt".
Rear Seat Belt Guide, Removing and Installing
Rear Seat Belt Guide, Removing and Installing
Removing
 Caution
- Do not rotate bolts -2- under any circumstances when removing and installing belt guide -3-. They are set by the manufacturer.
- Replace the entire belt guide if damaged.
- Versions with a side cushion: remove the side cushion. Refer to → Chapter "Rear Side Padding With Side Airbag, Removing and Installing".
- Remove the rear sill trim. Refer to → Chapter "Rear Sill Panel Strip, Removing and Installing".
- Remove the luggage compartment side trim. Refer to → Chapter "Luggage Compartment Side Trim Panel, Removing and Installing".
- Remove the cover from the seat belt guide Refer to → Chapter "Seat Belt Guide Cover, Removing and Installing".
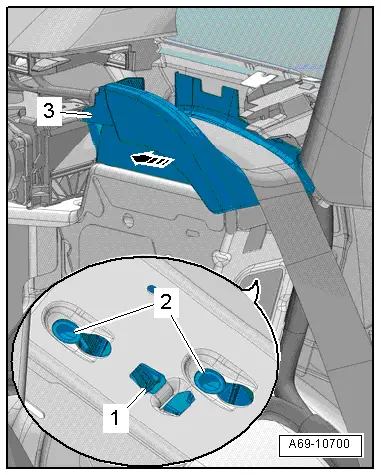
- Push the belt guide retaining hook -1- upward and hold it there.
- Slide the belt guide -arrow- back until the bolt heads -2- can be disengaged from the console on the body.
- Remove the seat belt guide -3- sideways from the vehicle interior.
- Rear outer right seat belt guide: Disconnect the connector from the Rear Parking Aid Warning Buzzer -H15-.
- Thread out the belt and remove the belt guide.
Installing
Install in reverse order of removal. Note the following:
- Insert the belt into the depression in the belt guide -3- and then place the belt guide on onto the bracket.
- Press the belt guide down while pulling it forward. This engages the bolt heads in the guides.
Installation notes, for example tightening specifications, replacing components. Refer to → Chapter "Overview - Rear Outer Three-Point Seat Belt".
Rear Seat Belt Guide in Center Seating Position, Removing and Installing
Special tools and workshop equipment required
- Trim Removal Wedge -3409-
Removing
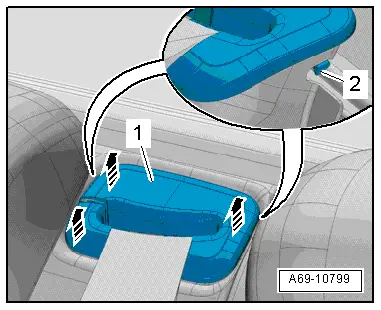
- Release the retaining tabs -2- with a screwdriver or the Trim Removal Wedge -3409-.
- at the same time unclip the belt guide -1- upward -arrows-.
- Open the gap on the belt guide and thread out the belt.
Installing
Install in reverse order of removal.
Installation notes, for example tightening specifications, replacing components. Refer to → Chapter "Overview - Rear Center Three-Point Seat Belt".
READ NEXT:
 Front Belt End Fitting, Removing and Installing
Front Belt End Fitting, Removing and Installing, USA and Canada
Market-Specific
Removing
- Remove the front seat. Refer to
→ Chapter "Front Seat, Removing and Installing".
- Re
Child Seat Anchors
Overview - Front Child Seat Anchors
1 - Bolt
8 Nm
Quantity: 2
Replace
Install with locking compound. Refer to the Parts Catalog for the
locking compound.
2 -
Airbag System
Component Location Overview - Airbag System
1 - Airbag Control Module -J234-
Overview. Refer to
→ Chapter "Overview - Airbag Control Module".
2 - Airbag IndicatoSEE MORE:
Rear Bumper Cover, Removing and Installing
Caution
If the vehicle has lane change assistance, the lane
change assistance control module -J769-/-J770- must be
recalibrated. Refer to
→ Electrical Equipment; Rep. Gr.96; Lane Change
Assistance; Lane Change Assistance, Calibrating.
Special tools and workshop e
Instrument Panel Vent, Removing and Installing
Side Instrument Panel Vent, Removing and Installing
Special tools and workshop equipment
required
Hook Tool -T40207-
Removing
Note
The vent has a hole on inside for attaching the Hook Tool
-T40207-.
- Carefully insert the Hook Tool -T40207- between the slats
and hook i