Audi Q3: Front Belt End Fitting, Removing and Installing
Front Belt End Fitting, Removing and Installing, USA and Canada Market-Specific
Removing
- Remove the front seat. Refer to → Chapter "Front Seat, Removing and Installing".
- Remove front sill panel trim. Refer to → Chapter "Front Sill Panel Strip, Removing and Installing".
- Remove the lower B-pillar trim panel. Refer to → Chapter "Lower B-Pillar Trim Panel, Removing and Installing".
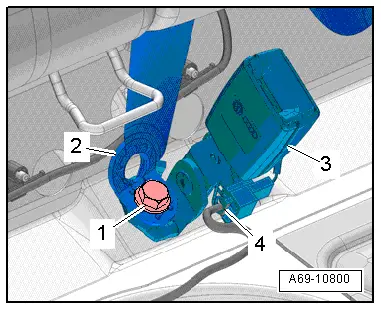
- Remove the nuts -arrows- for the carpet reinforcement.
- Disengage the carpet -1- with the reinforcement from the sill panel and pull to the side.
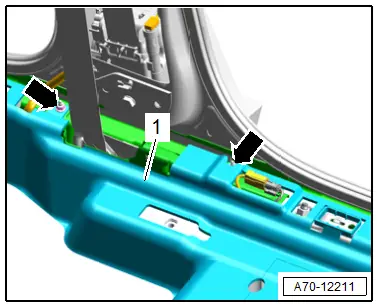
- Disengage the front belt tensioner connector -2- at the cover and free it up.
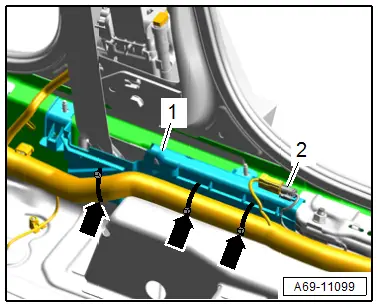
- Pull the carpet near the belt end fitting to the side, and cut through the cable ties -arrows-.
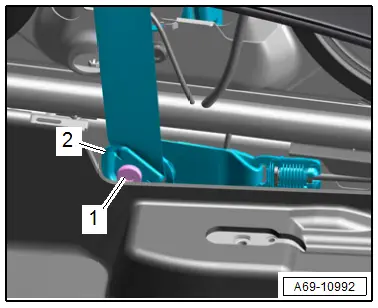
- Unclip the belt end fitting cover -1- from the sill panel and remove.
- Open the cover -2- for the belt anchor -1- with a screwdriver on the catches -arrow-, open and push aside.
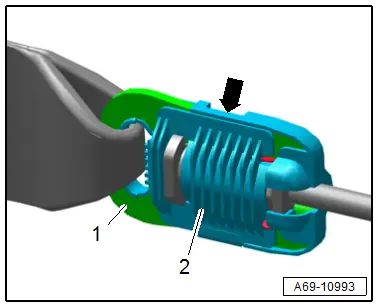
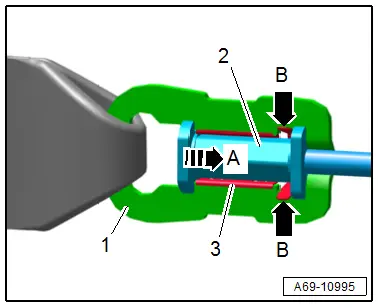
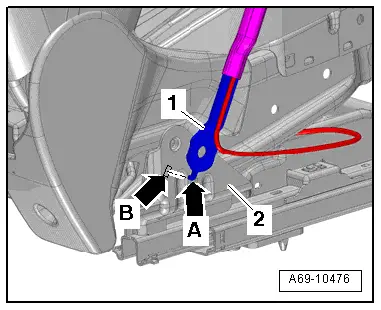
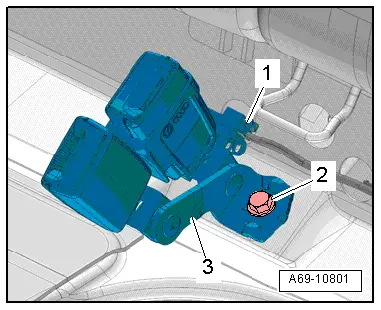
- Push together the catches on the securing clamp with a plies -A arrows-.
- At the same time push the anchoring pins -2- together with the securing clamp -3- to release in the direction of -arrow B-.
- Disengage the anchoring pins from the securing clamp in the belt anchor -1-.
- Remove the bolt -1- and then remove the belt relay -2-.
Installing
Install in reverse order of removal. Note the following:
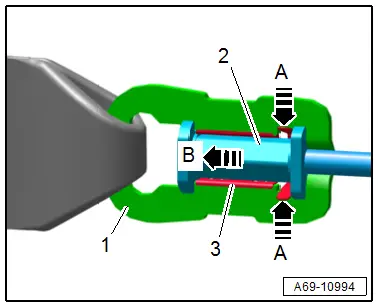
- Engage the anchoring bolts -2- in the securing clamp -3- and push in the direction of -arrow A-, until the catches -B arrows- engage.
Information for installation: for example, tightening specifications, replacing body parts. Refer to → Chapter "Overview - Front Three-Point Seat Belt, USA and Canada Market" and → Chapter "Overview - Foot Rest and Carpet".
Front Belt End Fitting, Removing and Installing, Not USA and Canada Market-Specific
NOT FOR NORTH AMERICAN MARKET
Removing
- Move the front seat all the way forward/up.
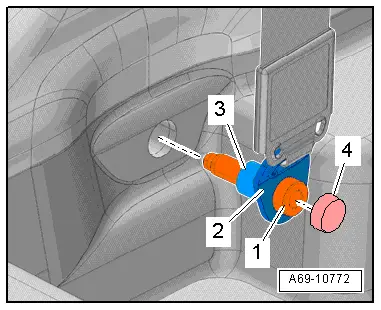
- Pry the cap -4- off using a screwdriver.
- Remove the bolt -1-.
- Remove the bolt with the belt anchor -2- and the stop sleeves -3-.
Installing
Install in reverse order of removal.
Installation notes, for example tightening specifications, replacing components. Refer to → Chapter "Overview - Front Three-Point Seat Belt".
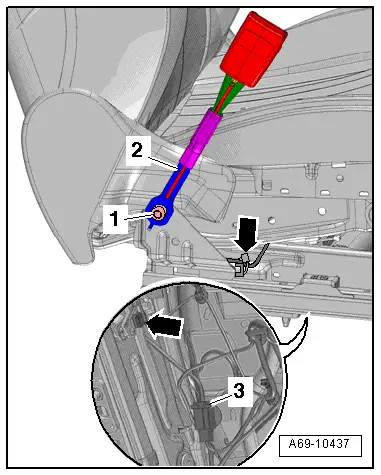
Rear Outer Belt End Fitting, Removing and Installing
Removing
- Remove the rear bench seat. Refer to → Chapter "Bench Seat/Single Seat, Removing and Installing".
- Remove the rear sill trim. Refer to → Chapter "Rear Sill Panel Strip, Removing and Installing".
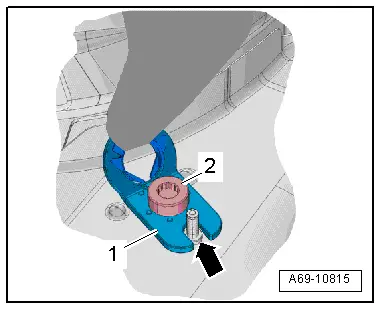
- Remove the bolt -2- from the belt end fitting -1-.
Installing
Install in reverse order of removal. Note the following:
- The threaded pin -arrow- on the floor panel must be positioned in the cut-out of the belt anchor.
Installation notes, for example tightening specifications, replacing components. Refer to → Chapter "Overview - Rear Outer Three-Point Seat Belt".
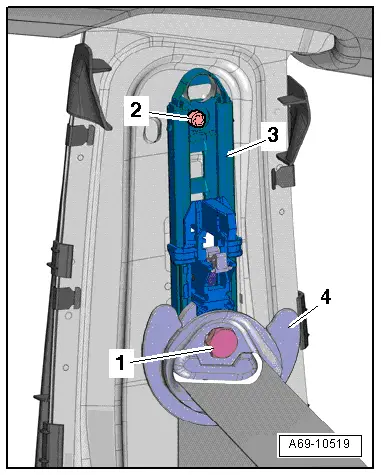
Seat Belt Height Adjuster, Removing and Installing
Removing
- Press button for seat belt height adjuster and move the slide for seat belt height adjustment into the lowest position.
- Remove the upper B-pillar trim panel. Refer to → Chapter "Upper B-Pillar Trim, Removing and Installing".
- Set aside the upper B-pillar trim with the seat belt still threaded through it.
- Remove the bolt -1-.
- Remove the seat belt relay -4- and seat belt.
- Remove the bolt -2-.
- Remove the seat belt height adjuster -3- at the top of the B-pillar.
Installing
Install in reverse order of removal. Note the following:
- If parts of the seat belt system are removed due to an accident, replace the belt system bolts.
 Note
Note
- Replacement seat belt height adjusters are delivered with the slide in the lowest position (installation position).
- If removed seat belt height adjusters are reinstalled, these should be placed in the lowest position (installation position).
- Hook seat belt height adjuster -3- into the B-pillar.
- Tighten the bolt -2-.
- Install the seat belt height adjuster -4- and tighten the bolt -1-.
 Note
Note
The belt height adjuster button must not be pressed when installing the upper B-pillar trim with slide.

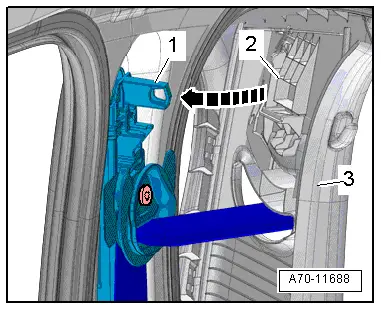
- First, insert the B-pillar trim panel -3- upward into the mount on the roof.
- The mount -2- for the sliding piece of the upper B-pillar trim panel must engage in the retaining pin -1- on the seat belt height adjuster -arrow-.
Seat belt height adjuster replacement part:
- After installing the upper B-pillar trim, push the slide all the way up.
- This unlocks the seat belt height adjuster assembly anchorage.
Procedure for all seat belt height adjusters:
- When checking function, the following conditions must be fulfilled:
- The seat belt height adjuster must audibly engage all four possible positions (and in the highest position too).
- Belt height adjuster button must return to upper position by itself after being pressed.
- Belt relay must swing into vertical position or carrier direction by itself after tightening screw.
If any functions did not work, the seat belt height adjuster assembly must be checked; the height adjuster may need to be replaced.
Installation notes, for example tightening specifications, replacing components. Refer to → Chapter "Overview - Front Three-Point Seat Belt".
Front Seat Belt Latch, Removing and Installing
Removing
- Remove the front seat. Refer to → Chapter "Front Seat, Removing and Installing".
- Disconnect the connector -3- and free up the wire -arrows-.
- Remove bolt -1- and remove belt latch -2-.
Installing
Install in reverse order of removal. Note the following:
- Install the seat belt latch -1- so that the tab -arrow A- engages in the opening -arrow B- on the seat frame -2-.
 WARNING
- Follow all safety precautions when working with pyrotechnic components. Refer to → Chapter "Pyrotechnic Components Safety Precautions".
- Before handling pyrotechnic components (for example, connecting the connector), the person handling it must "discharge static electricity". This can be done by touching the door striker, for example.
- Observe all measures when installing the front seat. Refer to → Chapter "Front Seat, Removing and Installing".
Installation notes, for example tightening specifications, replacing components. Refer to → Chapter "Overview - Front Seat Belt Latch".
Rear Seat Belt Latch, Removing and Installing
Removing
- Remove the rear bench seat. Refer to → Chapter "Bench Seat/Single Seat, Removing and Installing".
Right rear seat belt latch with rear center belt end fitting:
- Vehicles with a seat belt switch: disconnect the connector -4- from the seat belt switch.
- Remove the bolt -1-.
- Remove the center rear belt end fitting -2-.
- Remove the seat belt latch -3-.
Left rear seat belt latch:
- Vehicles with a seat belt switch: disconnect the connector -1- from the seat belt switch.
- Remove the bolt -2-.
- Remove the seat belt latch -3-.
Installing
Install in reverse order of removal.
Installation notes, for example tightening specifications, replacing components. Refer to → Chapter "Overview - Rear Seat Belt Latch".
READ NEXT:
 Child Seat Anchors
Overview - Front Child Seat Anchors
1 - Bolt
8 Nm
Quantity: 2
Replace
Install with locking compound. Refer to the Parts Catalog for the
locking compound.
2 -
Airbag System
Component Location Overview - Airbag System
1 - Airbag Control Module -J234-
Overview. Refer to
→ Chapter "Overview - Airbag Control Module".
2 - Airbag Indicato
Airbag Control Module
Overview - Airbag Control Module
1 - Airbag Control Module -J234-
Removing and installing. Refer to
→ Chapter "Airbag Control Module -J234-, Removing and Installing".
ContrSEE MORE:
Lock Carrier
Overview - Lock Carrier
1 - Lock Carrier
Removing and installing. Refer to
→ Chapter "Lock Carrier, Removing and Installing".
2 - Bolt
4.5 Nm
3 - Bolt
4.5 Nm
4 - Lower Mount
For the front bumper cover, and headlamp housing
Component Location Overview - Passenger Compartment Trim
1 - Cover
Overview. Refer to
→ Chapter "Overview - C-Pillar Trim Panel".
2 - Rear Sill Panel Strip
Overview. Refer to
→ Chapter "Overview - Rear Sill Panel Strip".
3 - Lower B-Pillar Trim Panel
Overview. Refer to
→ Chapter 