Audi Q3: Parallel Parking Assist
Overview - Parallel Parking Assist
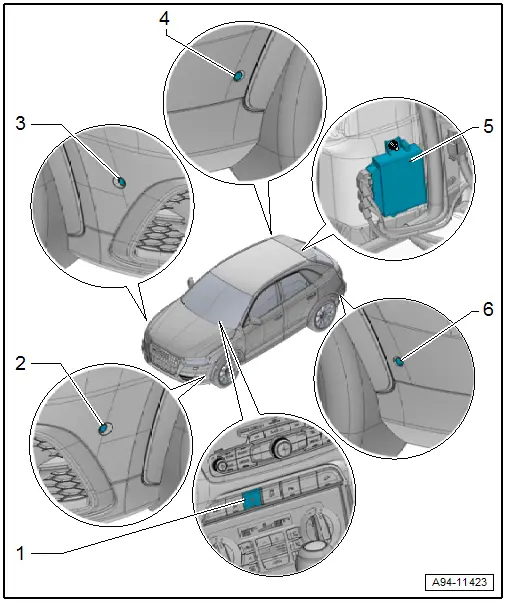
1 - Parallel Parking Assistance Button -E581-
- Overview. Refer to → Chapter "Component Location Overview - Instrument Panel Controls".
2 - Left Front Parallel Parking Assistance Sensor -G568-
- Only on vehicles with parallel parking assistance
- Removing and installing. Refer to → Chapter "Front Sensor, Removing and Installing".
3 - Right Front Parallel Parking Assistance Sensor -G569-
- Only on vehicles with parallel parking assistance
- Removing and installing. Refer to → Chapter "Front Sensor, Removing and Installing".
4 - Right Rear Parallel Parking Assistance Sensor -G717-
- Removing and installing. Refer to → Chapter "Rear Sensor, Removing and Installing".
5 - Parallel Parking Assistance Control Module -J791-
- Removing and installing. Refer to → Chapter "Parking Aid Control Module -J446-, Removing and Installing".
6 - Left Rear Parallel Parking Assistance Sensor -G716-
- Removing and installing. Refer to → Chapter "Rear Sensor, Removing and Installing".
Front Sensor, Removing and Installing
Removing
- Remove the front wheel spoiler. Refer to → Body Exterior; Rep. Gr.66; Wheel Housing Liner; Front Wheel Housing Liner, Removing and Installing.
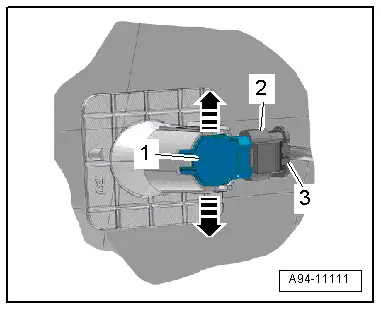
- Press both tabs -arrows- to the side and press the sensor -1- inward from the outside.
- Disconnect the connector -2- by sliding the retainer -3- back and pressing the release down.
Installing
Install in reverse order of removal.
Tightening Specifications
- Wheel spoiler.
Rear Sensor, Removing and Installing
Removing
- Press both tabs -arrows- to the side and press the sensor -1- inward from the outside.
- Disconnect the connector -2- by sliding the retainer -3- back and pressing the release down.
Installing
Install in reverse order of removal.

READ NEXT:
 Automatic Headlamp Range Control
Overview - Automatic Head Lamp Range Control
1 - Left Front Level Control System Sensor -G78-
Component location: on the left front control arm
Removing and installing. Refer to
â
Component Location Overview - Instrument Panel Lamps
1 - Center Instrument Panel Vent Illumination Bulb -L68-
integrated in the center instrument panel vent Cannot be replaced
separately if faulty.
Center Instrument Panel Vent, removSEE MORE:
Switching lane guidance on and off
Applies to: vehicles with adaptive cruise assist and lane guidance
Fig. 101 Turn signal lever: button for lane guidance and
lane departure warning
Within the limits of the system, lane guidance
provides corrective steering to assist the driver
with keeping the vehicle in the center of the lane
as m
Options and settings
Options
Context-dependent functions and settings may
be available depending on vehicle equipment, the
selected source, the connected mobile device,
and the connection type.
Requirement: the playback view must be displayed
1 fig. 141.
Press More 11.
Play more like this
The track currently playin