
Audi Q3: Component Location Overview - Instrument Panel Lamps
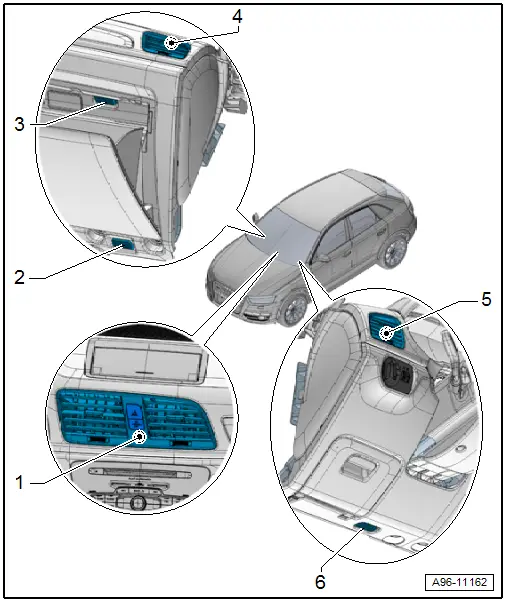
1 - Center Instrument Panel Vent Illumination Bulb -L68-
- integrated in the center instrument panel vent Cannot be replaced separately if faulty.
- Center Instrument Panel Vent, removing and installing. Refer to → Body Interior; Rep. Gr.70; Instrument Panel; Instrument Panel Vent, Removing and Installing.
2 - Right Footwell Lamp -W10-
- Removing and installing. Refer to → Chapter "Left/Right Footwell Lamp -W9- / -W10-, Removing and Installing".
3 - Glove Compartment Lamp -W6-
Through MY 2014
- 12 V, 5 W
- Removing and installing. Refer to → Chapter "Glove Compartment Lamp -W6-, Removing and Installing".
From MY 2015 as LED version. Cannot be replaced separately if faulty.
4 - Right Instrument Panel Vent Illumination Bulb -L69-
- Equipment level
- Cannot be replaced separately if faulty.
- Replacing. Refer to → Body Interior; Rep. Gr.70; Instrument Panel; Instrument Panel Vent, Removing and Installing.
5 - Left Instrument Panel Vent Illumination Bulb -L67-
- Equipment level
- Cannot be replaced separately if faulty.
- Replacing. Refer to → Body Interior; Rep. Gr.70; Instrument Panel; Instrument Panel Vent, Removing and Installing.
6 - Left Footwell Lamp -W9-
- Removing and installing. Refer to → Chapter "Left/Right Footwell Lamp -W9- / -W10-, Removing and Installing".
Component Location Overview - Front Door Lamps
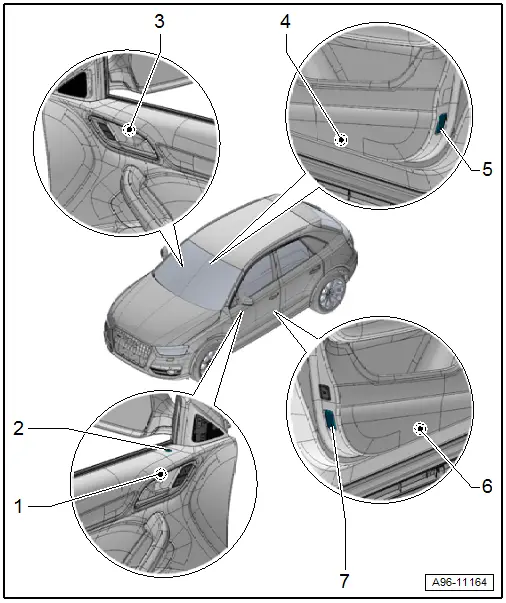
1 - Driver Door Opener Illumination Bulb -L108-
- Removing and installing. Refer to → Chapter "Driver and Front Passenger Door Opener Illumination Bulb -L108-/-L109-, Removing and Installing".
2 - Central Locking -SAFE- Indicator Lamp -K133-
- Removing and installing. Refer to → Chapter "Central Locking -SAFE- Indicator Lamp -K133-, Removing and Installing".
3 - Front Passenger Door Opener Illumination Bulb -L109-
- Removing and installing. Refer to → Chapter "Driver and Front Passenger Door Opener Illumination Bulb -L108-/-L109-, Removing and Installing".
4 - Right Front Entry Lamp -W32-
- 12 V, 3 W
- Removing and installing. Refer to → Chapter "Left/Right Front Entry Lamp -W31-/-W32-, Removing and Installing".
5 - Front Passenger Door Warning Lamp -W36-
- 12 V, 3 W
- Removing and installing. Refer to → Chapter "Driver/Front Passenger Door Warning Lamp -W30-/-W36-, Removing and Installing".
6 - Left Front Entry Lamp -W31-
- 12 V, 3 W
- Removing and installing. Refer to → Chapter "Left/Right Front Entry Lamp -W31-/-W32-, Removing and Installing".
7 - Driver Door Warning Lamp -W30-
- 12 V, 3 W
- Removing and installing. Refer to → Chapter "Driver/Front Passenger Door Warning Lamp -W30-/-W36-, Removing and Installing".
Component Location Overview - Rear Door Lamps
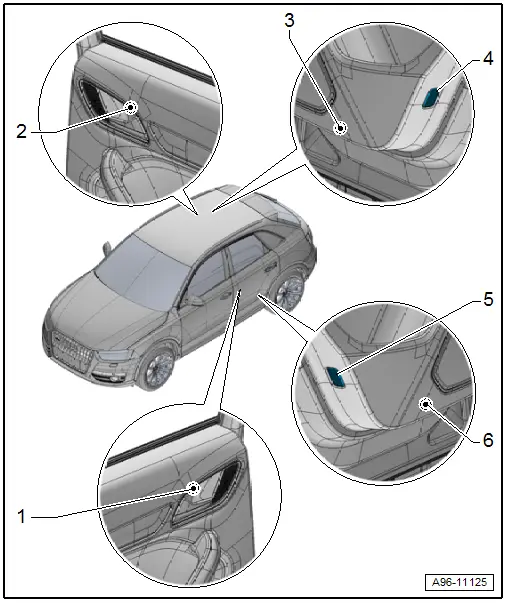
1 - Left Rear Door Opener Illumination Bulb -L110-
- Removing and installing. Refer to → Chapter "Left/Right Rear Door Opener Illumination Bulb -L110- / -L111-, Removing and Installing".
2 - Right Rear Door Opener Illumination Bulb -L111-
- Removing and installing. Refer to → Chapter "Left/Right Rear Door Opener Illumination Bulb -L110- / -L111-, Removing and Installing".
3 - Right Rear Entry Lamp -W34-
- 12 V, 3 W
- Removing and installing. Refer to → Chapter "Left/Right Rear Entry Lamp -W33- / -W34-, Removing and Installing".
4 - Right Rear Door Warning Lamp -W38-
- 12 V, 3 W
- Removing and installing. Refer to → Chapter "Left/Right Rear Door Warning Lamp -W37-/-W38-, Removing and Installing".
5 - Left Rear Door Warning Lamp -W37-
- 12 V, 3 W
- Removing and installing. Refer to → Chapter "Left/Right Rear Door Warning Lamp -W37-/-W38-, Removing and Installing".
6 - Left Rear Entry Lamp -W33-
- 12 V, 3 W
- Removing and installing. Refer to → Chapter "Left/Right Rear Entry Lamp -W33- / -W34-, Removing and Installing".
READ NEXT:
 Component Location Overview - Door Ambient Lighting
1 - Storage Compartment Illumination Bulb -L120- in the Front Center
Console
Equipment level
Removing and installing. Refer to
→ Chapter "Storage Compartment Illumination
Glove Compartment Lamp -W6-, Removing and Installing
Removing
- Turn the light switch to position "0".
- Press in the tab -1- using a
flat-head screwdriver and pry out the glove compartment lamp
-2-.
- Disconnect the connector -3-.
Driver/Front Passenger Door Warning Lamp -W30-/-W36-, Removing and
Installing
Removing
- Press the tab -1- with a
flat-blade screwdriver and remove the door warning lamp
-2-.
- Disconnect the connector -3-.
- Carefully pry out the cover over the lamp in dSEE MORE:
Tachometer
The tachometer 2 displays the engine
speed in revolutions per minute (RPM). The beginning
of the red zone in the tachometer indicates
the maximum permissible engine speed for
all gears once the engine has been broken in. Before
reaching the red zone, you should shift into
the next higher gear, selec
Component Location Overview - Storage Compartment/Covers
1 - Center Console
Overview. Refer to
→ Chapter "Overview - Center Console".
2 - Driver Side Instrument Panel Cover
Overview. Refer to
→ Chapter "Overview - Driver Side Instrument Panel Cover".
3 - Trim Panel
For the steering column