Audi Q3: Overview - Seat Pan
Overview - Seat Pan, Modular Wiring Routing
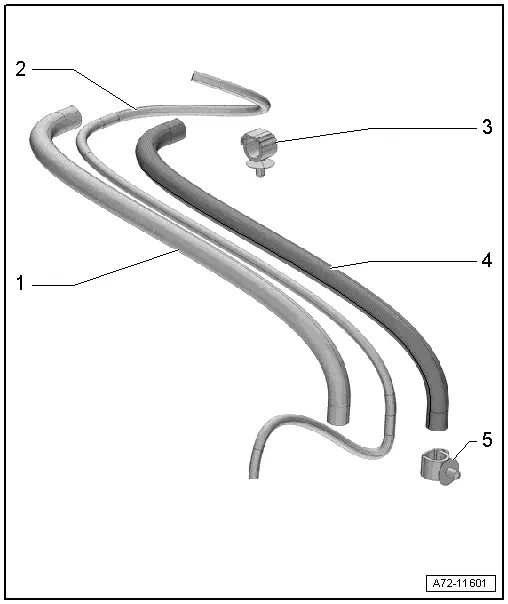
1 - Corrugated Tube Upper Section
- Must terminate flush with the wiring bracket
- Must terminate flush with the corrugated tube lower section
2 - Wiring Harness
- Do not twist installed wires
3 - Rear Wiring Bracket
- Attach back at the same location when installing
- Clipped into the seat pan.
4 - Corrugated Tube Lower Section
- Must terminate flush with the wiring bracket
- Must terminate flush with the corrugated tube upper section
5 - Front Wiring Bracket
- Attach back at the same location when installing
- Clip in on the sill panel
Overview - Seat Pan, Sill Panel/Tunnel Side Seat Side Trim on Manual Front Seat
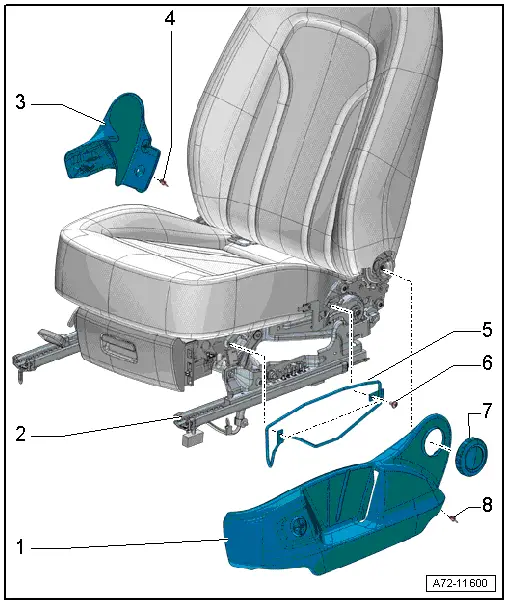
1 - Seat Side Sill Panel Trim
- Removing and installing. Refer to → Chapter "Seat Side Trim on Sill Panel Side, Removing and Installing, Manual Front Seat".
2 - Front Seat
3 - Seat Side Trim on the Tunnel Side
- Removing and installing. Refer to → Chapter "Seat Side Trim on the Tunnel Side, Removing and Installing".
4 - Expanding Rivet
5 - Bracket
- For seat side sill panel trim
- Removing and installing. Refer to → Chapter "Seat Side Trim on Sill Panel Side, Removing and Installing, Manual Front Seat".
6 - Bolt
- 8 Nm
- Quantity: 2
7 - Hand Wheel
- For backrest adjustment
- Removing and installing. Refer to → Chapter "Backrest Adjustment Hand Wheel, Removing and Installing".
- Press on until it engages audibly
8 - Expanding Rivet
Overview - Seat Pan, Sill Panel/Tunnel Side Seat Side Trim on Folding Passenger Seat
Sill Panel/Tunnel Side Seat Side Trim
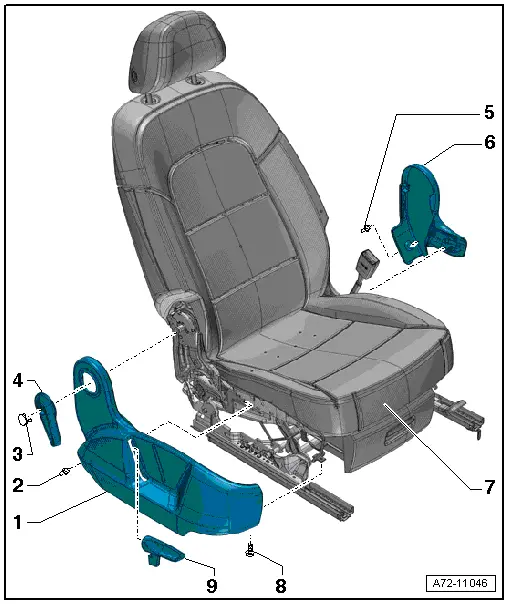
1 - Seat Side Sill Panel Trim
- can be replaced with seat installed
- Removing and installing. Refer to → Chapter "Seat Side Trim on Sill Panel Side, Removing and Installing, Passenger Folding Seat".
- Push in until fully engaged in the bracket.
2 - Expanding Clip
3 - Cap
- Press until it engages completely
4 - Release Lever
- For the backrest
- Removing and installing. Refer to → Chapter "Backrest Release, Removing and Installing".
- Press until it engages completely
5 - Expanding Clip
6 - Seat Side Trim on the Tunnel Side
- Can be replaced only with the seat removed
- Removing and installing. Refer to → Chapter "Seat Side Trim on the Tunnel Side, Removing and Installing".
7 - Front Folding Seat
- Passenger seat only
8 - Bolt
- 8 Nm
9 - Seat Height Adjustment Handle
- Removing and installing. Refer to → Chapter "Seat Height Adjuster, Removing and Installing".
- Push the handle all the way on
Sill Panel Seat Side Trim Bracket
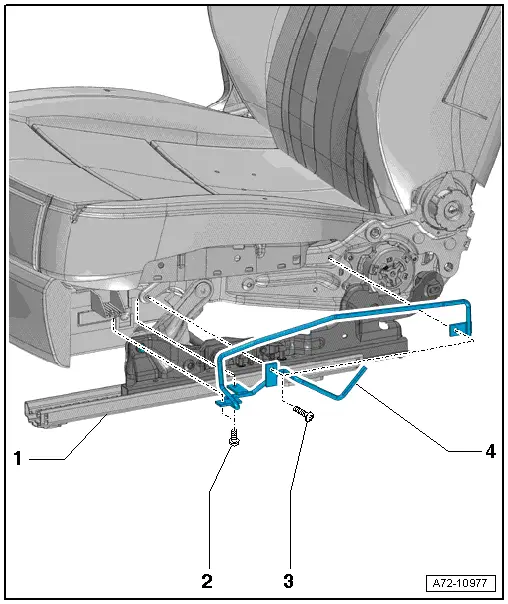
1 - Front Seat
2 - Bolt
- 8 Nm
- Quantity: 2
3 - Bolt
- 8 Nm
- Quantity: 2
4 - Bracket
- For seat side sill panel trim
- Removing and installing. Refer to → Chapter "Seat Side Trim on Sill Panel Side, Removing and Installing, Passenger Folding Seat".
READ NEXT:
 Overview - Seat Pan, Sill Panel/Tunnel Side Seat Side Trim on Power Front
Seat
Overview - Seat Pan, Sill Panel/Tunnel Side Seat Side Trim on Power Front
Seat
1 - Bolt
Quantity: 3
8 Nm
2 - Front Seat
3 - Seat Side Trim on the Tunnel Side
Removing and installing. Refer to
→ Chapter "Seat Side Trim o
Overview - Seat Pan, Drawer
1 - Retaining Tab
2 - Drawer
3 - Bolt
1.5 Nm
4 - Bolt
1.5 Nm
5 - Mount
For the drawer
Removing and installing. Refer to
→&
Front Seat, Removing and Installing
Front Seat, Removing and Installing, Manual/Power
Special tools and workshop equipment
required
Universal Vehicle Protector -VAS871 001-
Airbag Lockout Adapter -VAS6282-
Removing
SEE MORE:
Charging the battery using the USB input
Applies to: vehicles with Audi phone box/Audi phone box light
You can charge your mobile device using a special
USB adapter with the Audi phone box.
Requirement: the ignition must be switched on.
To charge your mobile device via USB, connect it
to the USB input 1 fig. 123.
Tips
You can purch
Drive Axle, Removing and Installing, Left Drive Axle with CV Joint, Inserted
with Inner Splines
Special tools and workshop equipment
required
Puller - Driveshaft -T10382-
Torque Wrench 1332 40-200Nm -VAG1332-
Slide Hammer Set -VW771-
Removing
- Loosen the drive axle threaded connection on the wheel side.
Refer to
→ Chapter "Drive Axle Threaded Connection, Loosenin