Audi Q3: Overview - Seat Pan, Drawer
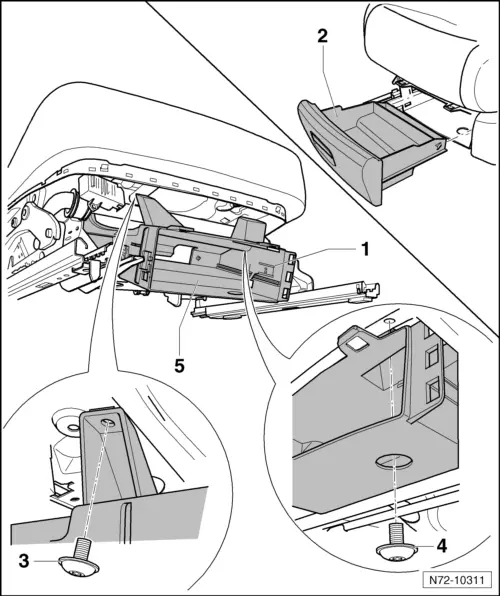
1 - Retaining Tab
2 - Drawer
3 - Bolt
- 1.5 Nm
4 - Bolt
- 1.5 Nm
5 - Mount
- For the drawer
- Removing and installing. Refer to → Chapter "Drawer Mount, Removing and Installing".
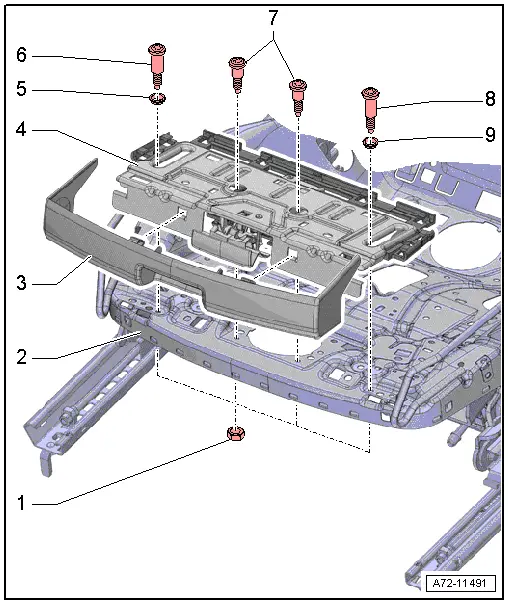
Overview - Seat Pan, Storage Compartment

1 - Front Seat
2 - Seat Side Sill Panel Trim
3 - Spring Nut
- Quantity: 2
- Inserted in the seat pan
- Replace any damaged or deformed threaded clips
4 - Storage Compartment
- Equipment levels
- Removing and installing. Refer to → Chapter "Storage Compartment, Removing and Installing".
- cannot be disassembled, only available as a complete replacement part
- Allocation. Refer to the Parts Catalog.
5 - Bolt
- 1.5 Nm
- Quantity: 2
6 - Upper Seat Frame
Overview - Seat Pan, Seat Depth Adjuster
1 - Nut
- Quantity: 4
- Replace
2 - Sport Seat
- With a seat depth adjuster
3 - Trim
- For seat depth adjustment
- Removing and installing. Refer to → Chapter "Seat Depth Adjuster, Removing and Installing".
- Press on until it engages audibly
4 - Seat Depth Adjuster
- Removing and installing. Refer to → Chapter "Seat Depth Adjuster, Removing and Installing".
5 - Bushing
6 - Bolt
- 4 Nm
- Replace
- Use locking fluid when installing the bolt. Refer to the Parts Catalog for the locking fluid.
7 - Bolts
- 4 Nm
- Replace
- Use locking fluid when installing the bolt. Refer to the Parts Catalog for the locking fluid.
8 - Bolt
- 4 Nm
- Replace
- Use locking fluid when installing the bolt. Refer to the Parts Catalog for the locking fluid.
9 - Bushing
Overview - Seat Pan, Power Front Seat
1 - Bushing
- Inserted in all bearing locations
- Cannot be replaced
- The assembly component must be replaced if the bushing is damaged
2 - Upper Seat Frame
- Removing and installing. Refer to → Chapter "Upper Seat Frame, Removing and Installing, Power Front Seat".
- Allocation. Refer to the Parts Catalog.
- Install all electrical and electronic components and wires in the new upper frame.
3 - Bolt
- 22 Nm
- Quantity: 4
- Self-locking
- Replace
- Threaded holes for bolts must be cleaned, for example, with a thread tap
4 - Seat Pan Lower Frame
- Driver side: with Driver Seat Forward/Back Adjustment Motor -V28-
- Front passenger side: with Front Passenger Seat Forward/Back Adjustment Motor -V31-
- Cannot be disassembled
- Removing and installing. Refer to → Chapter "Seat Pan, Removing and Installing, Power Front Seat".
- To replace the seat belt latch install in the new lower frame
READ NEXT:
 Front Seat, Removing and Installing
Front Seat, Removing and Installing, Manual/Power
Special tools and workshop equipment
required
Universal Vehicle Protector -VAS871 001-
Airbag Lockout Adapter -VAS6282-
Removing
Airbag Adapter, Connecting and Disconnecting
Connectors, Disconnecting and Connecting at Connector Station
Connector assignment. Refer to
→ Wiring diagrams, Troubleshooting & Component locations.
Note
The connector stati
Seat Height Adjuster, Removing and Installing
Seat Height Adjuster, Removing and Installing
Removing
Caution
Move the front seat to the highest possible
position. This reduces the spring force when removing
and installing the seaSEE MORE:
Overview - Sunroof
1 - Panorama Roof Frame
Removing. Refer to
→ Chapter "Sunroof Frame, Removing and Installing".
2 - Seal
Open the panel "1" completely and remove
the seal.
When installing, first position is on the front side, then push it
to the rear under the panel "2
Wheel and Tire Guide
Audi Q3, Type 8U
This is the Wheel and Tire Guide for the Following Model:
"Audi Q3 / RS Q3".
Play Close Attention to the corresponding Notes and Cautions As Well As the
Comments in the Document.
Note
Inner diameter 57 mm, hole circle 112 mm, 5 wheel bolts,
tightening specification
© 2019-2026 Copyright www.auq3.net | 0.0098
