Audi Q3: Seat Position Sensor
Overview - Seat Position Sensor
 Note
Note
The illustration shows the passenger seat position sensor with the wiring harness.
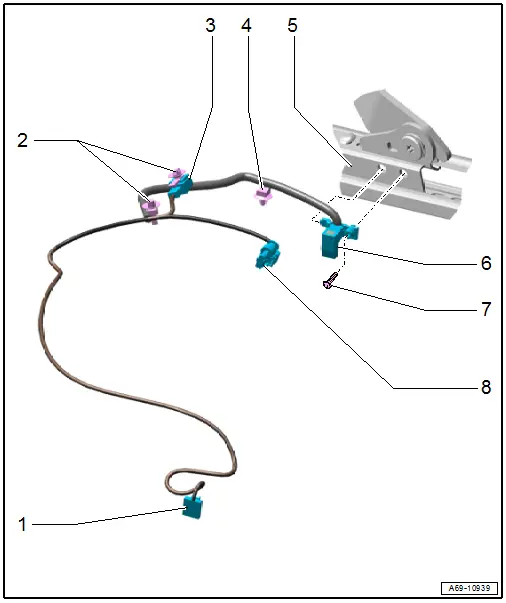
1 - Connector
- Connector station in the vehicle floor under on the sill panel under the seat.
2 - Cable Holder/Cable Tie
- Clipped in the seat frame.
3 - Connector
- for the belt latch
4 - Cable Holder/Cable Tie
- Clipped in the seat frame.
5 - Seat rail
- Tunnel side
6 - Front Passenger Seat Position Sensor -G554-
- Driver seat: Driver Seat Position Sensor -G553-
- Removing and installing. Refer to → Chapter "Seat Position Sensor, Removing and Installing".
7 - Bolt
- 1.2 Nm
8 - Connector
- Only for passenger seat: for Passenger Occupant Detection System Control Module -J706-
Seat Position Sensor, Removing and Installing
The seat position sensor is available as a replacement part with the wiring harness and connector. The following wires with connectors are contained in the wiring harness:
- Driver seat: wire with seat belt latch connector coupling.
- Passenger seat: wire with seat belt latch connector coupling and Passenger Occupant Detection System Control Module -J706-.
Removing
 WARNING
- Follow all safety precautions when working with pyrotechnic components. Refer to → Chapter "Pyrotechnic Components Safety Precautions".
- Before handling airbag units (for example, disconnecting the connector), the person handling it must "discharge static electricity". This can be done by touching the door striker, for example.
- Remove the front seat. Refer to → Chapter "Front Seat, Removing and Installing".
- Fasten the front seat on the Engine/Transmission Holder - Seat Repair Fixture -VAS6136-. Refer to → Chapter "Front Seat, Mounting on Fixture for Seat Repair".
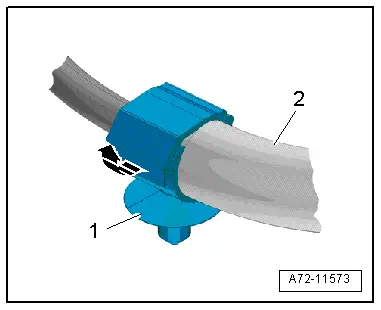
- Open the rear wiring holder -1- for modular wire routing on the seat pan lower frame using a screwdriver -arrow- and remove the corrugated tube -2-.
- Remove the seat position sensor wire -G553-/-G554- from the protective cover -2- and free it up.
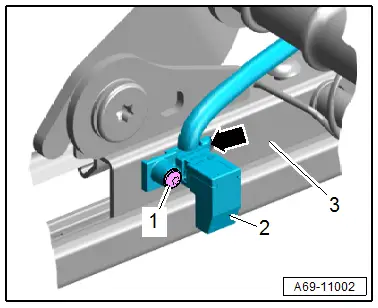
- Remove the bolt -1-.
- Unclip and disengage the seat position sensor -2- for the lower seat pan -3--arrow-.
- Remove the cable ties or cable clips for the wire on the seat pan lower frame.
Driver seat:
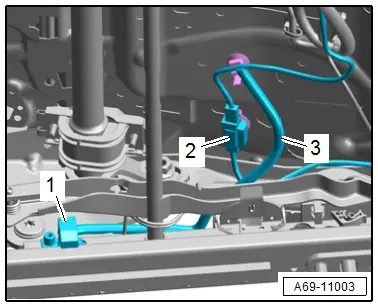
- Disconnect the connector -2- to the seat belt latch.
- Remove the seat position sensor -1- with the wire -3-.
Front Passenger Seat:
- Remove the passenger occupant detection system. Refer to → Chapter "Passenger Occupant Detection System, Removing and Installing".
Installing
 WARNING
- Follow all safety precautions when working with pyrotechnic components. Refer to → Chapter "Pyrotechnic Components Safety Precautions".
- Before handling pyrotechnic components (for example, connecting the connector), the person handling it must "discharge static electricity". This can be done by touching the door striker, for example.
- Observe all measures when installing the front seat. Refer to → Chapter "Front Seat, Removing and Installing".
Install in reverse order of removal.
Installation notes, for example tightening specifications, replacing components. Refer to → Chapter "Overview - Seat Position Sensor".
READ NEXT:
 Belt Fastening Detection
Front Passenger Occupant Detection Sensor -G128-, Removing and Installing
Note
The passenger occupant detection sensor is only installed in
the front passenger seat.
Special tools and wo
Passenger Occupant Detection System
Component Location Overview - Passenger Occupant Detection System
WARNING
The replacement part (service kit) for the passenger
occupant detection system is already precalibrated and must
Deformation Element
Overview - Deformation Element
1 - Nut
25 Nm
Quantity: 3
2 - Lower Deformation Element
Component location: under the instrument panel on the driver side
RemoSEE MORE:
Vehicles with Break-Down Kit
Tire Sealant
WARNING
If tire sealant was used, then the wheel electronics
on that particular wheel must be replaced.
Audi vehicles have either a spare wheel or a wheel repair
kit, depending on equipment.
The wheel repair kit is located in the luggage compartment,
where the spar
Battery Charger -VAS5095A-
WARNING
Risk of injury. Follow all warning messages and
safety precautions. Refer to
→ Chapter "Warnings and Safety Precautions".
In order to prevent damage to the Battery -A- or
vehicle, observe the battery type information. Refer to
→ Chapter "Battery Types".
&