Audi Q3: Overview - Rear Bumper Cover
Overview - Bumper Cover, Audi Q3
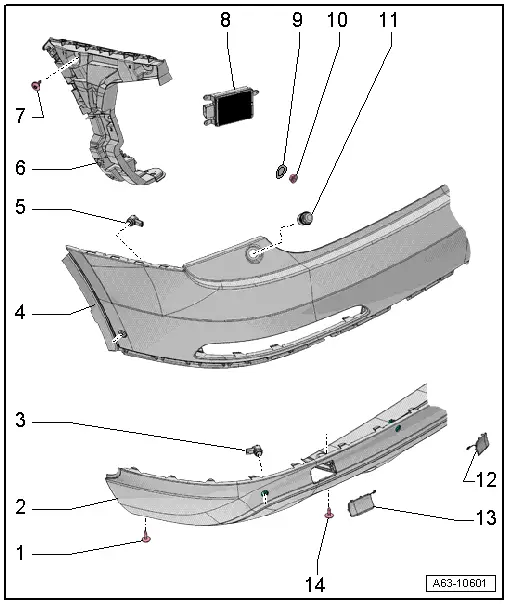
1 - Bolt
- 1.7 Nm
- Quantity: 2
2 - Bumper Cover Lower Section
- There are different versions. Refer to the Parts Catalog.
- Removing and installing. Refer to → Chapter "Bumper Cover Lower Section, Removing and Installing".
3 - Rear Parking Aid Sensor
- Removing and installing. Refer to → Electrical Equipment; Rep. Gr.94; Overview - Parking Aid.
4 - Rear Bumper Cover
- Removing and installing. Refer to → Chapter "Bumper Cover, Removing and Installing".
5 - Rear Parking Aid Sensor
- Removing and installing. Refer to → Electrical Equipment; Rep. Gr.94; Overview - Parallel Parking Assist.
6 - Side Mount
- For the bumper cover
- Removing and installing. Refer to → Chapter "Bumper Cover Side Mount, Removing and Installing".
7 - Bolt
- Quantity: 3
- Tightening sequence → Fig. "Bumper Cover Side Mount - Tightening Specification and Sequence"
8 - Lane Change Assistance Control Module
- Removing and installing. Refer to → Electrical Equipment; Rep. Gr.94; Overview - Parallel Parking Assist.
9 - Grommet
- Quantity: 2
10 - Nut
- Quantity: 4
- 4 Nm
11 - Bolt
- Quantity: 2
- 1.5 Nm
12 - Cover
- For the towing eye
13 - Cover
14 - Bolt
- 6 Nm
- Quantity: 2
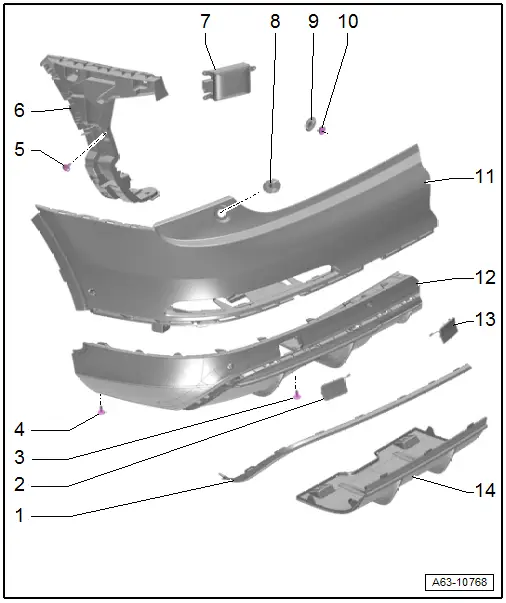
Overview - Bumper Cover, Audi Q3 Offroad

1 - Bolt
- 6 Nm
- Quantity: 2
2 - Cover
3 - Bolt
- 1.7 Nm
- Quantity: 2
4 - Bolt
- Quantity: 3
- Tightening sequence. Refer to → Fig. "Bumper Cover Side Mount - Tightening Specification and Sequence"
5 - Side Mount
- For the bumper cover
- Removing and installing. Refer to → Chapter "Bumper Cover Side Mount, Removing and Installing".
6 - Lane Change Assistance Control Module
- Removing and installing. Refer to → Electrical Equipment; Rep. Gr.94; Overview - Parallel Parking Assist.
7 - Bolt
- 1.5 Nm
- Quantity: 2
8 - Grommet
- Quantity: 2
9 - Nut
- 4 Nm
- Quantity: 4
10 - Rear Bumper Cover
- Removing and installing. Refer to → Chapter "Bumper Cover, Removing and Installing".
11 - Bumper Cover Lower Section
- There are different versions. Refer to the Parts Catalog.
- Removing and installing. Refer to → Chapter "Bumper Cover Lower Section, Removing and Installing".
12 - Cover
- For the towing eye
13 - Impact Guard
- Removing and installing. Refer to → Chapter "Impact Guard, Removing and Installing, Audi Q3 Offroad".
14 - Bolt
- 6 Nm
- Quantity: 2
15 - Cover
- For vehicles with a trailer hitch
Overview - Bumper Cover, Audi RS Q3
1 - Trim Strip
- For the bumper cover lower section
- Removing and installing. Refer to → Chapter "Bumper Cover Lower Section Trim Strip, Removing and Installing, Audi RS Q3".
2 - Cover
3 - Bolt
- 6 Nm
- Quantity: 2
4 - Bolt
- Quantity: 2
- 1.7 Nm
5 - Bolt
- Quantity: 3
- Tightening sequence, refer to → Fig. "Bumper Cover Side Mount - Tightening Specification and Sequence"
6 - Side Mount
- For the bumper cover
- Removing and installing. Refer to → Chapter "Bumper Cover Side Mount, Removing and Installing".
7 - Lane Change Assistance Control Module
- Removing and installing. Refer to → Electrical Equipment; Rep. Gr.94; Overview - Parallel Parking Assist.
8 - Bolt
- 1.5 Nm
- Quantity: 2
9 - Grommet
- Quantity: 2
10 - Nut
- 4 Nm
- Quantity: 4
11 - Rear Bumper Cover
- Removing and installing. Refer to → Chapter "Bumper Cover, Removing and Installing".
12 - Bumper Cover Lower Section
- There are different versions. Refer to the Parts Catalog.
- Removing and installing. Refer to → Chapter "Bumper Cover Lower Section, Removing and Installing".
13 - Cover
- For the towing eye
14 - Cover
- For vehicles with a trailer hitch
Overview - Impact Member
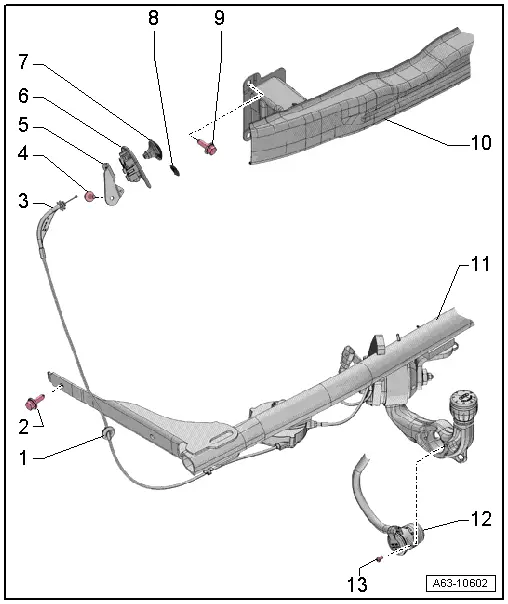
1 - Grommet
- For the cable
2 - Bolt
- 75 Nm
- Quantity: 2
3 - Cable
- For unlocking the trailer hitch
- Refer to → Chapter "Cable and Trailer Hitch Microswitch, Replacing"
4 - Bolt
- 2 Nm
5 - Bracket
- For cable mount
- Overview. Refer to → Chapter "Overview - Trailer Hitch".
6 - Mount
- For the cable
- Overview. Refer to → Chapter "Overview - Trailer Hitch".
7 - Pull Knob
- For unlocking the trailer hitch
- Overview. Refer to → Chapter "Overview - Trailer Hitch".
8 - Lock Clamp
- For the pull knob
9 - Bolt
- 30 Nm
- Left: 2 washers, right: 4 washers
10 - Impact Member
- For vehicles without a trailer hitch
- Removing and installing. Refer to → Chapter "Impact Member, Removing and Installing, Vehicles without Trailer Hitch".
11 - Impact Member
- For vehicles with a trailer hitch
- Removing and installing. Refer to → Chapter "Impact Member, Removing and Installing, Vehicles with Trailer Hitch".
12 - Socket
- Removing and installing. Refer to → Electrical Equipment General Information; Rep. Gr.96; Trailer Hitch.
- Connector assignment. Refer to → Electrical Equipment General Information; Rep. Gr.96; Trailer Hitch.
13 - Bolt
- Quantity: 3
- Tightening specification. Refer to → Chapter "Overview - Trailer Hitch".
READ NEXT:
 Rear Bumper Cover, Removing and Installing
Caution
If the vehicle has lane change assistance, the lane
change assistance control module -J769-/-J770- must be
recalibrated. Refer to
→ Electrical Equipment; Rep. Gr.9
Attachments, Removing and Installing
Bumper Cover Side Mount, Removing and Installing
Removing
- Remove the rear bumper cover. Refer to
→ Chapter "Bumper Cover, Removing and Installing".
- Remove the bolts -arrows-.
SEE MORE:
Front seats
General information
Make sure that:
You can press the pedals down completely
while your legs are slightly bent.
The distance between your upper body and the
steering wheel or instrument panel is at least
10 inches (25 cm).
The distance between your knees and the instrument
panel is at least
Interior lighting
Front interior lighting
Fig. 40 Headliner: interior lighting
Interior lighting buttons
- Interior lighting on/off
- Door contact switch on/off.
The interior lighting
is controlled automatically.
Touch-sensitive reading lights
To turn a reading light on or off, touch the surface
1 briefly.
To
